

Posted on 28/07/2016 at 16:53
Elvira : Rebuilding the 36hp, episode 5 : Fuel Pump


episode 5 : Fuel Pump
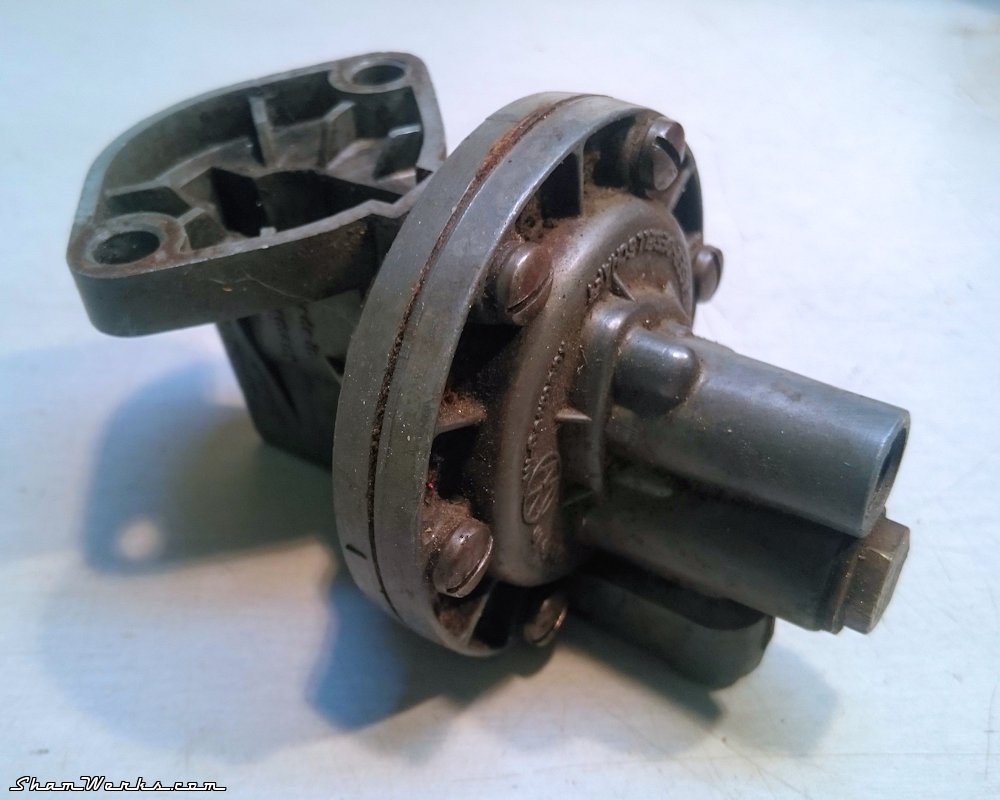
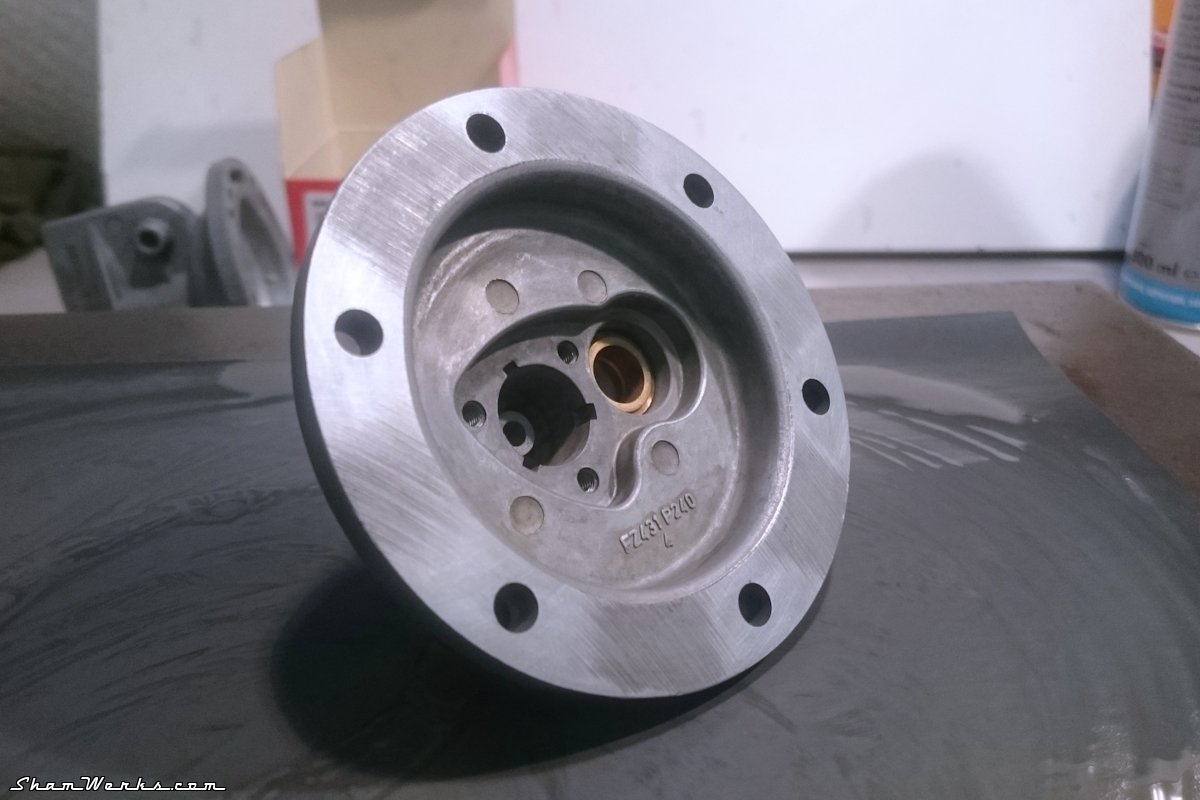
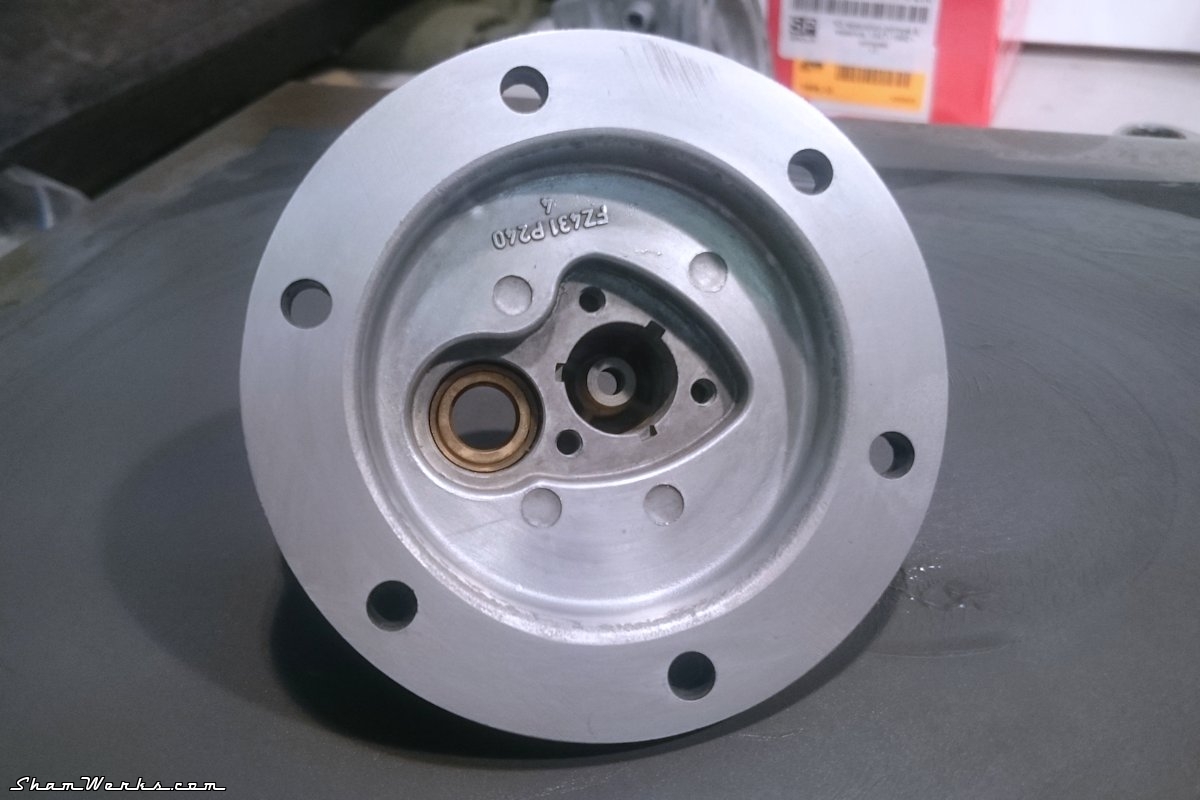
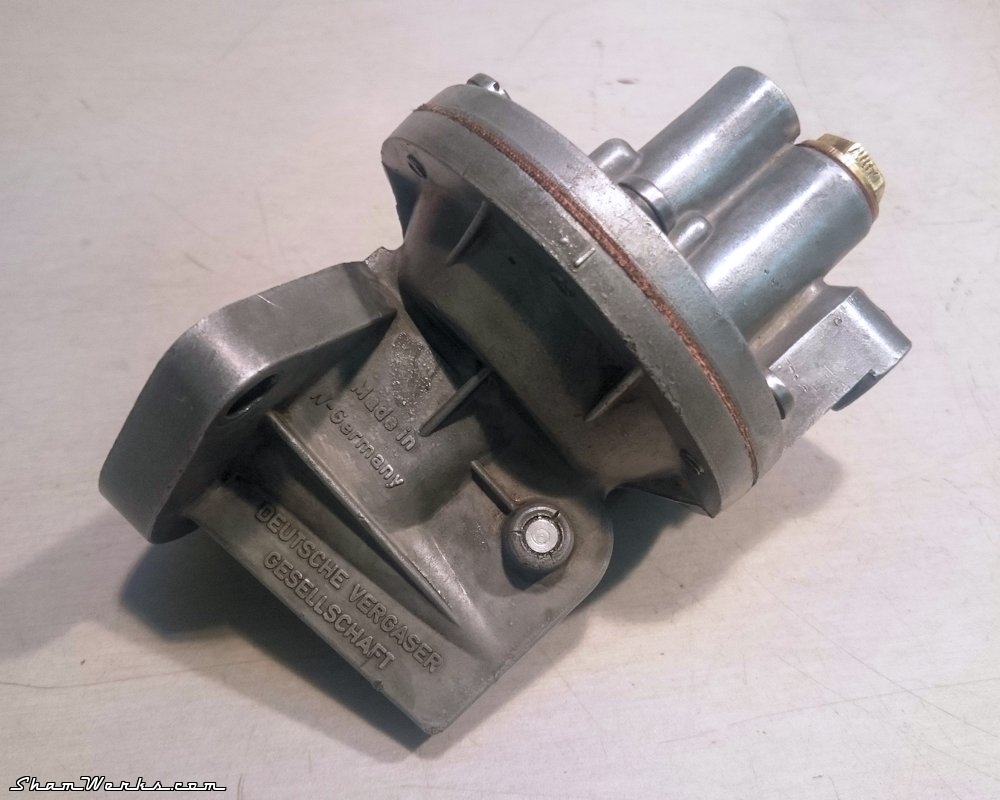
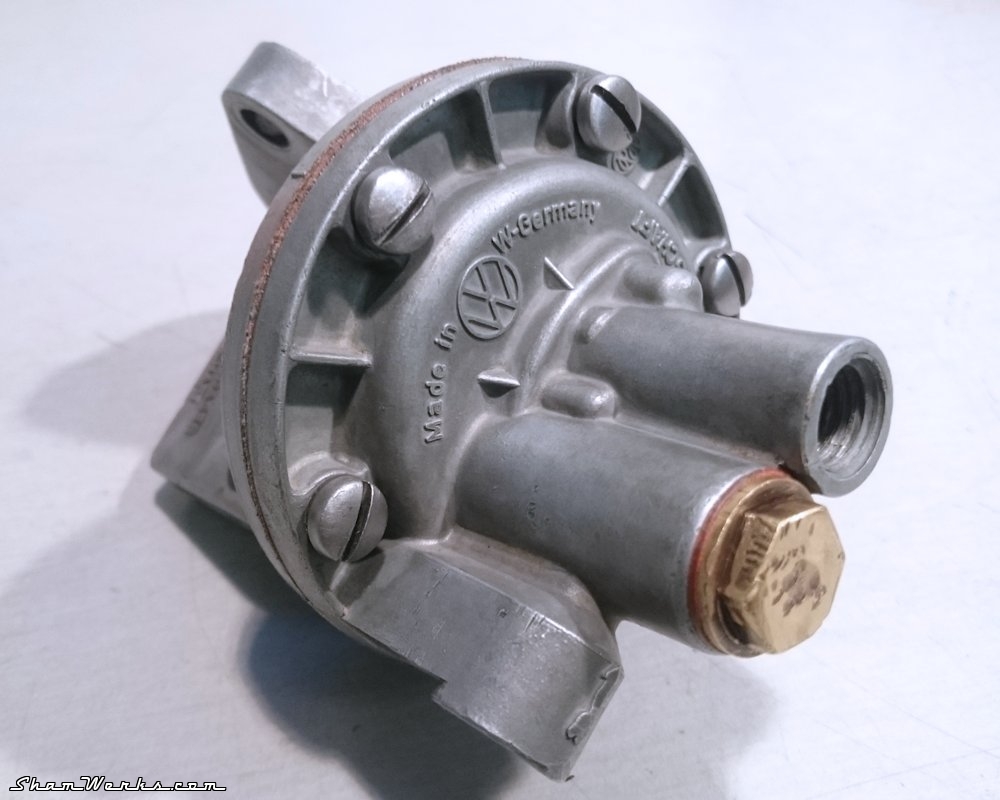
I've owned this car for 22 years now, and it has always run this very pump. It was long overdue for some TLC!

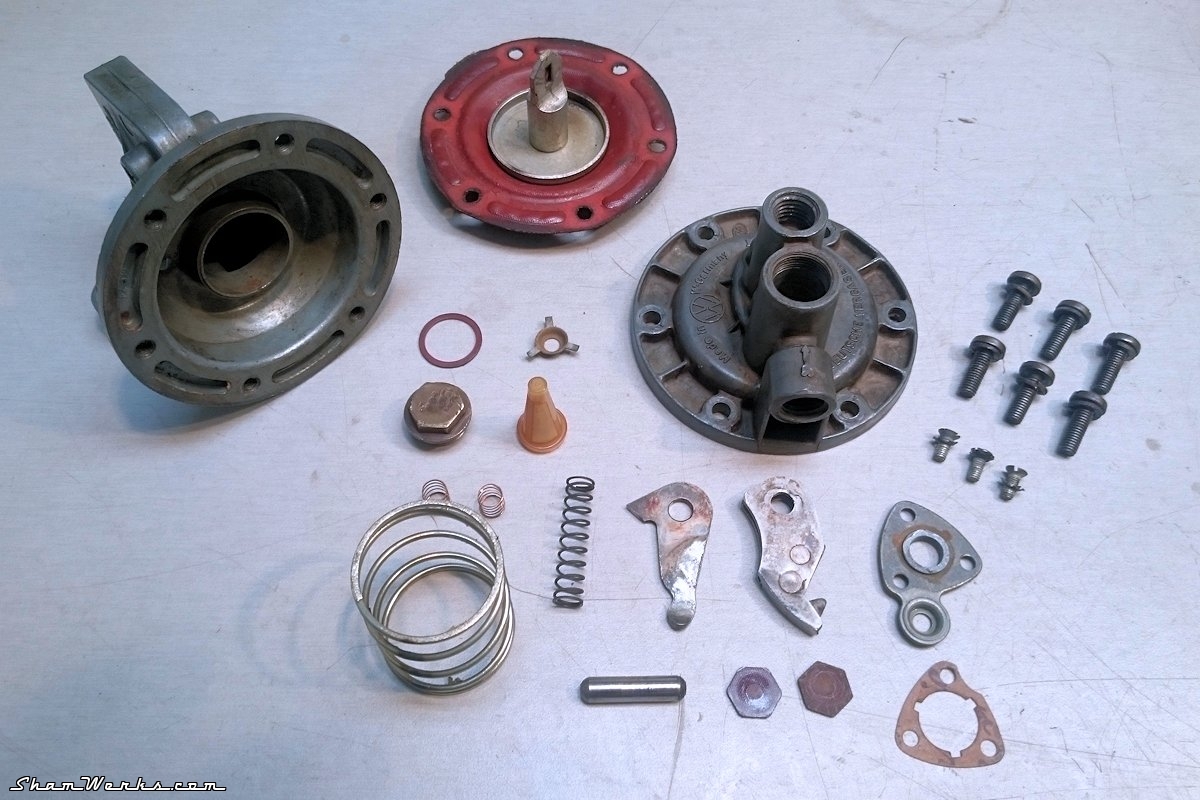
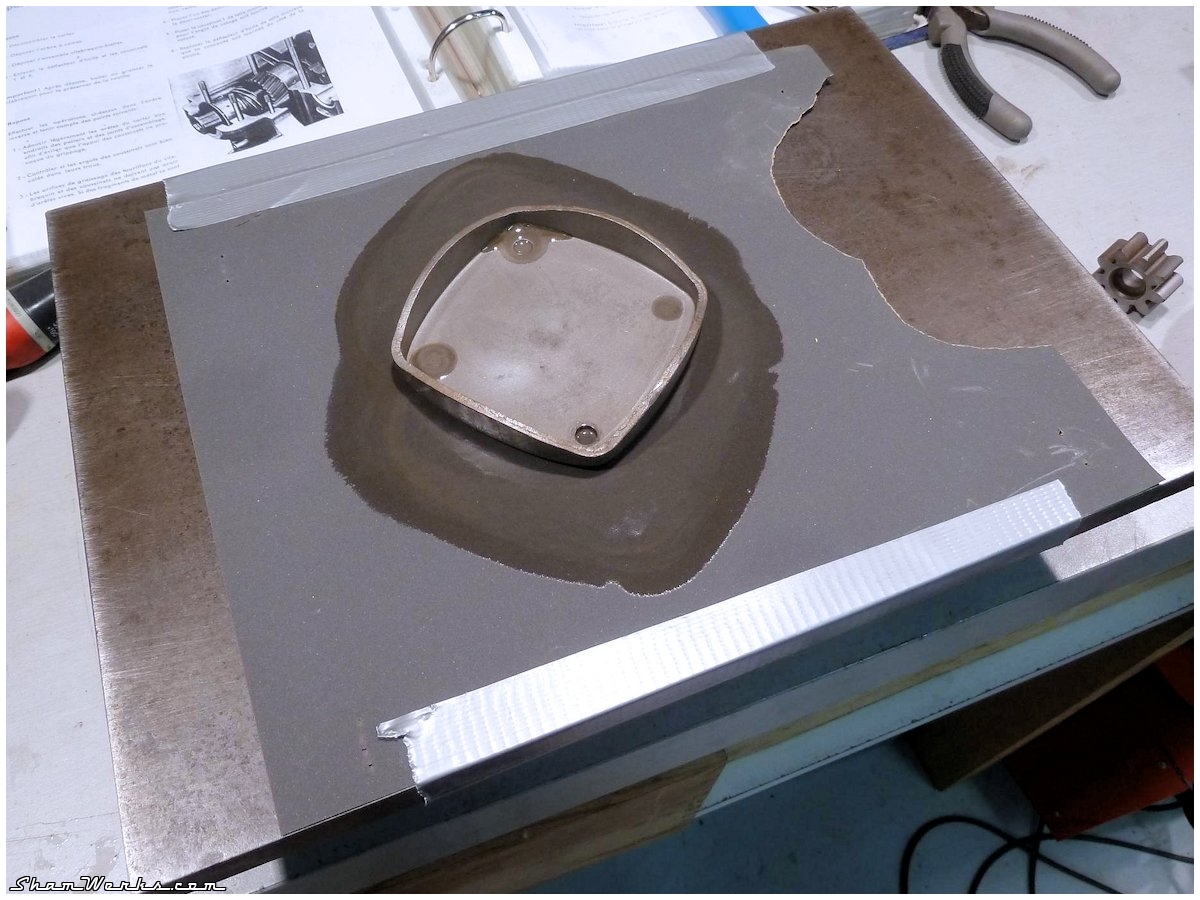
Next, just as for the carburetor earlier, I dump all the parts into the ultrasonic cleaning bath, filled up with lemon juice. It looks like new when it comes out after just 20 minutes at 80°C. I rince everything thoroughly with clean water to neutralize the acid action.

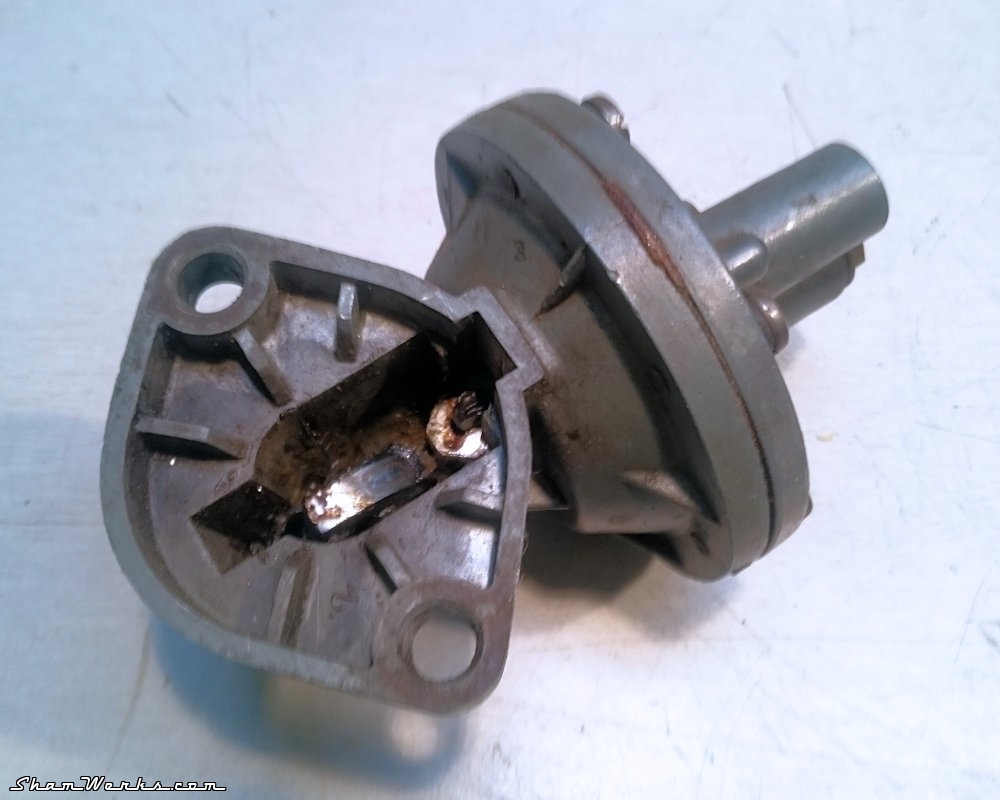
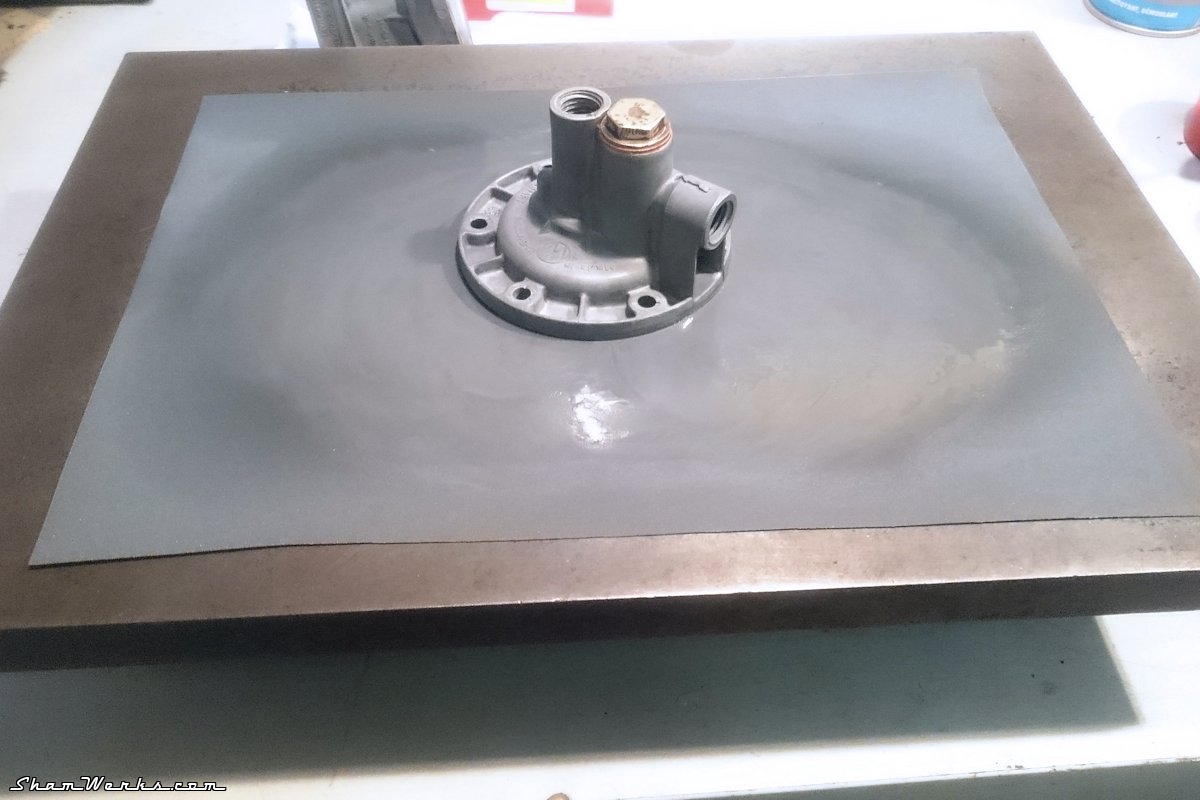
Ten minutes later, it looks much better! At least it should limit the risk of leaks right there...


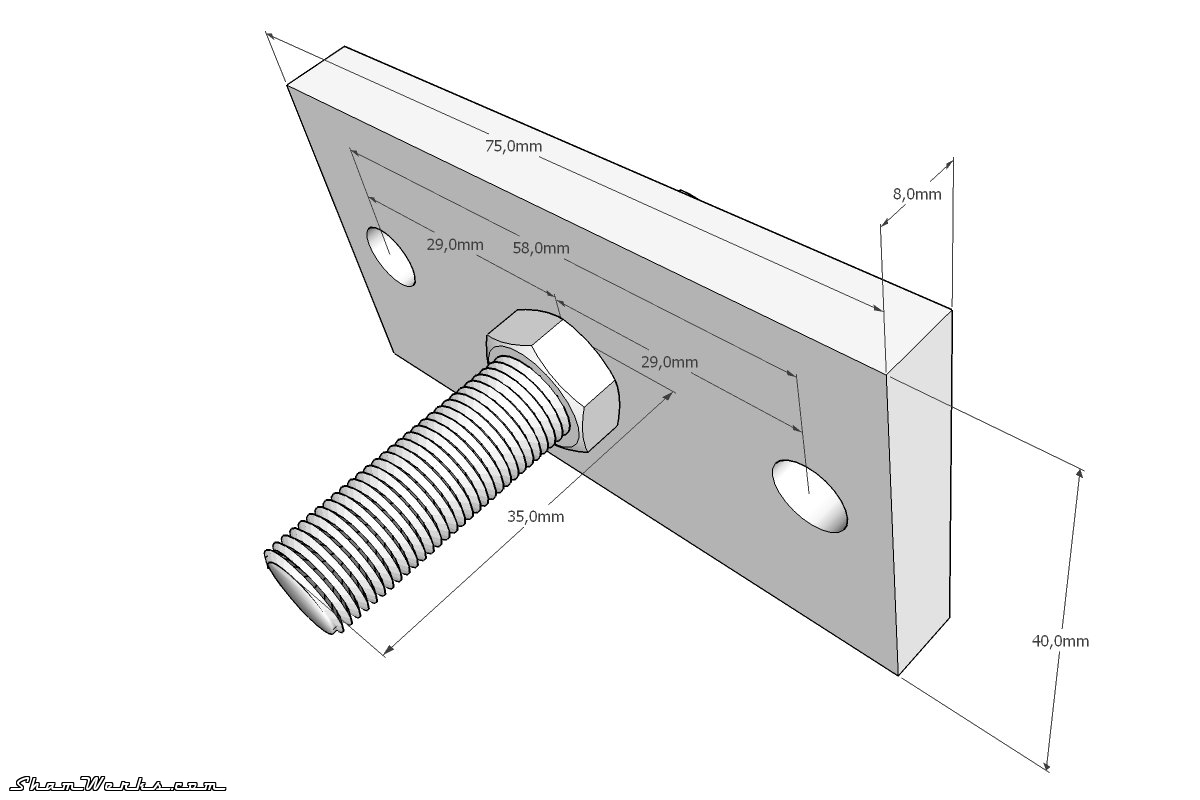
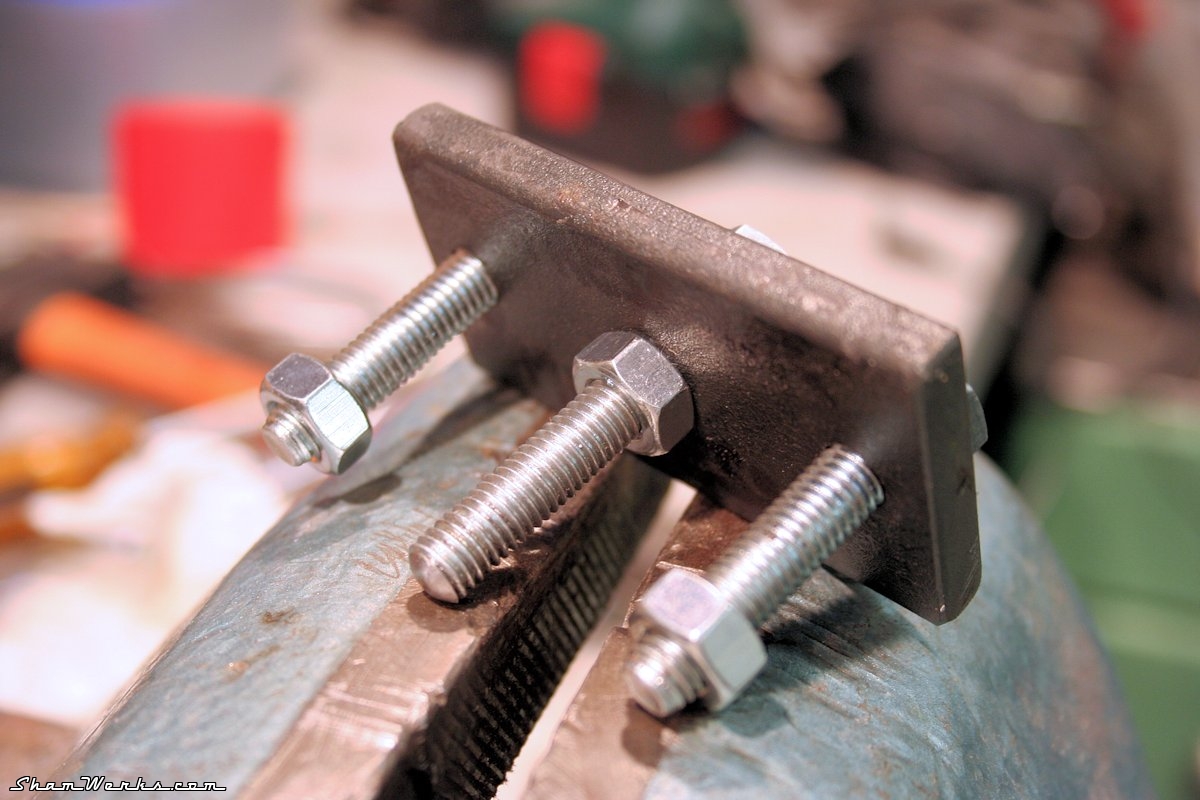
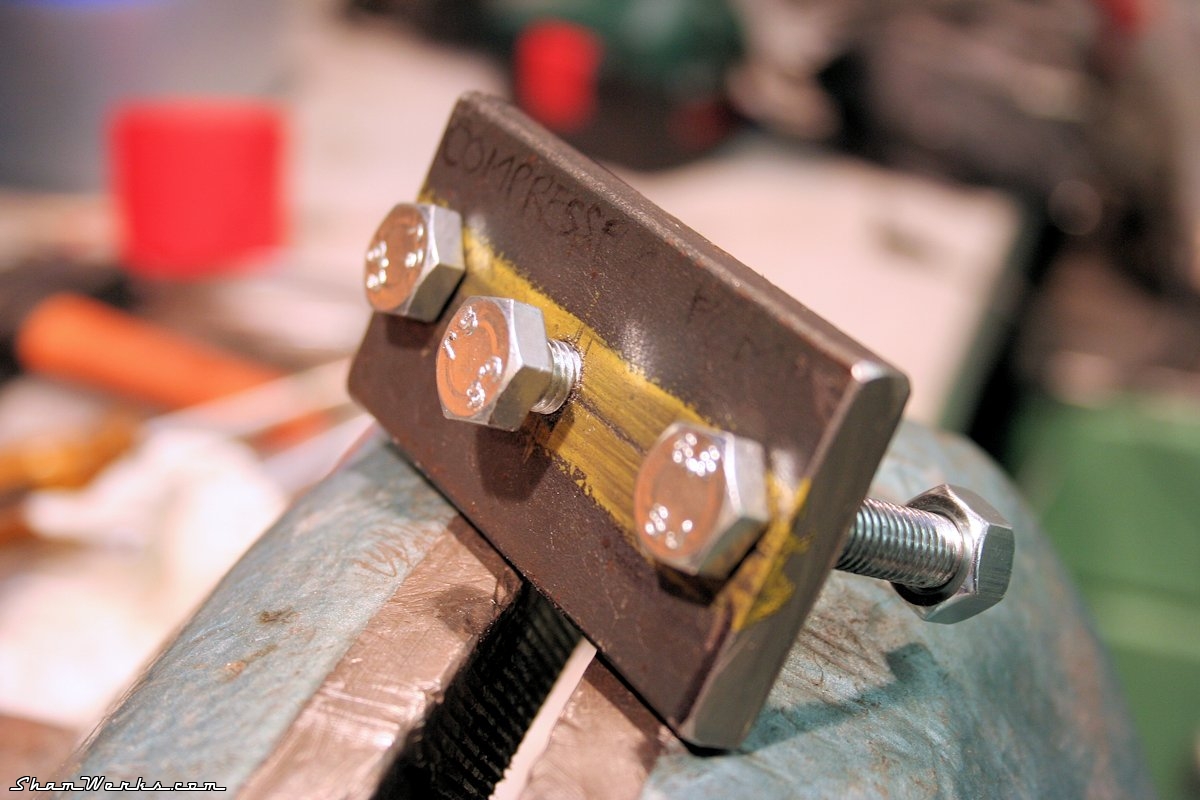
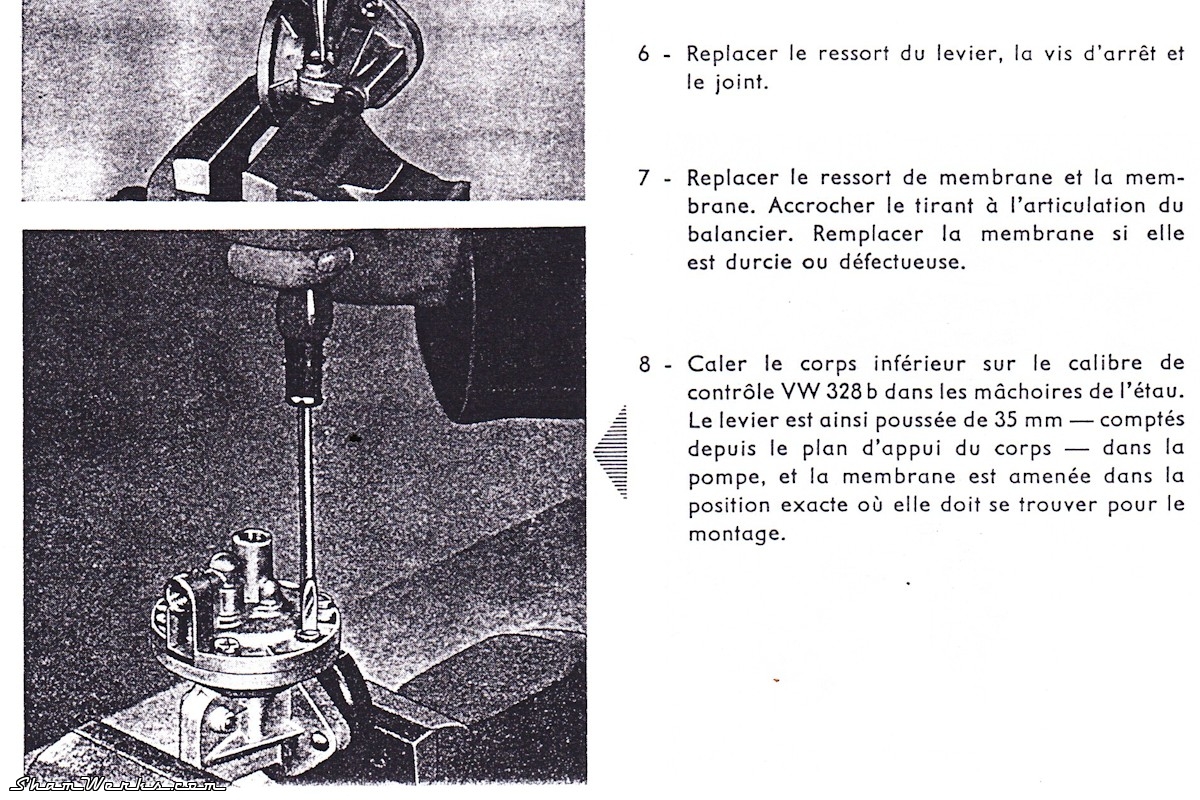
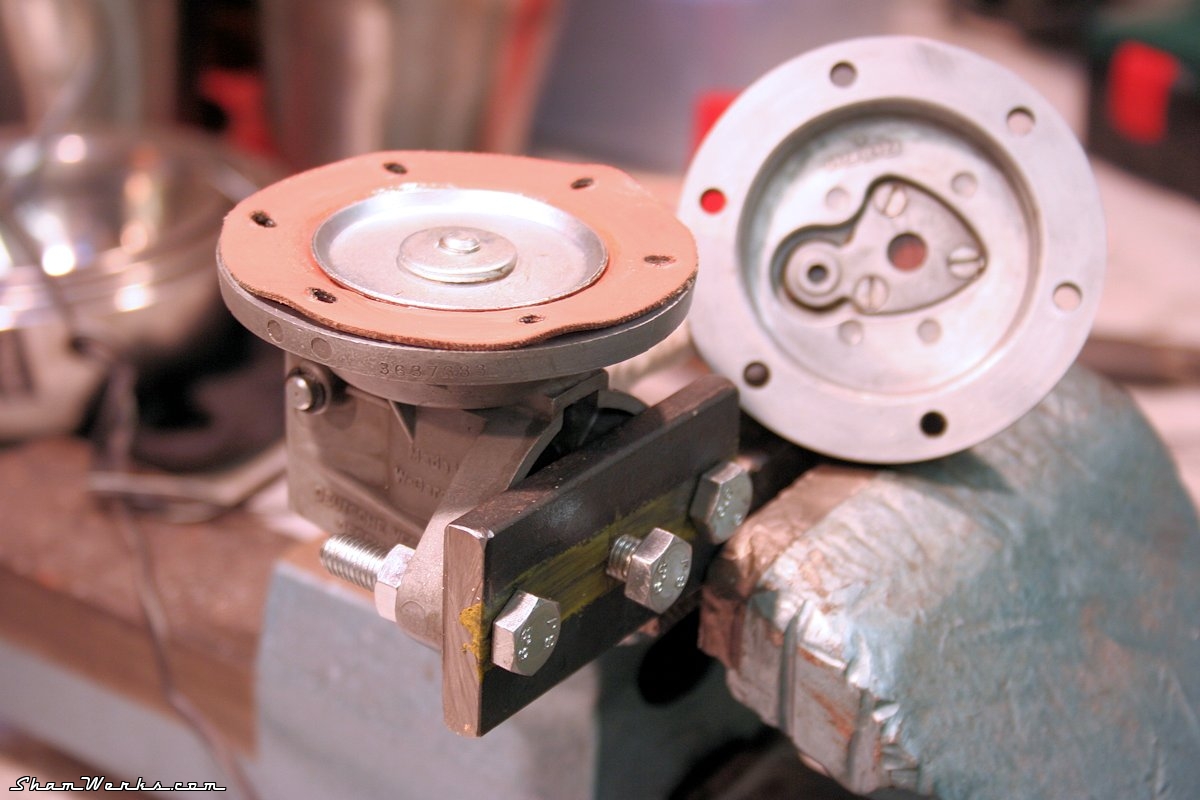
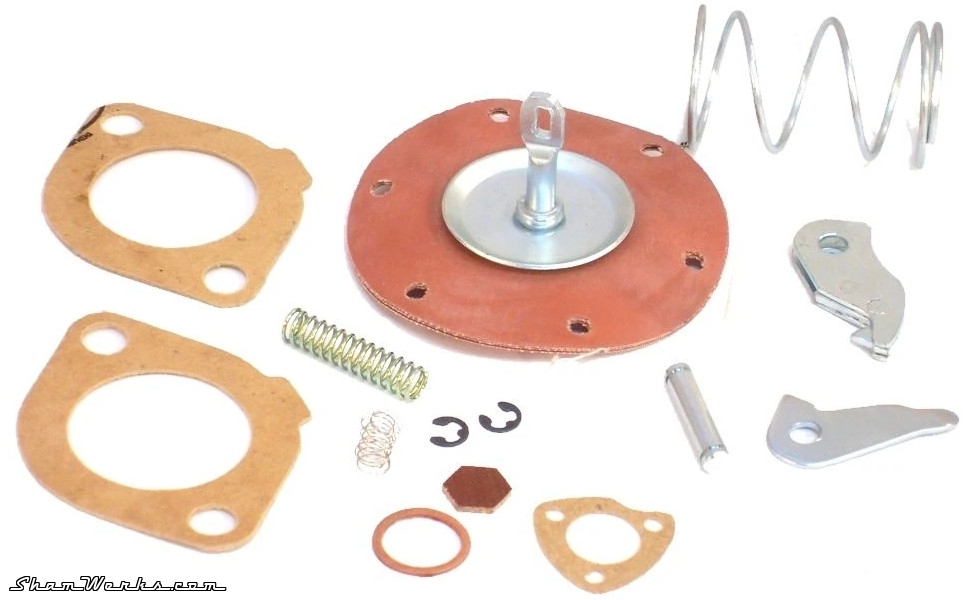
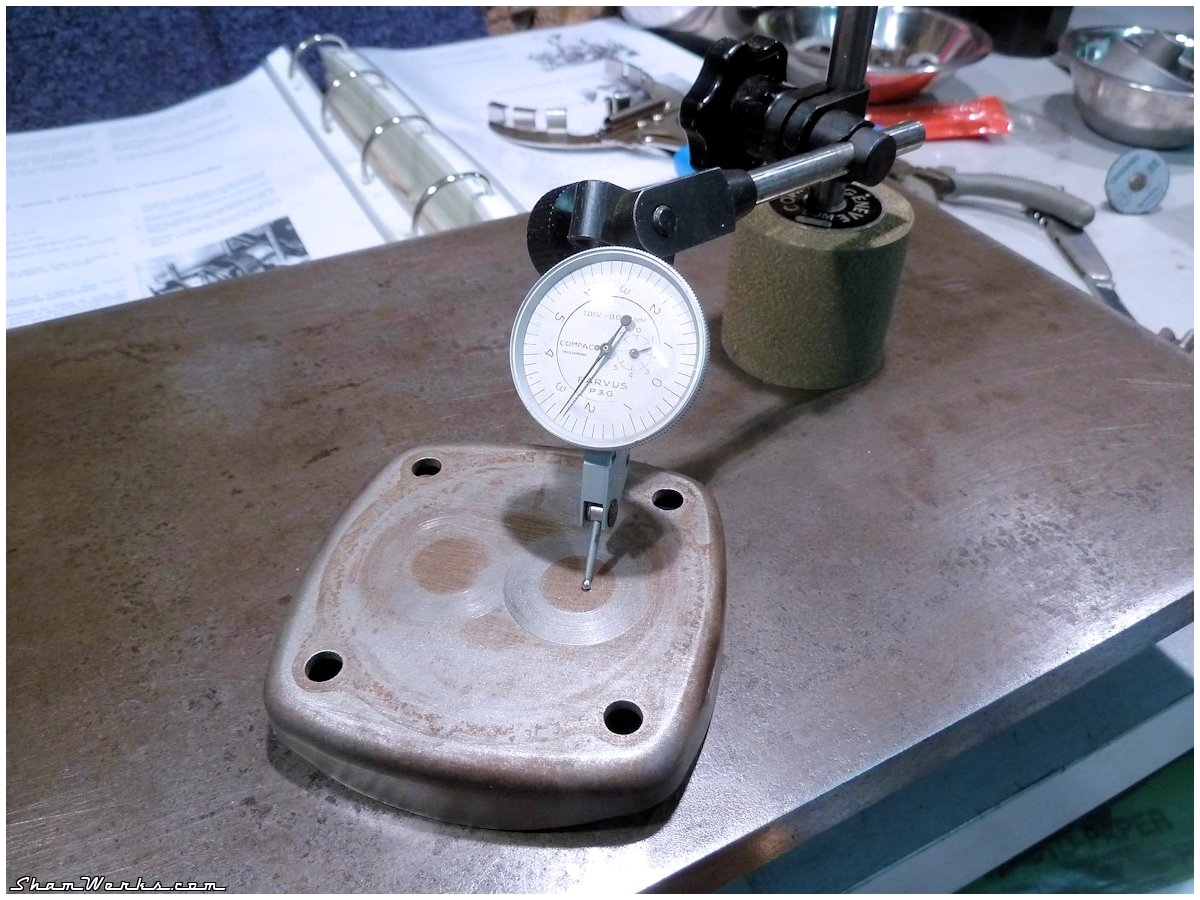
The 1958 workshop manual states that the pump's lever should be depressed by 35mm from the pump mounting plane ; so, a piece of laminated steel, three holes -one of which is tapped-, and there you go.
I finally just have to mount the membrane with a thin coat of grease, so that it slides smoothly in place, avoiding any "wrinkle" that may cause a leak...
NEXT!
Edit 2021/10/17
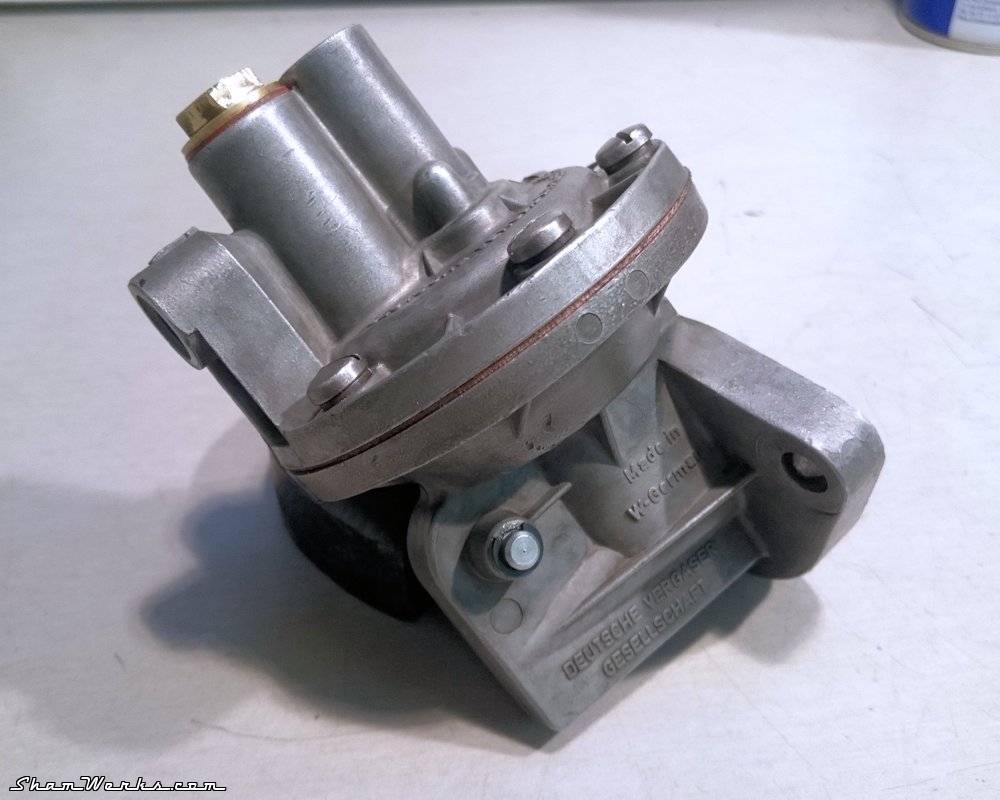
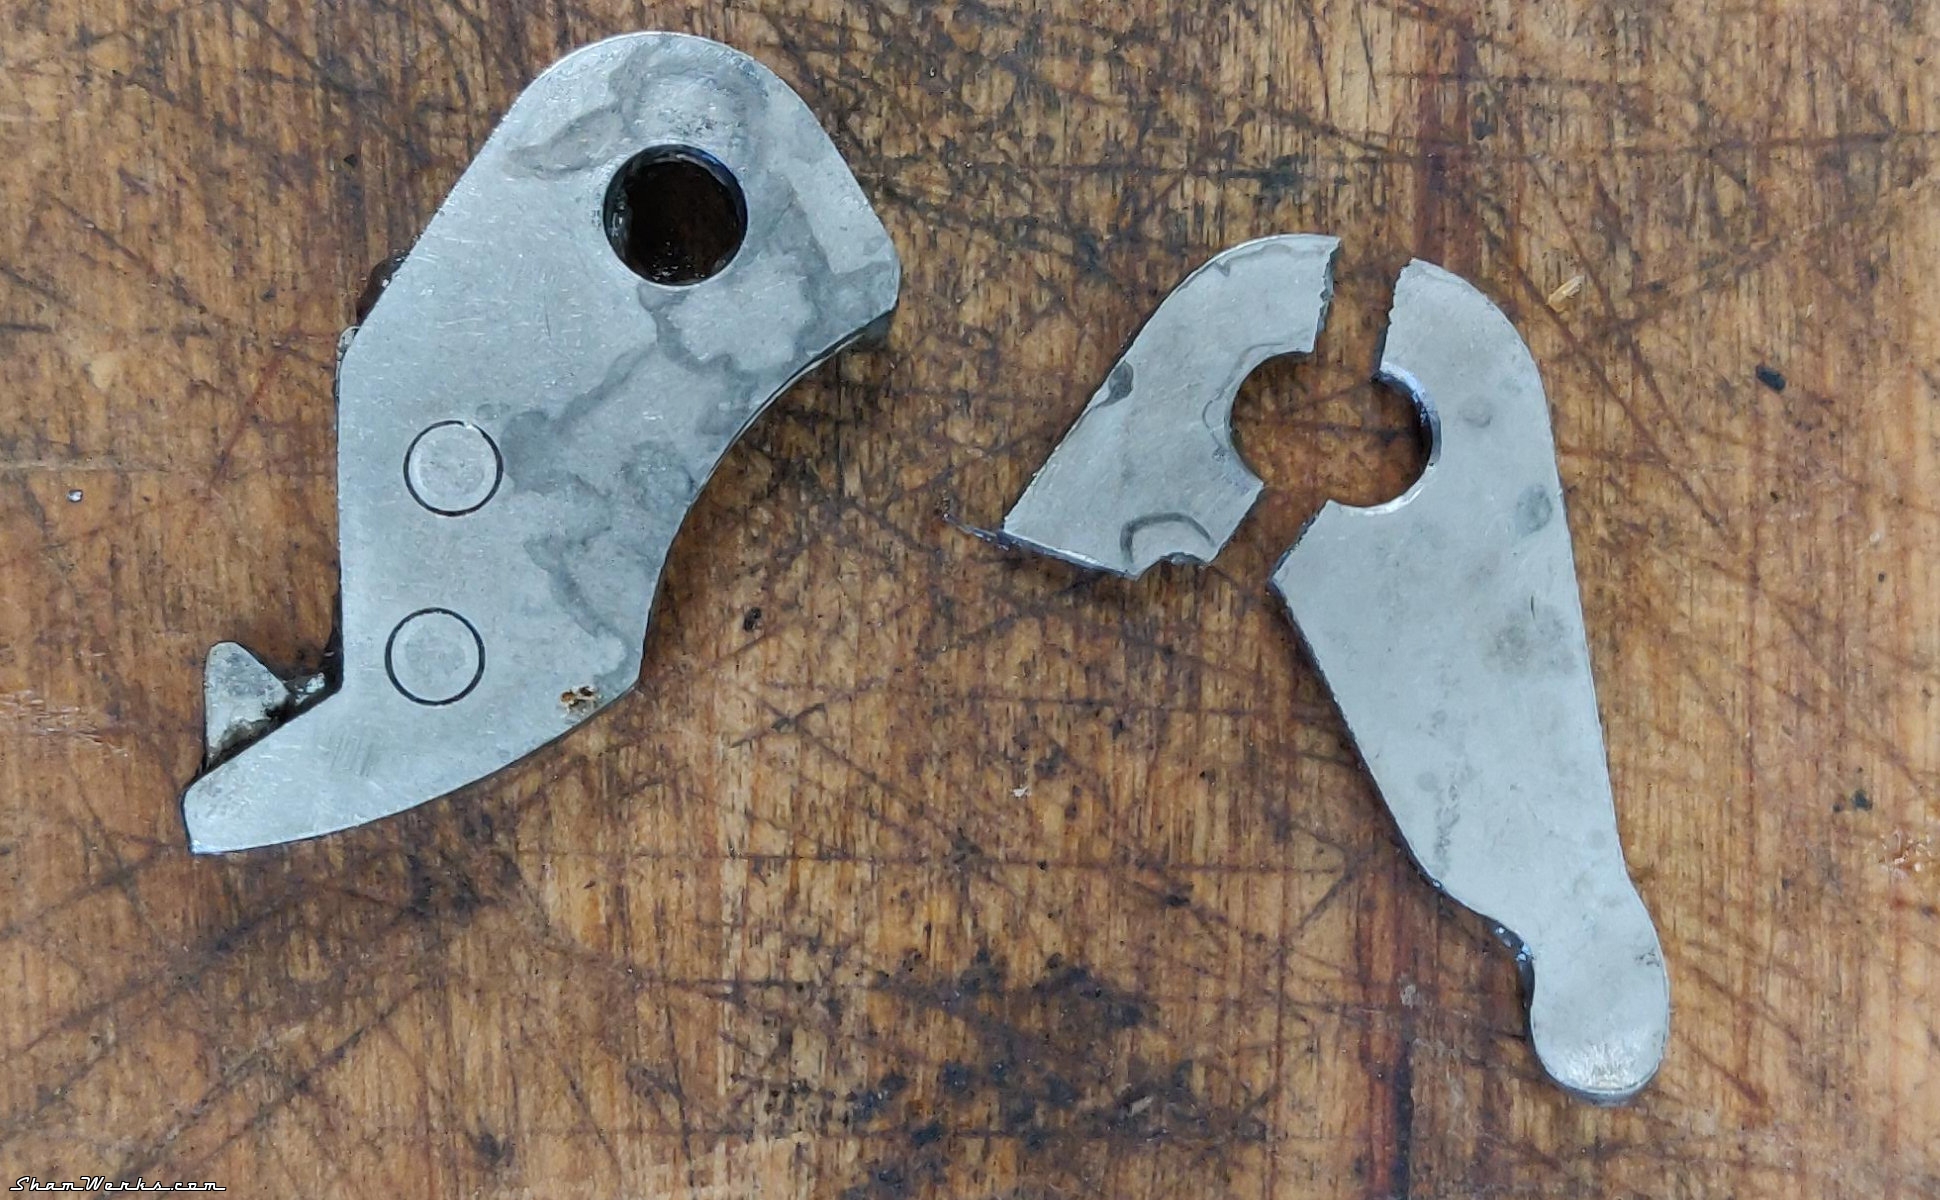
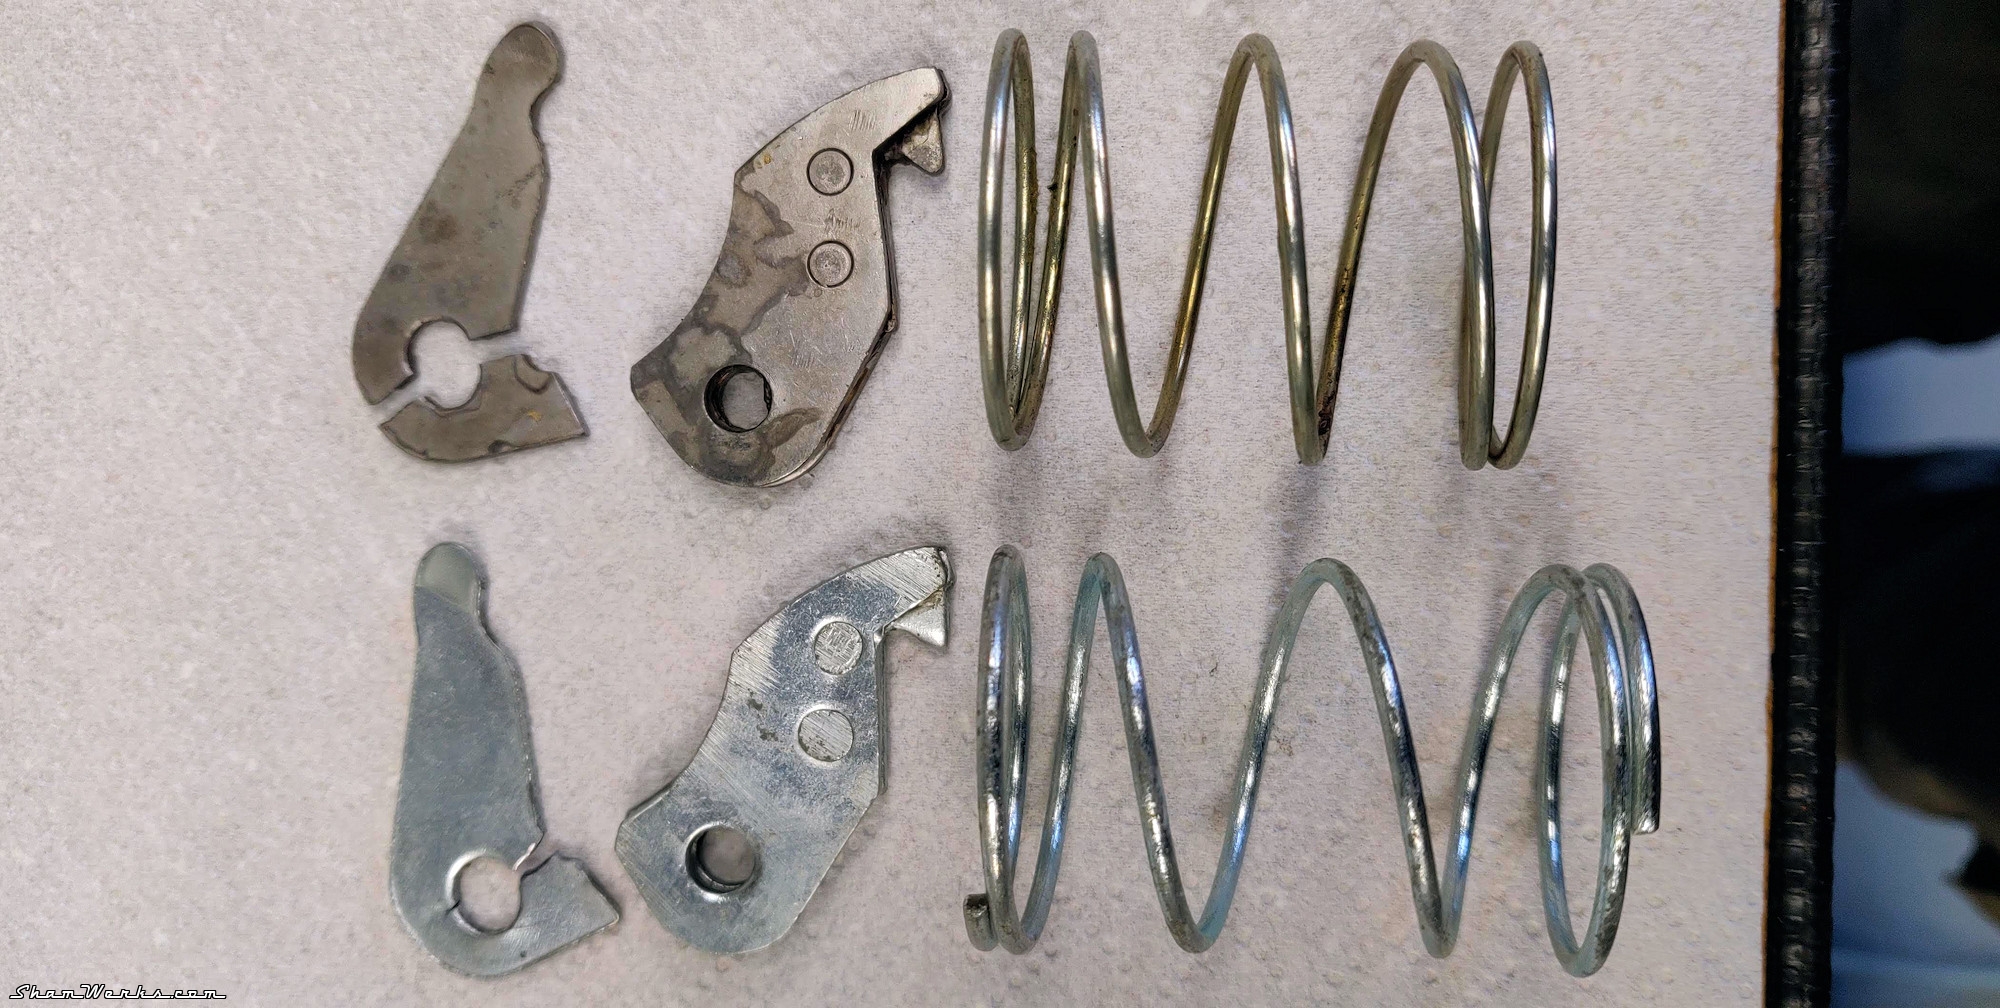
Well, finally, I should have used the lever parts from the kit... As the engine didn't start any more, I found out no fuel was coming to the carb, and I found the lever/arm thingy broken. The stronger spring may be responsible for the lever's untimely death.I put back everything together with the BBT lever, and it works perfectly (even though I still think these stamped parts don't really fill me with confidence). I also re-use my original axle, as the kit's one does look nice with its 2 circlips, but is too short for my pump's body.
Edit 2021/10/22
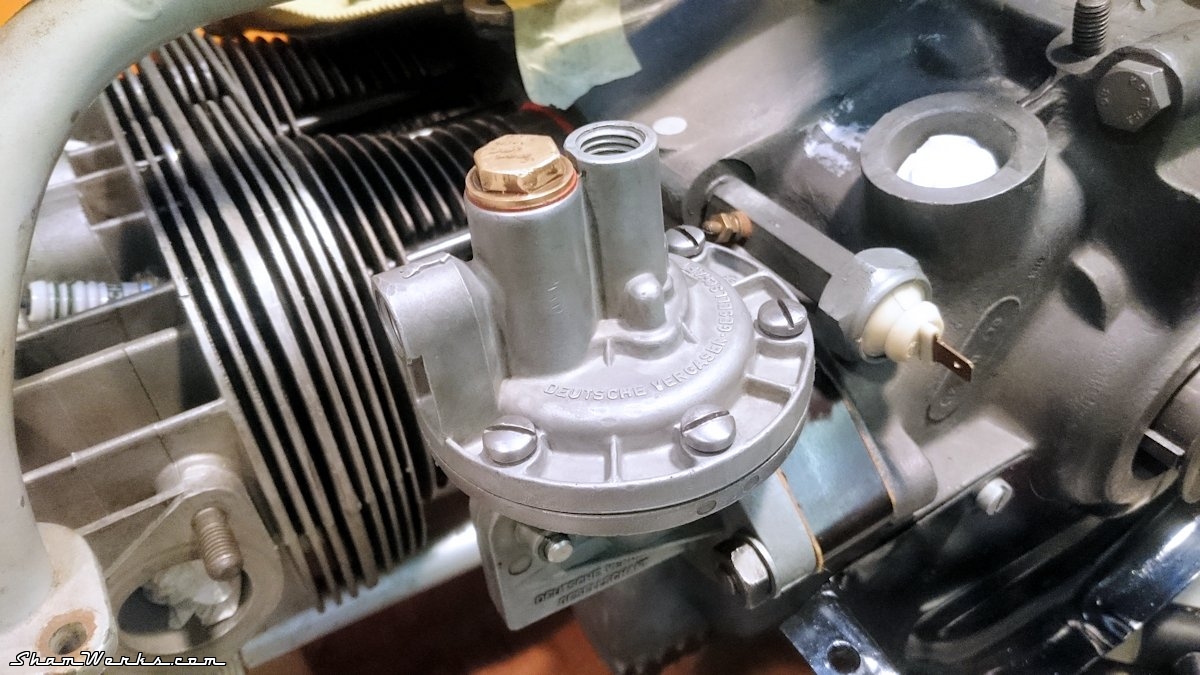
Do you remember when I was saying "The main spring is much longer and strong than my original one"?Well, I should have stuck with my initial gut felling and kept the original spring. The kit's one clearly puts way too much force on the lever... Which broke on me for the second time.
Except this time, I was on the road, for the first outing of Elvira in 14 years... And I rode back home on a tow truck.

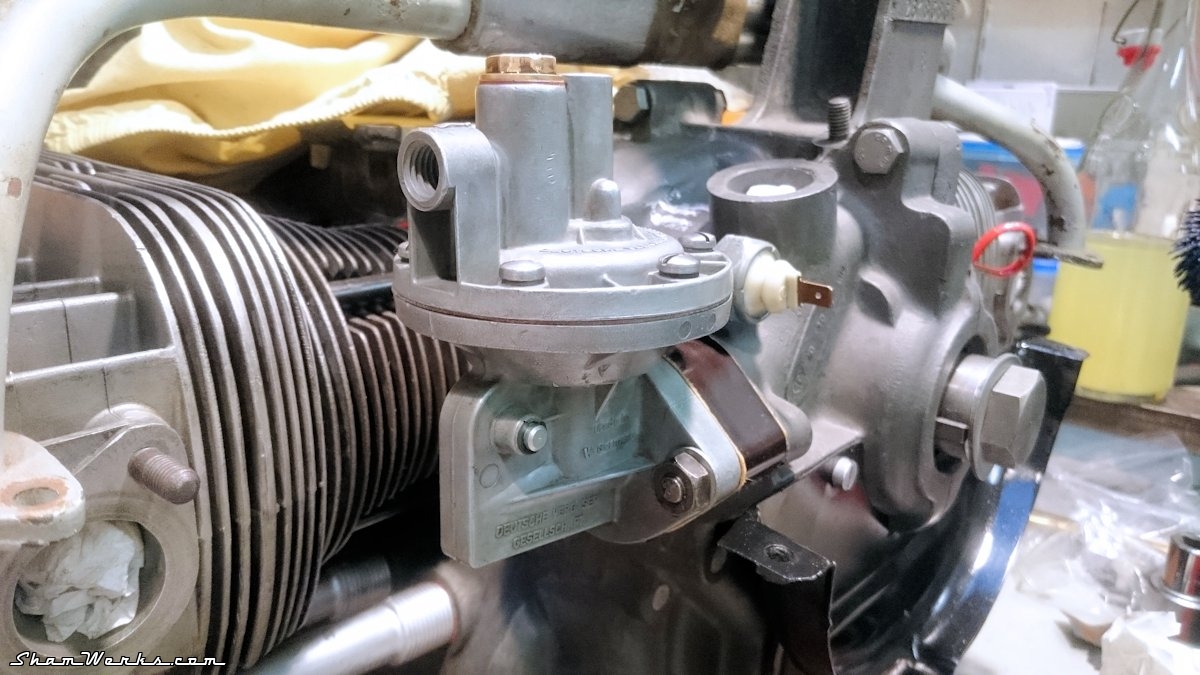
Re-fixed, and back on the road.... Again. Hopefully I won't have to reopen this fuel pump anytime soon!
Posted on 15/05/2016 at 23:20
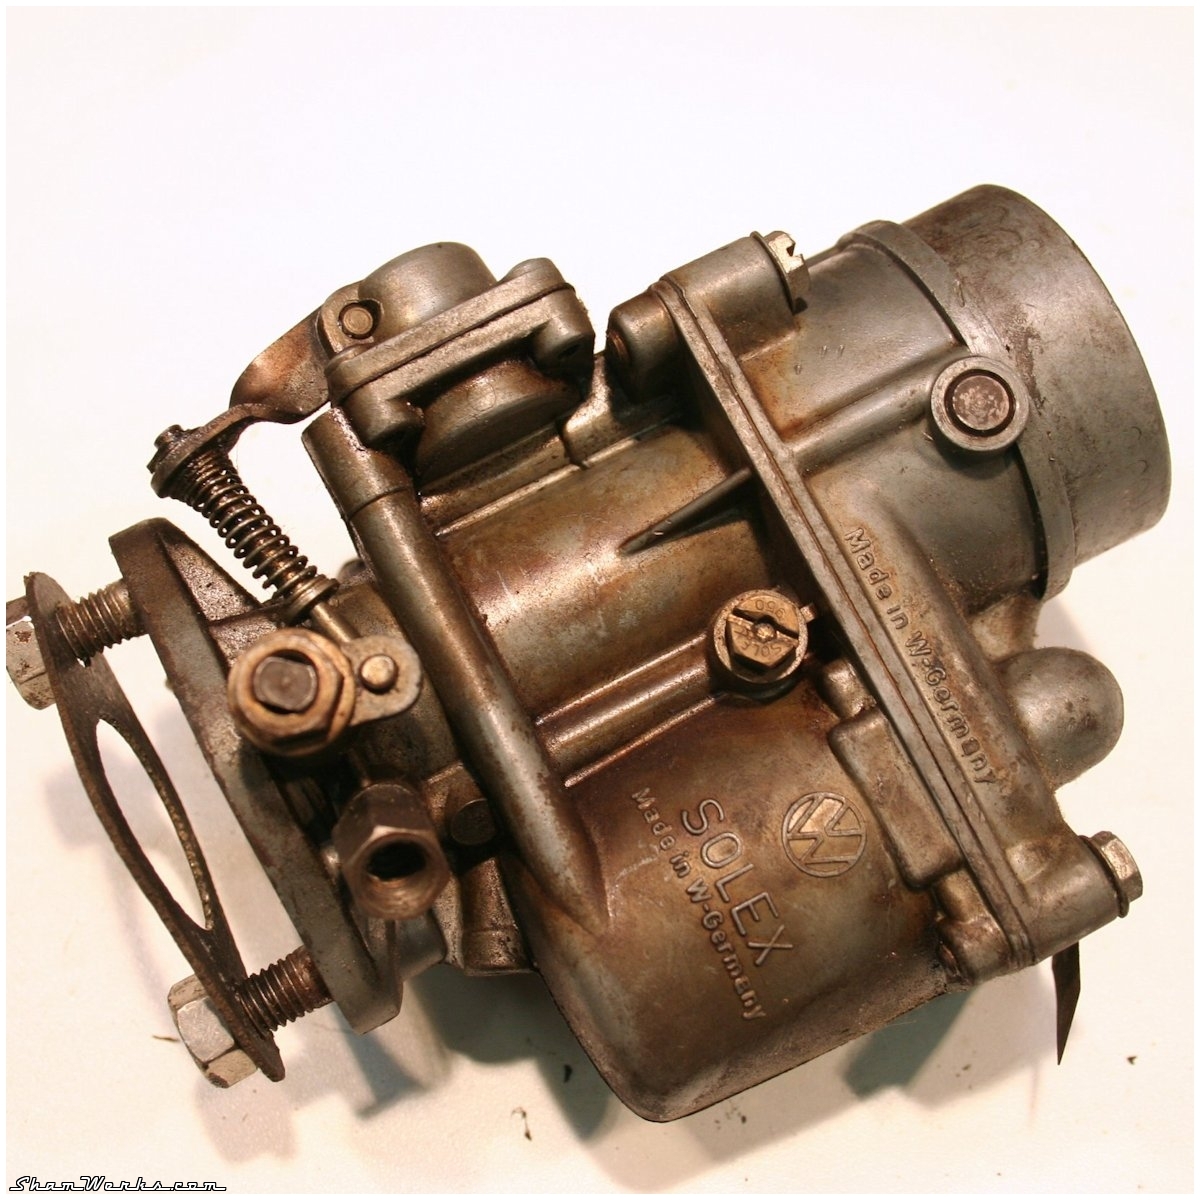
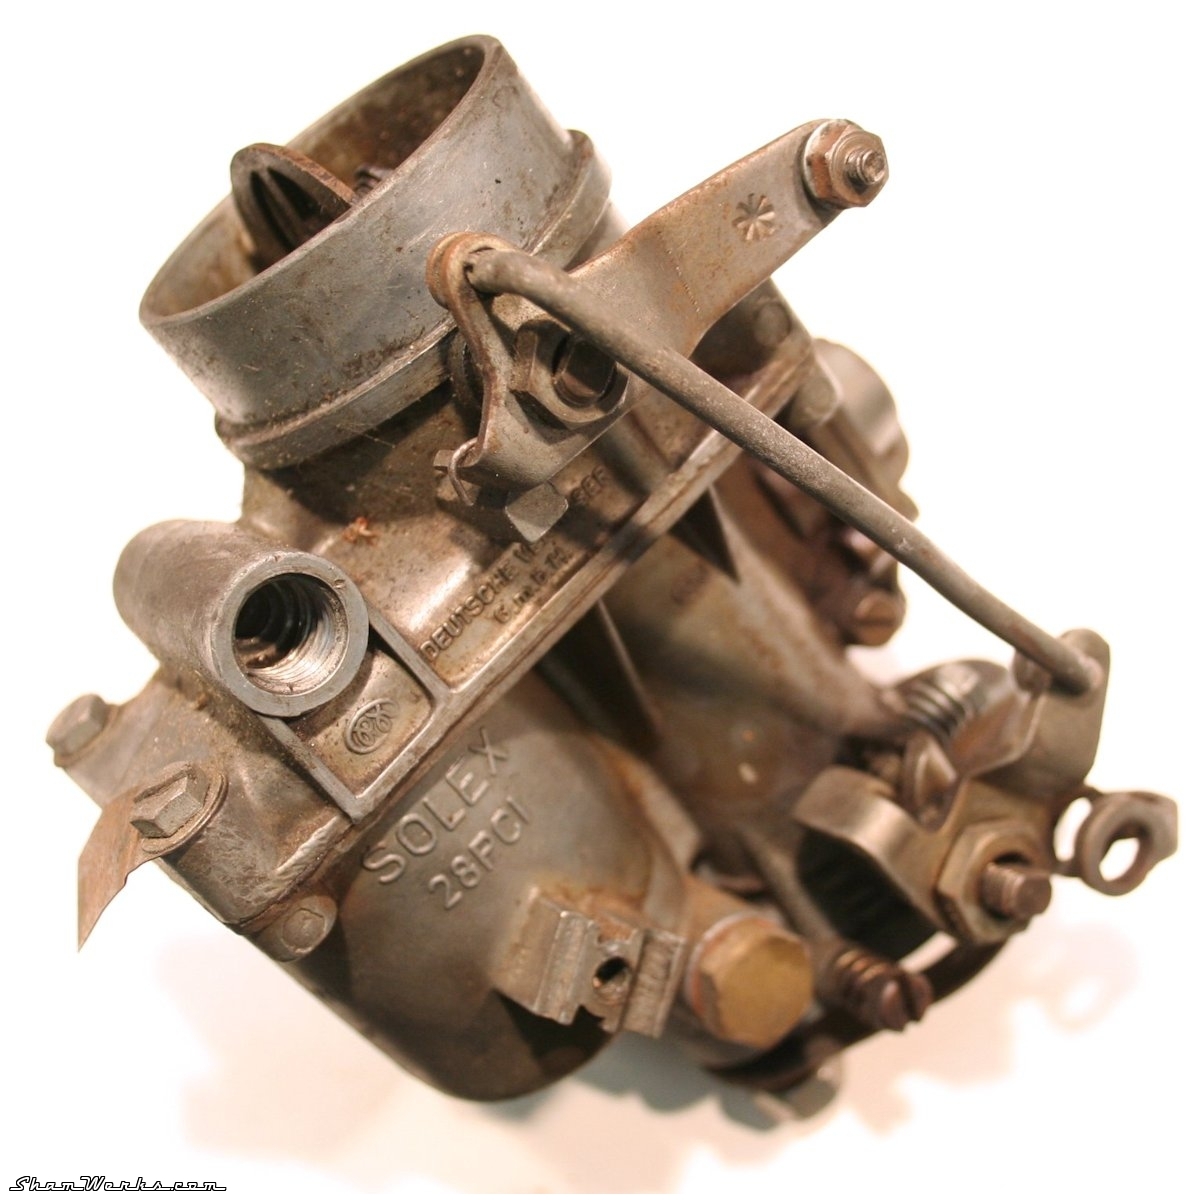
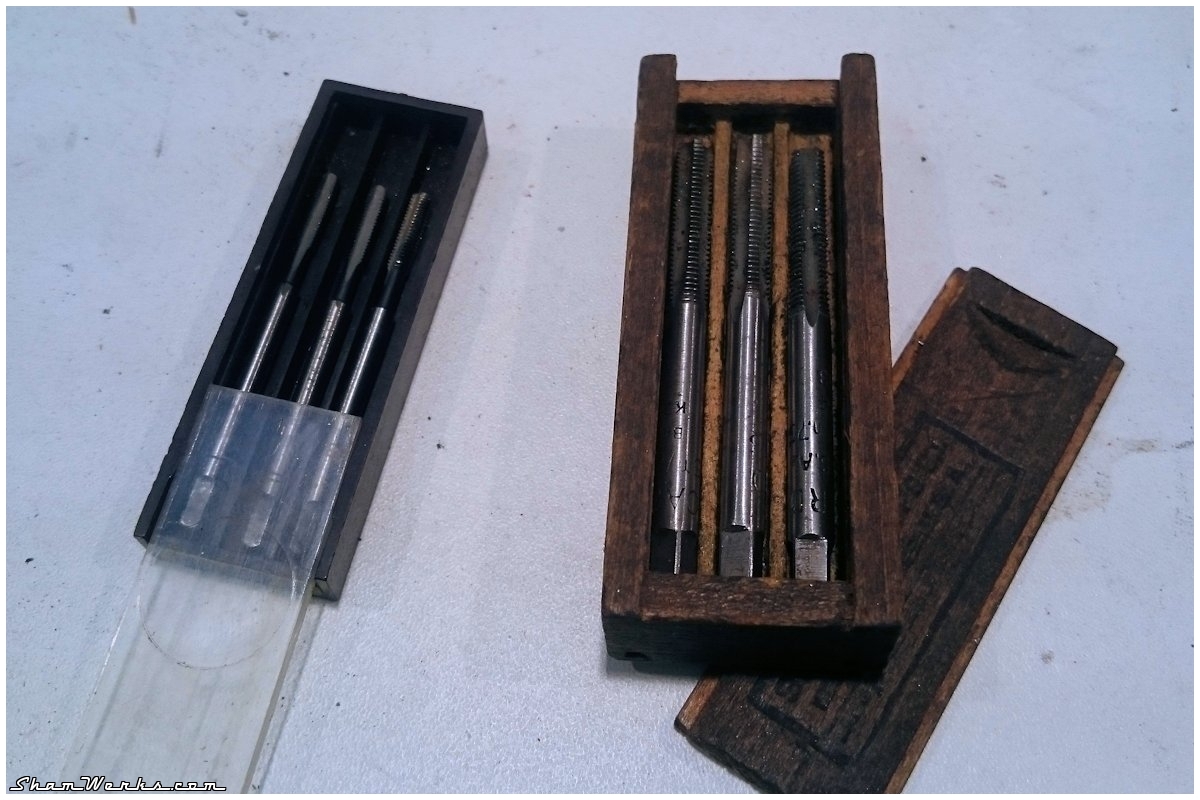
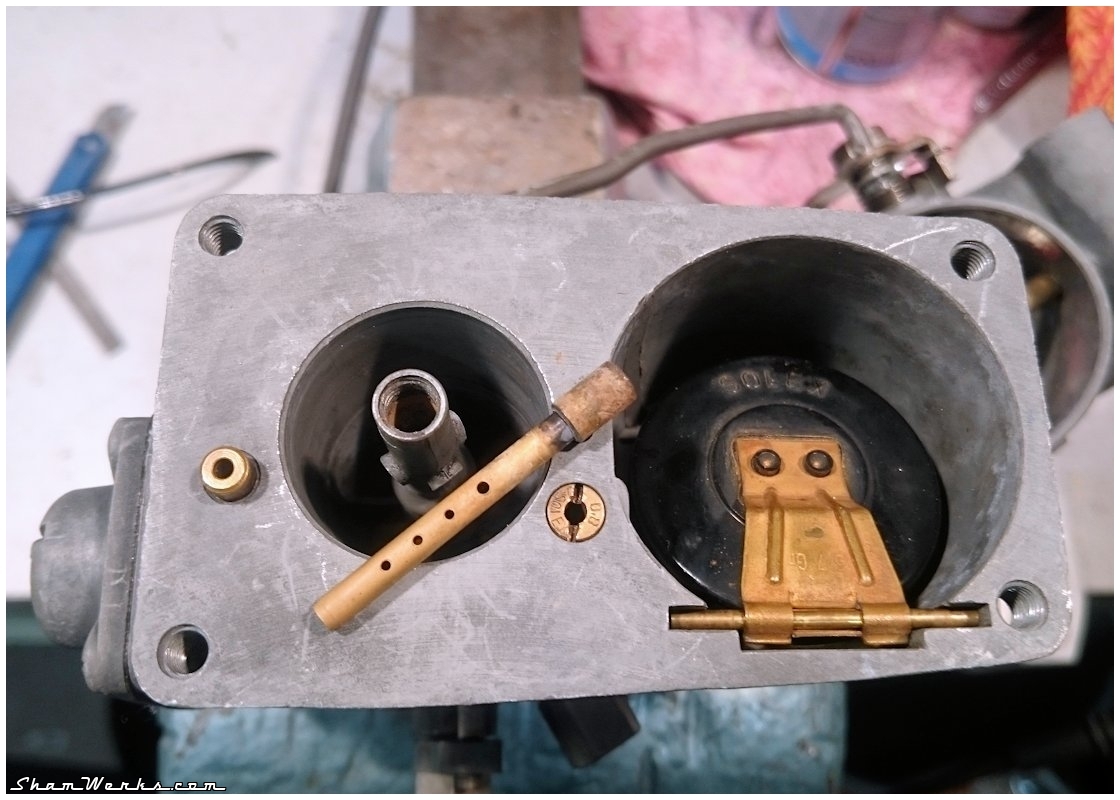
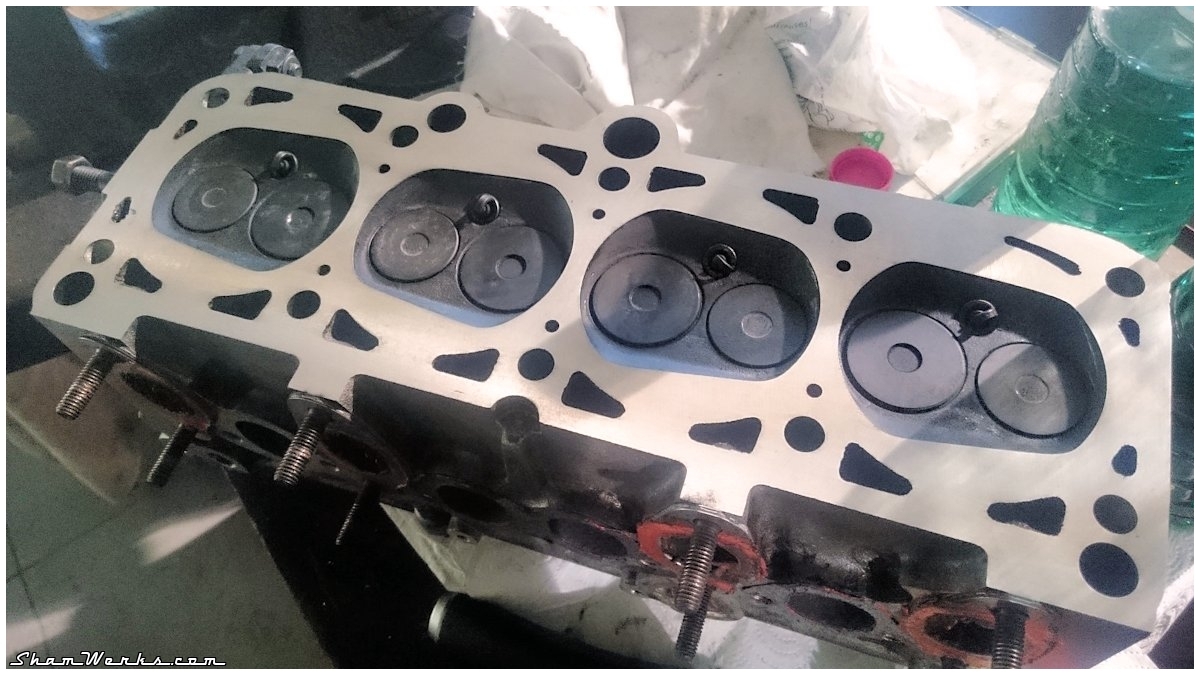
Elvira : Rebuilding the 36hp, part 4 : Solex 28 PCI
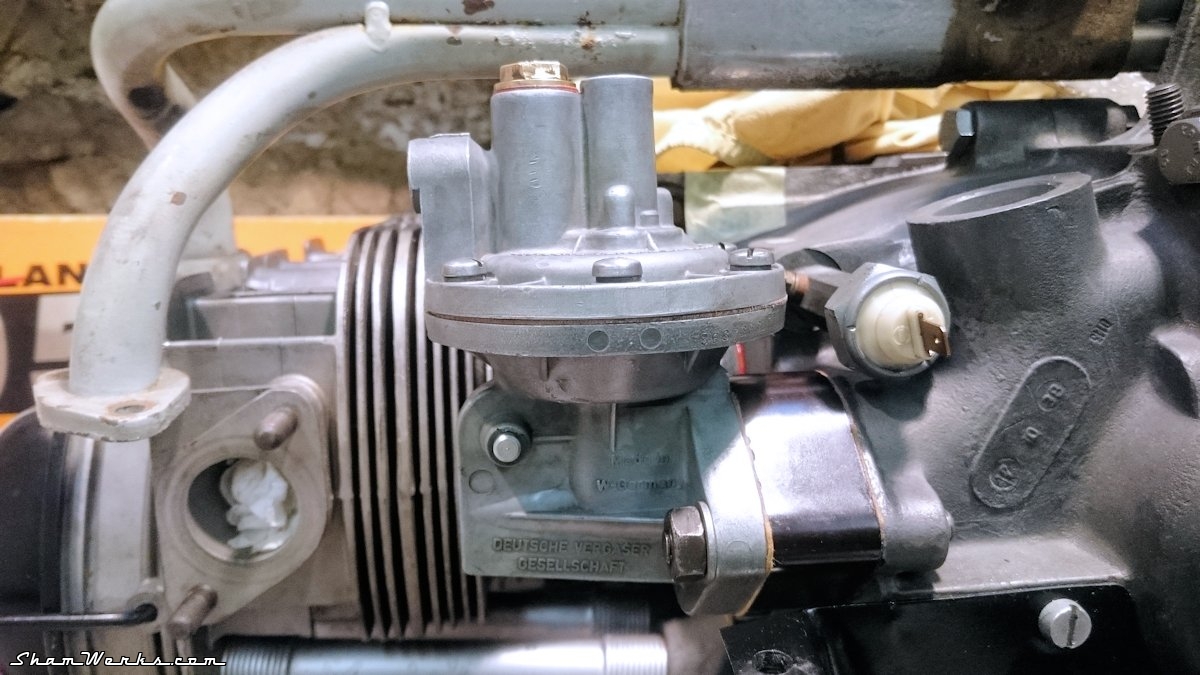
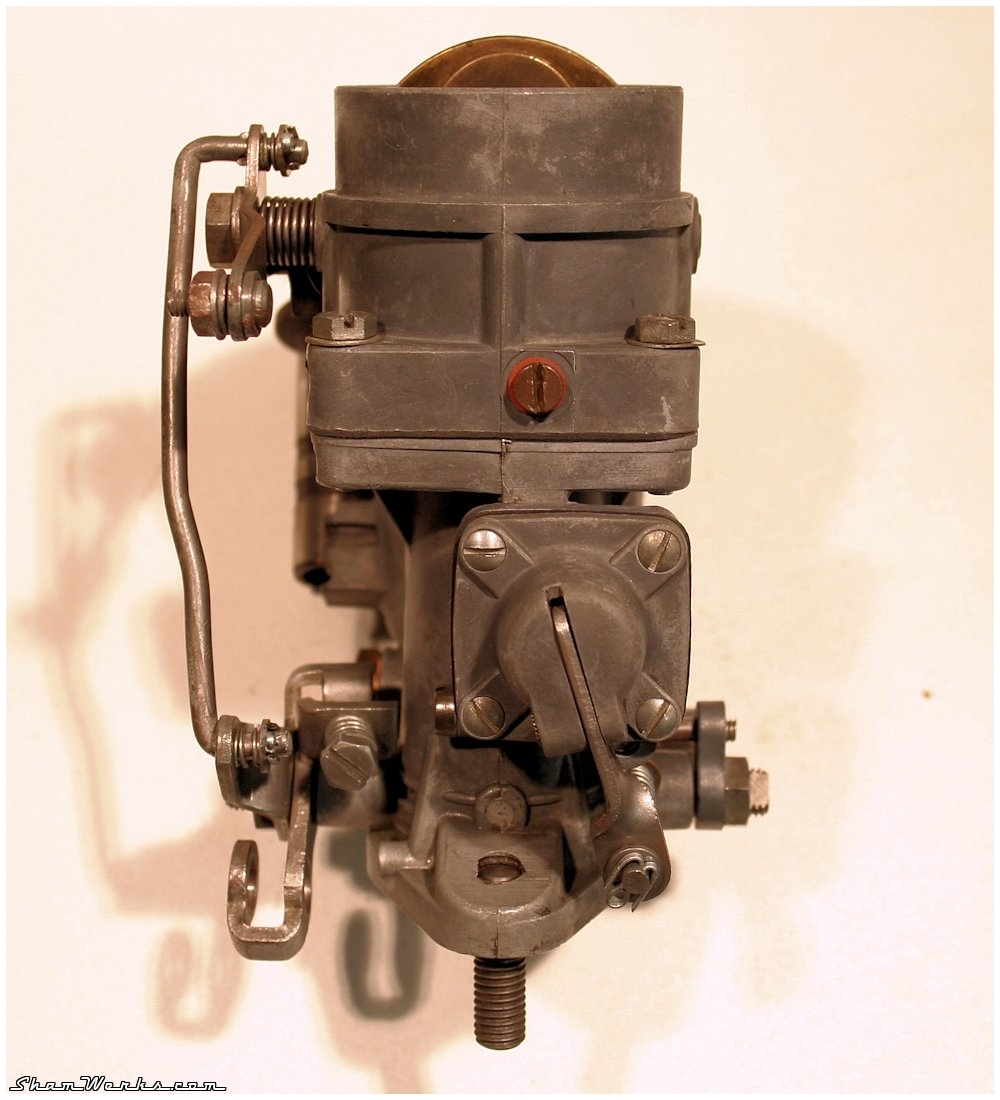
episode 4 : Solex 28 PCI Carburetor
After 57 years, it was long overdue for a rebuild...
So I tried the same approach, but using my ultrasound tank, filled up with 6 bottles of lemon juice, heated all the way up to 80°C!
So after I disassembled the Solex, I let it soak in for 3 ultrasonic rounds of 20 minutes, after which I rince everything in clean water (ideally it'd have to be warm to avoid thermal shock) in order to remove any remaining acidity left by the lemon juice... Then a quick blow dry. I immediatly lube the rotating parts to avoid any oxidization...
I think the ultrasound are pretty useless here, being dampened by the particles in suspension in the lemon juice ; but they still help agitating the whole thing, and it probably helps.
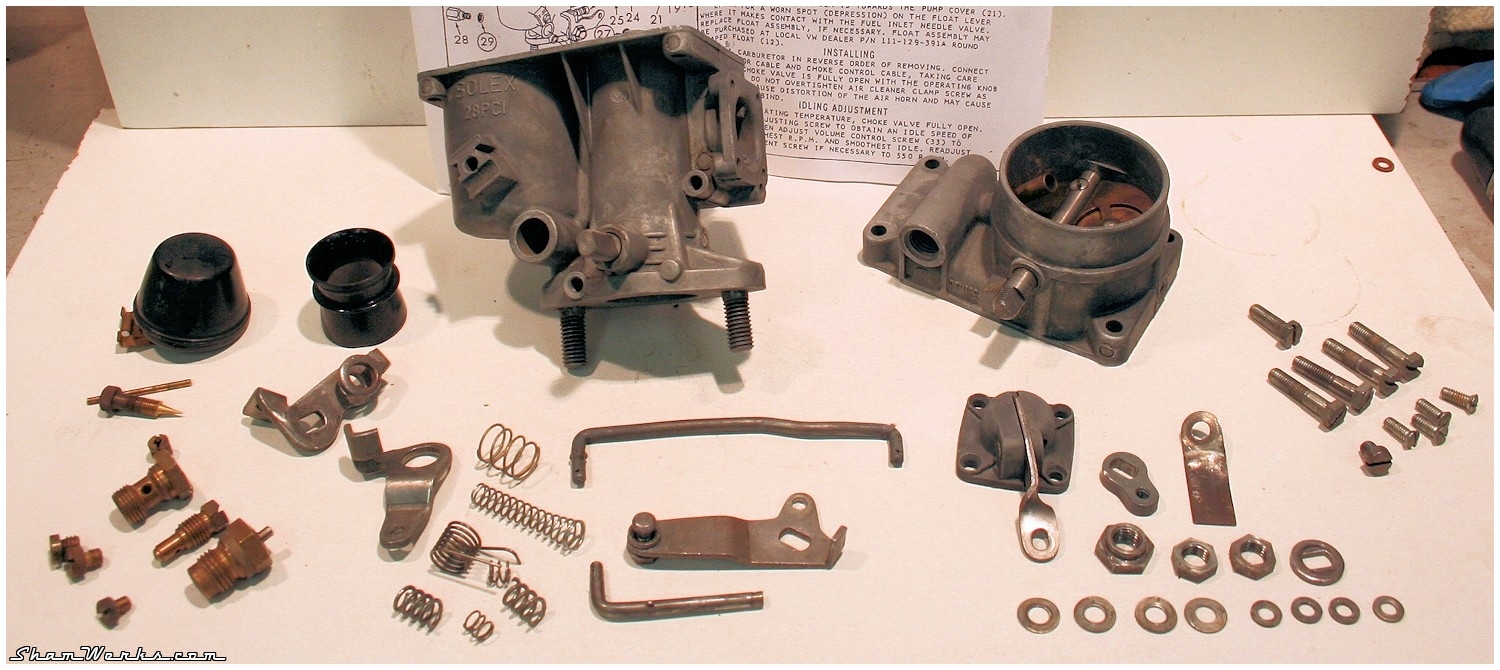
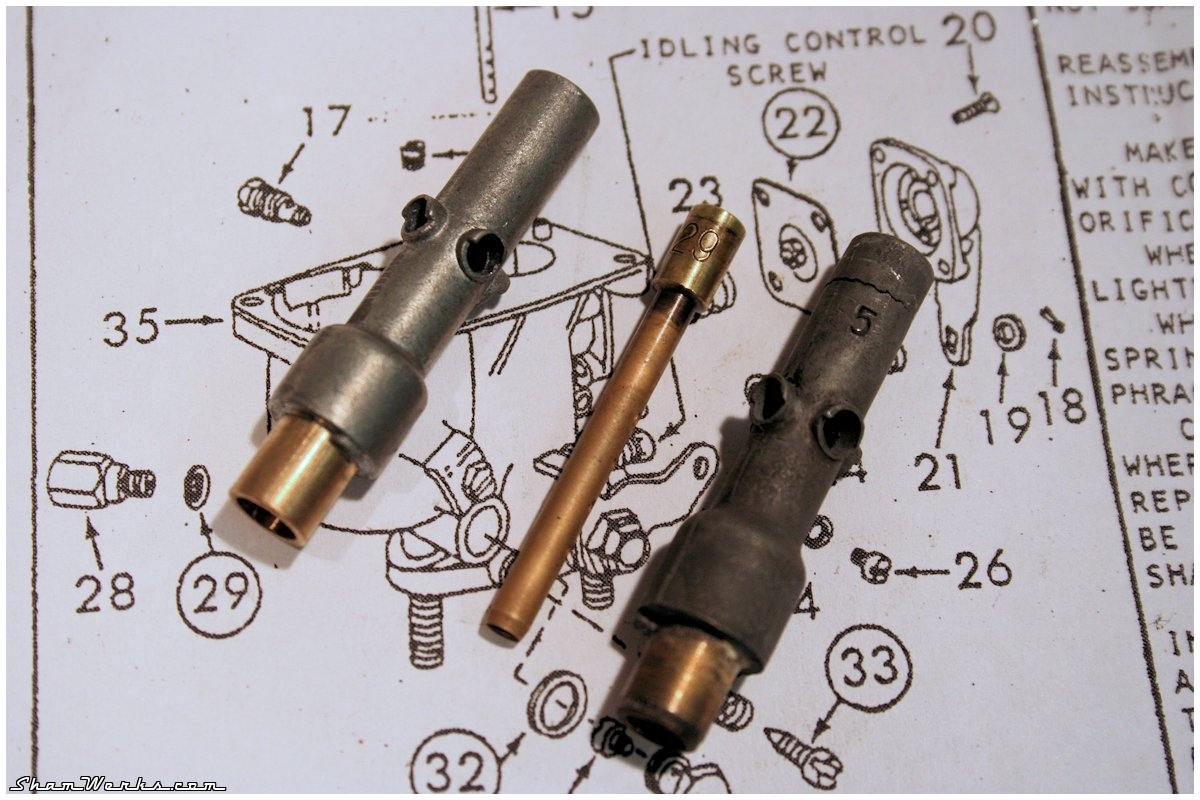
I reassemble the carb with a renovation kit - all the gaskets were dry, the accelerator pump diaphragm completely rigid... It was time to do something about it.
But obvisously, everything was going fine. Too fine. So as I was reinstallint the jet on the emulsion tube, lightly tightening it as I know it a fragile part... Crack. F*ck me.
Fortunately, this emulsion tube can be bought NOS online on eBay in Italy... So 10 days later, here we go again, I replace the cracked tube... (note : there's an alternative to the NOS tube : one can buy a brass made replica at Bob Services : thanks SebCore for the info!)
To extract the tube, I first tap it with an M3 tap, pull.... But only the brass part comes. Second try, I tap the remaining tube with an M5 tap, pull it... And this time it's out. Yes!
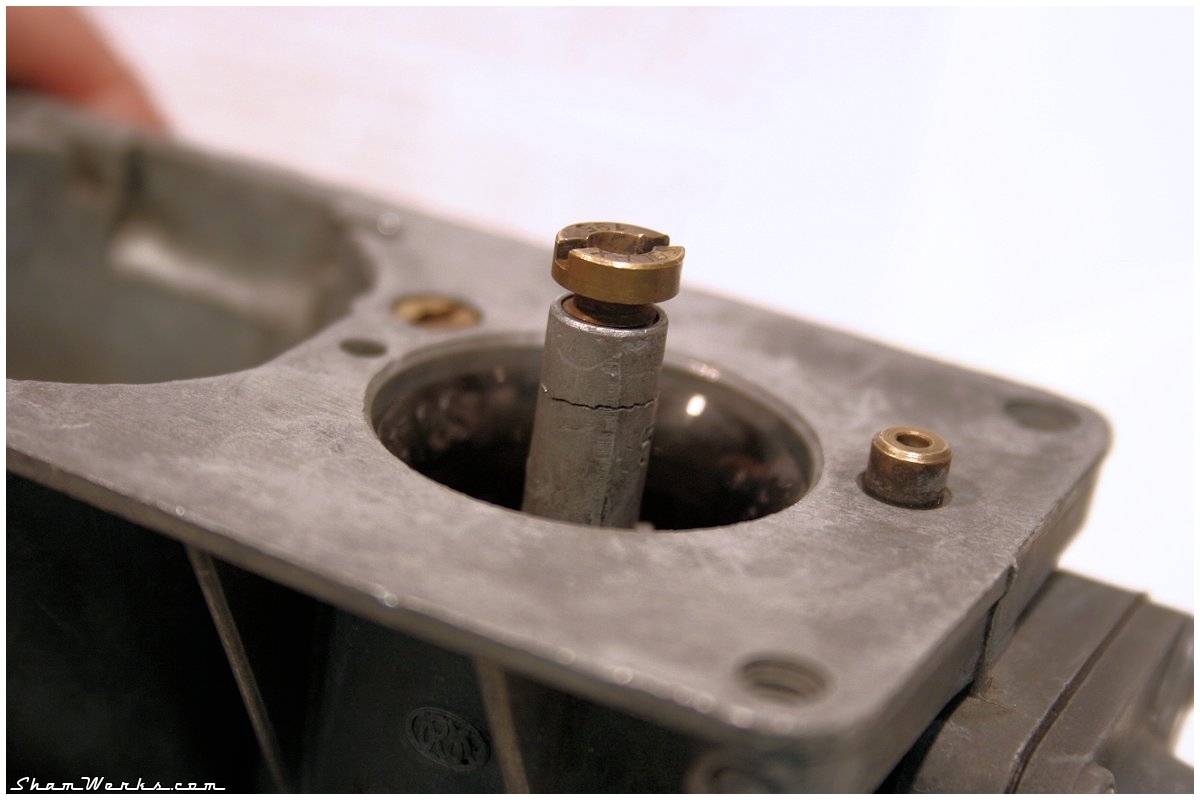
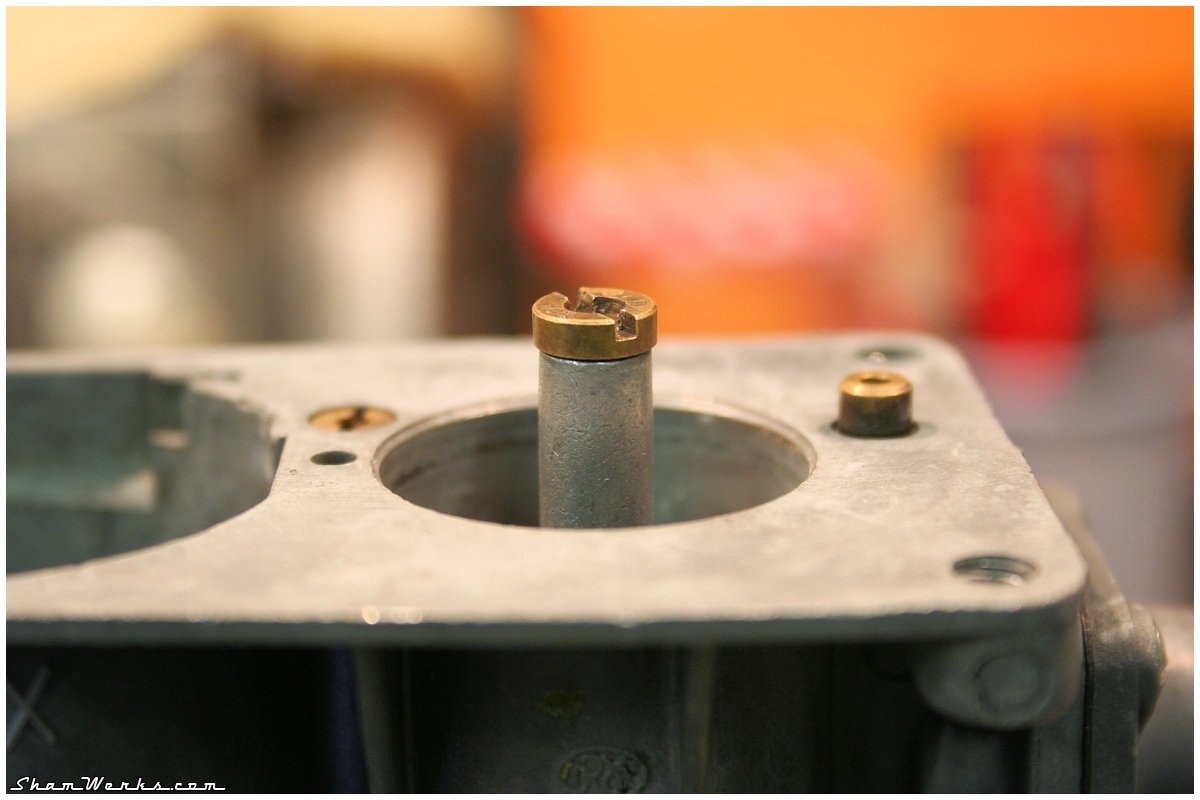
The new tube is inserted after heating the carb body with a heat gun (on "low", be gentle!). The tube itself is cooled down with a couple of squirts of brake cleaner fluid + compressed air blow. It's not settling in that easy, so it took some convincing with a small hammer and a drift punch, the carb being held in the vice. Again, gently!

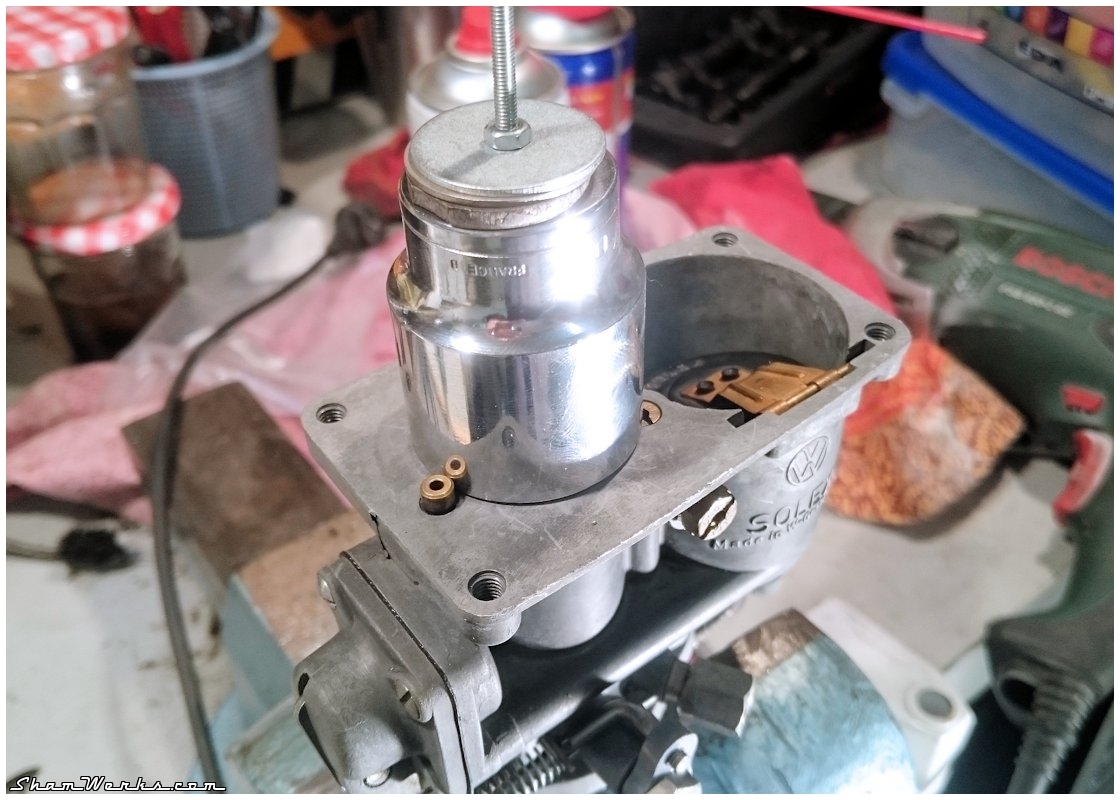
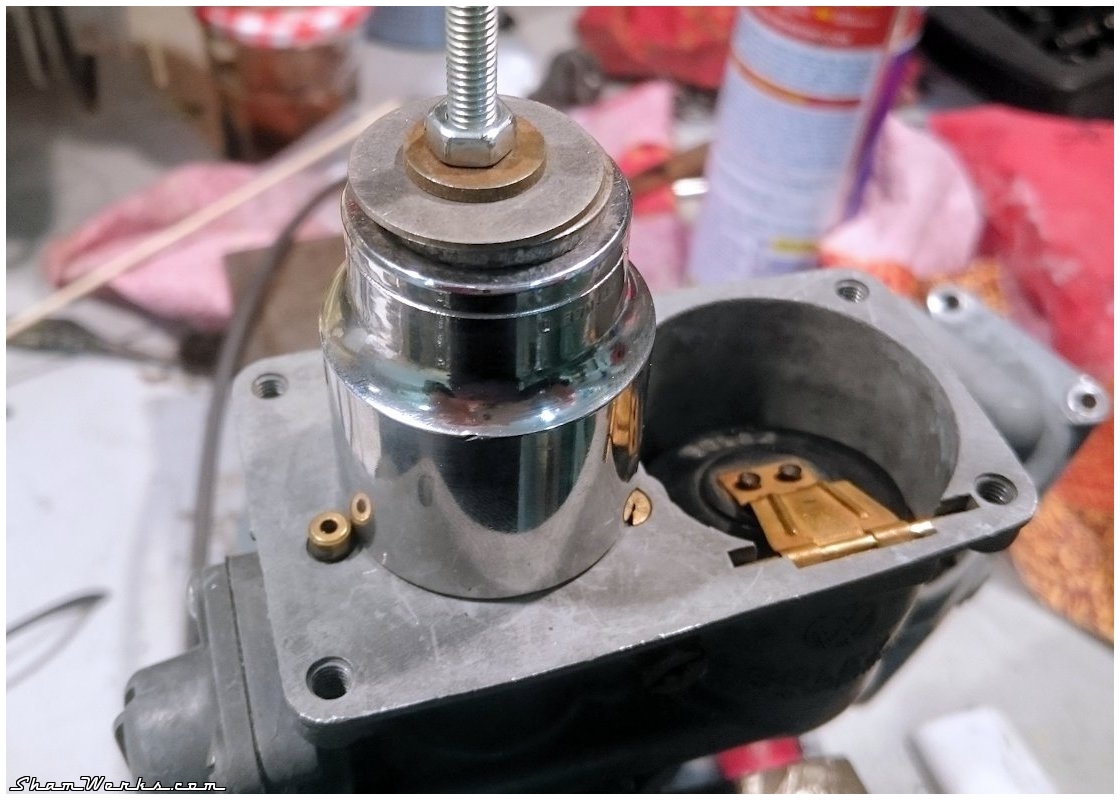
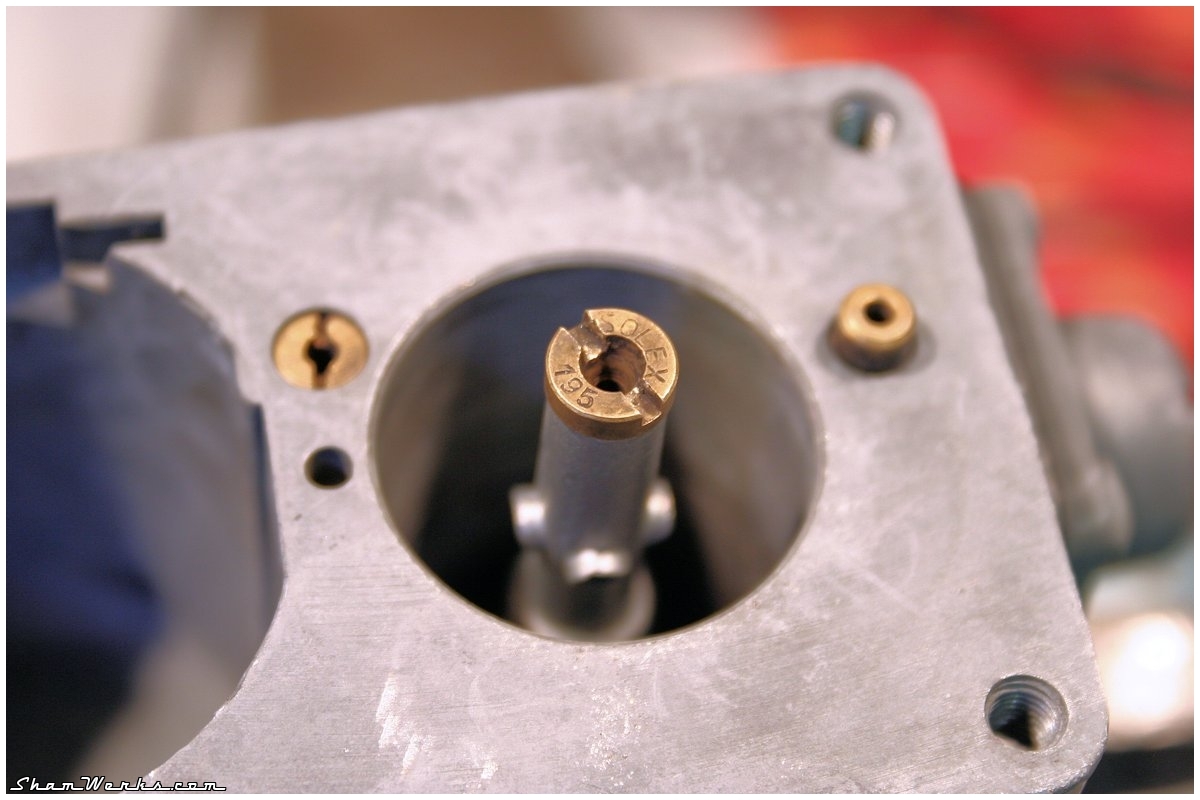

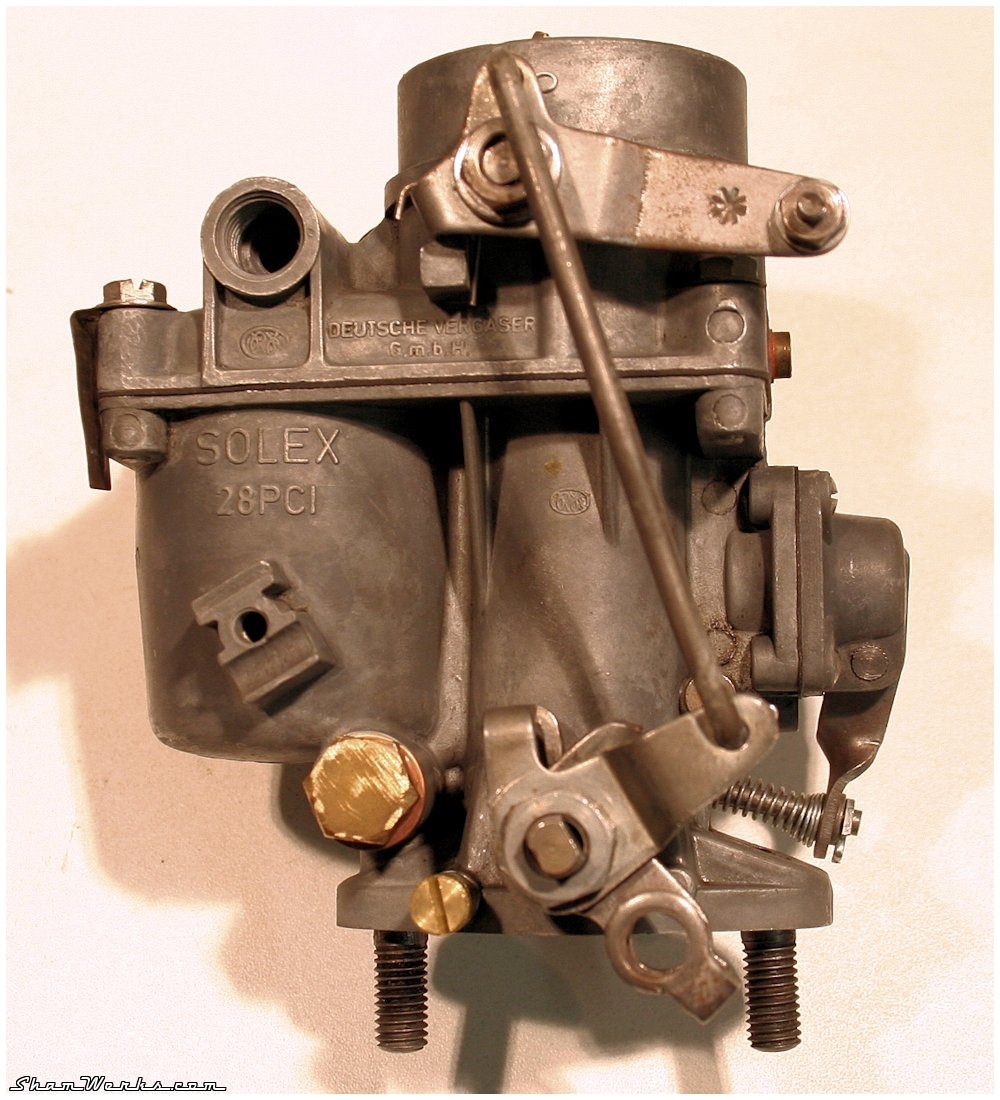
It directly goes into a plastic bag, waiting for the holy day it will make my engine come back to life...
Posted on 07/04/2016 at 22:58
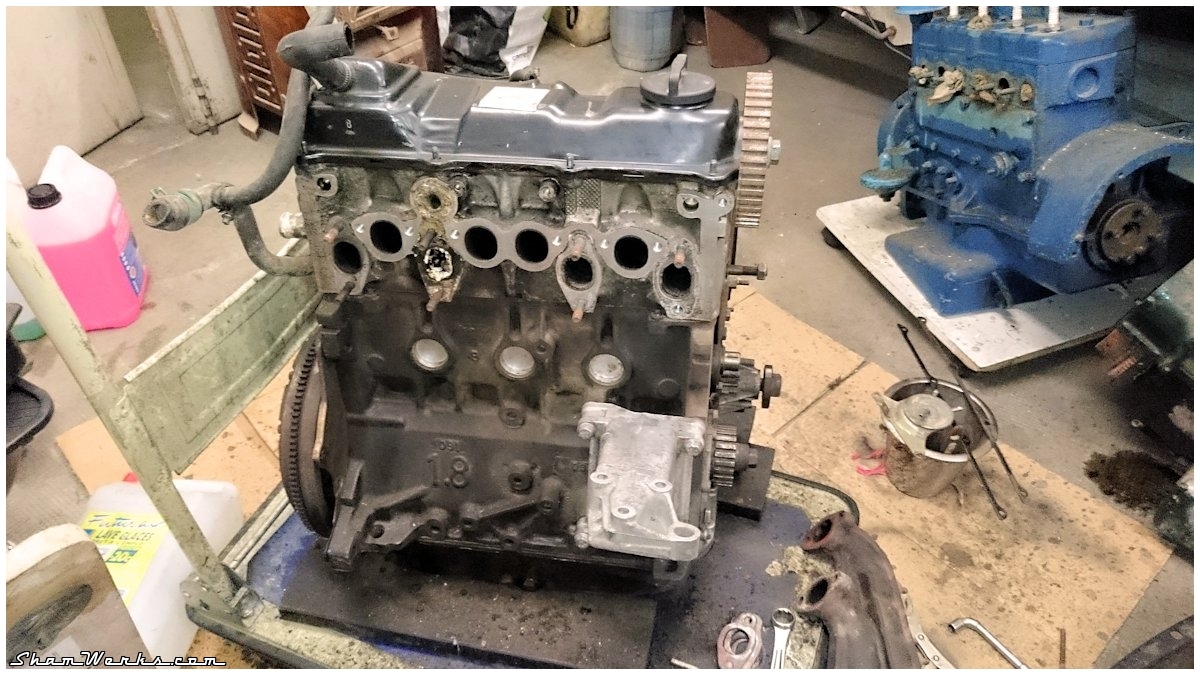
Krapo Bleu : Engine Swap!

Engine Swap!
As I said in my November 2013 article, its angine was starting to seriously wear out (270.000km... and I'll have to admit, I did not always take good care of it!), eating more and more oil (like a liter a month!), used to leak water, overheat... It was high time to do something about it, and finally take care of my "old friend" that helped my so many times, before I actually end up stuck on the side of the road with a broken engine.
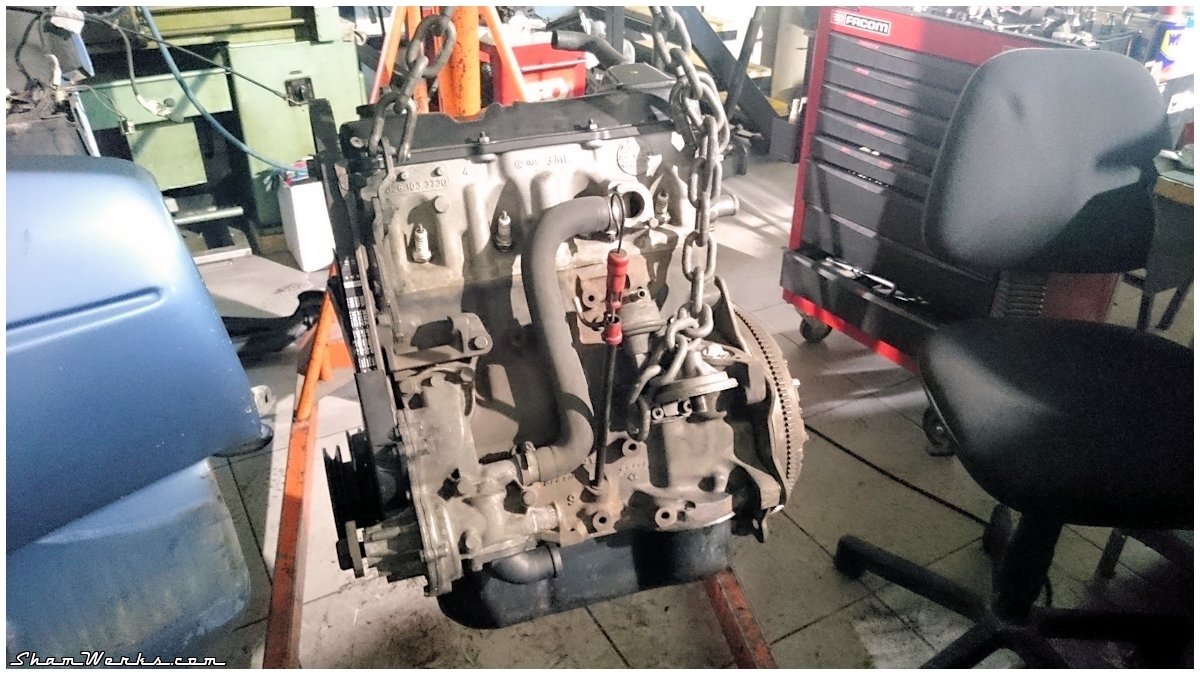
After spending a year looking for the right engine, I finally found in may 2014 a block on LeBonCoin (the equivalent of Craig's List in France), for 200€. It wasn't that easy, as several times people tried to sell me broken engines, with broken timing belt (the valves-in-pistons kind) or blown head gaskets...
This engine is strictly identical to the original one (OK, I know, therefore the term"engine swap" may not be appropriate : sue me!) : 1.8L, 90hp, Pierburg 2E2 carburetor, but scoring "only" 130.000km (barely broken in, right?

I've used that year to completely clean the engine, changed lip seals and head cover seal, etc...
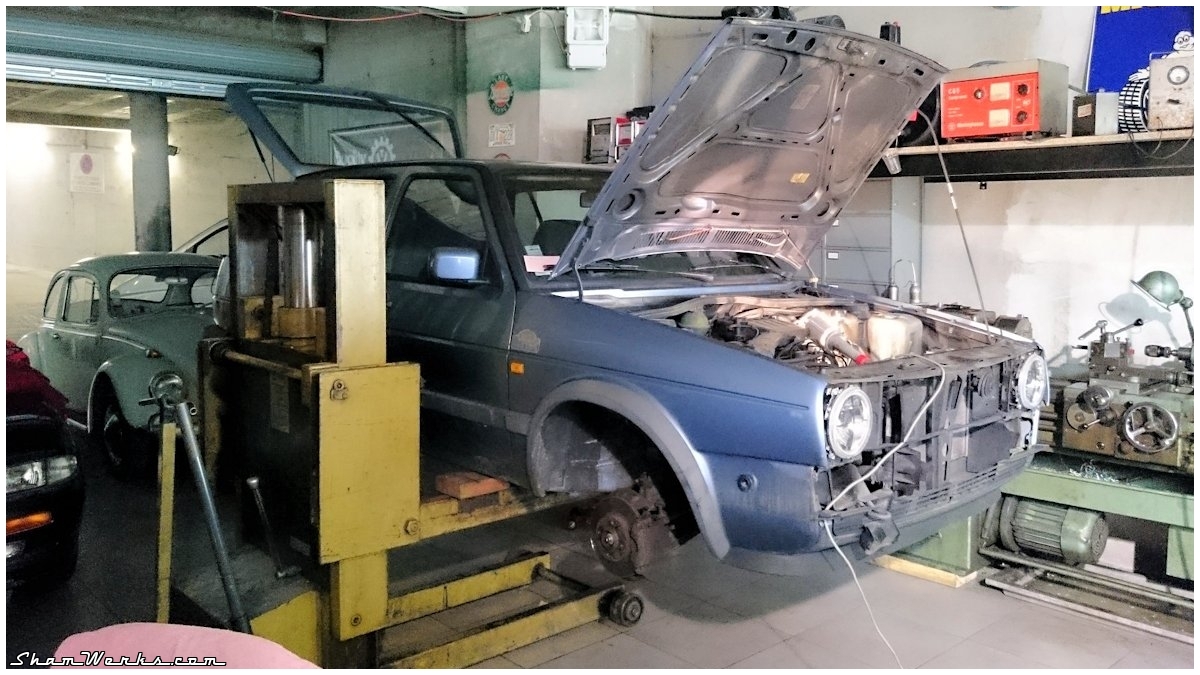
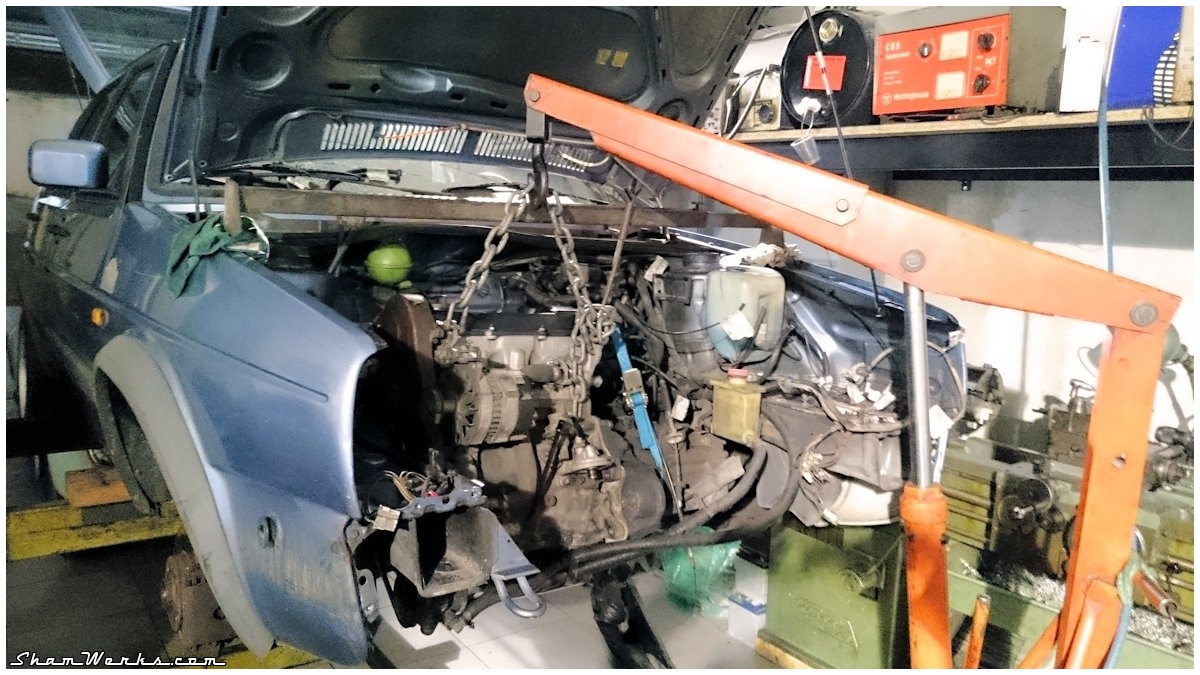
It's already July 2015 when I head up to Laurent's (Dangerous) to use his hoist, car lift and roomy workshop (which is a much easier way than using a jack in an underground one car garage!)
So there I go, starting with removing the whole front mask of the car, all the accessories, strapping the gearbox... And the engine comes out easily(-ish)!
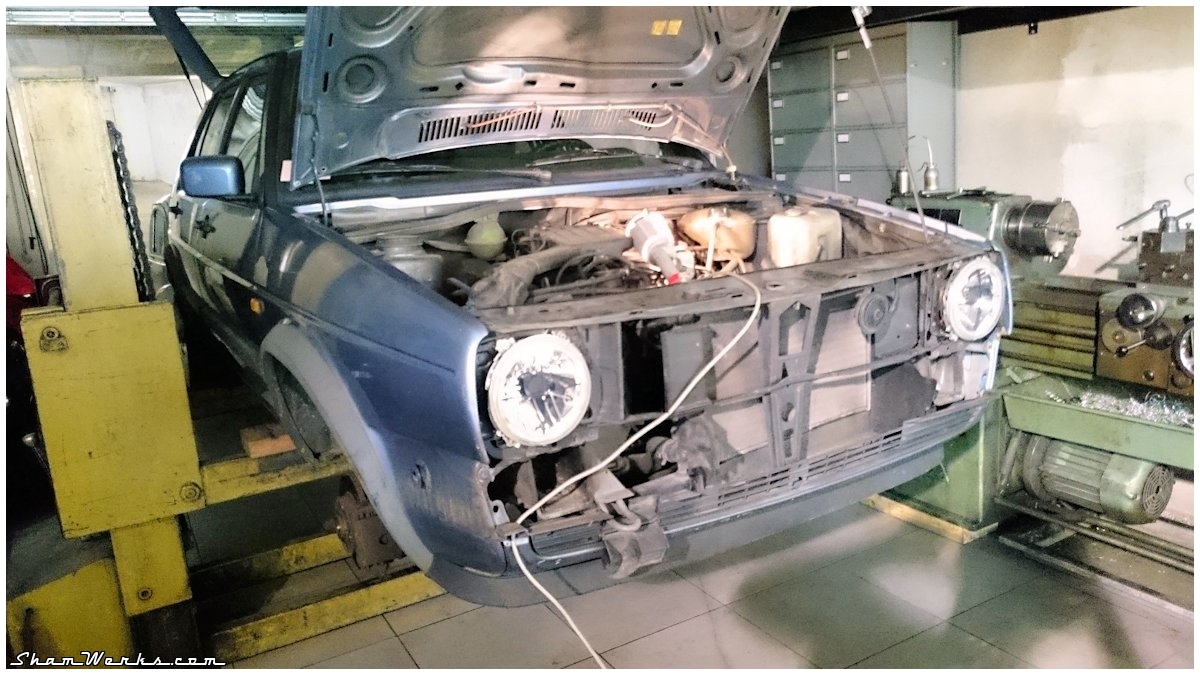
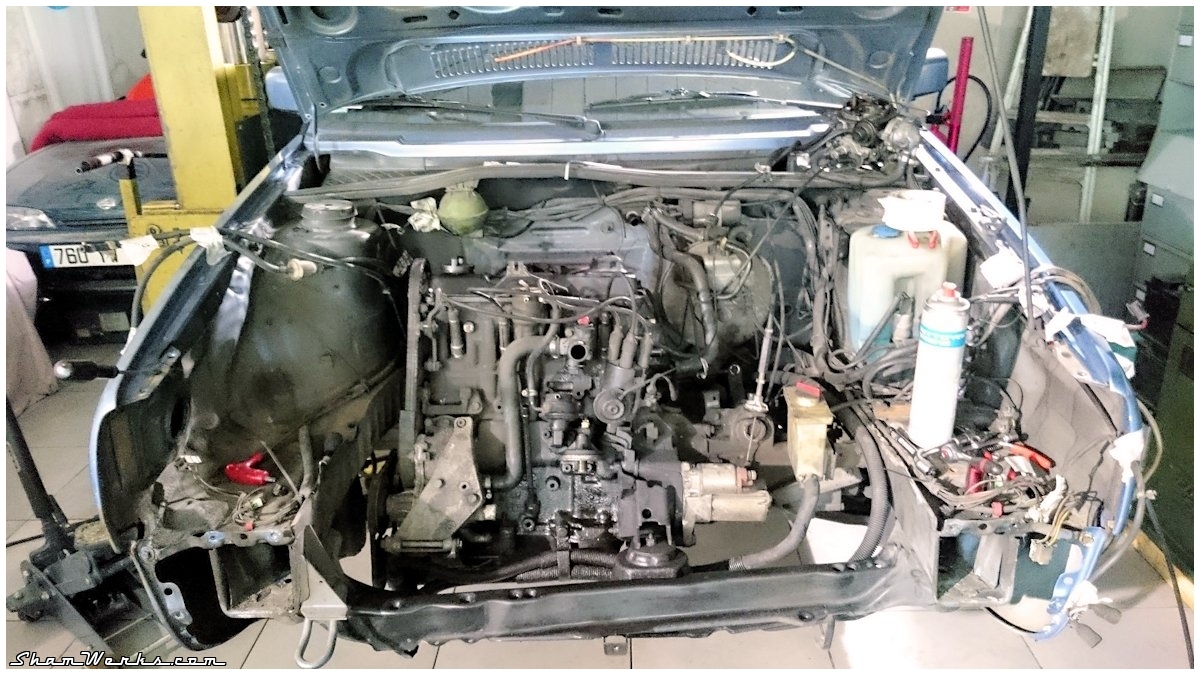
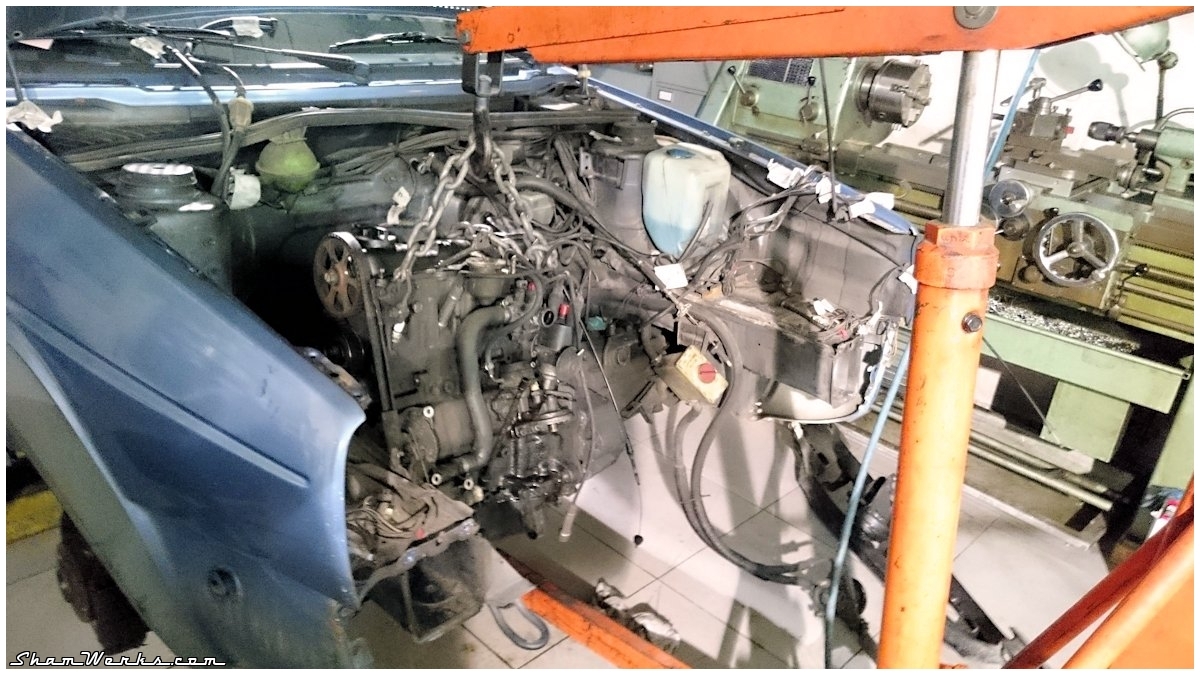
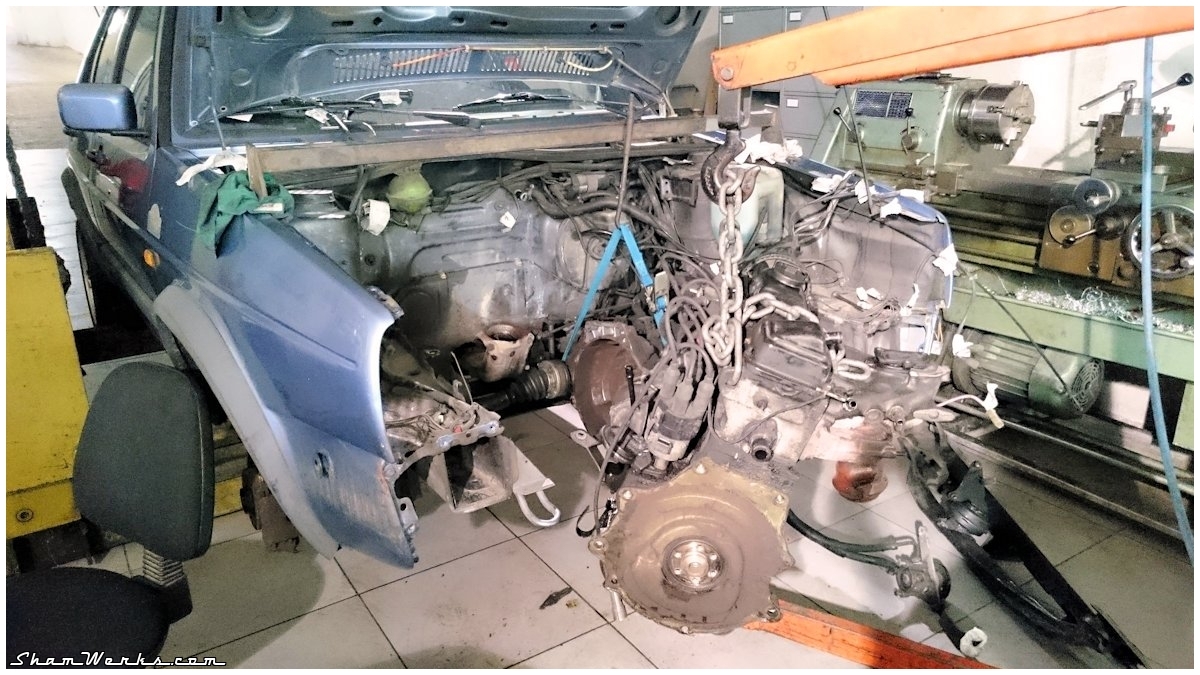
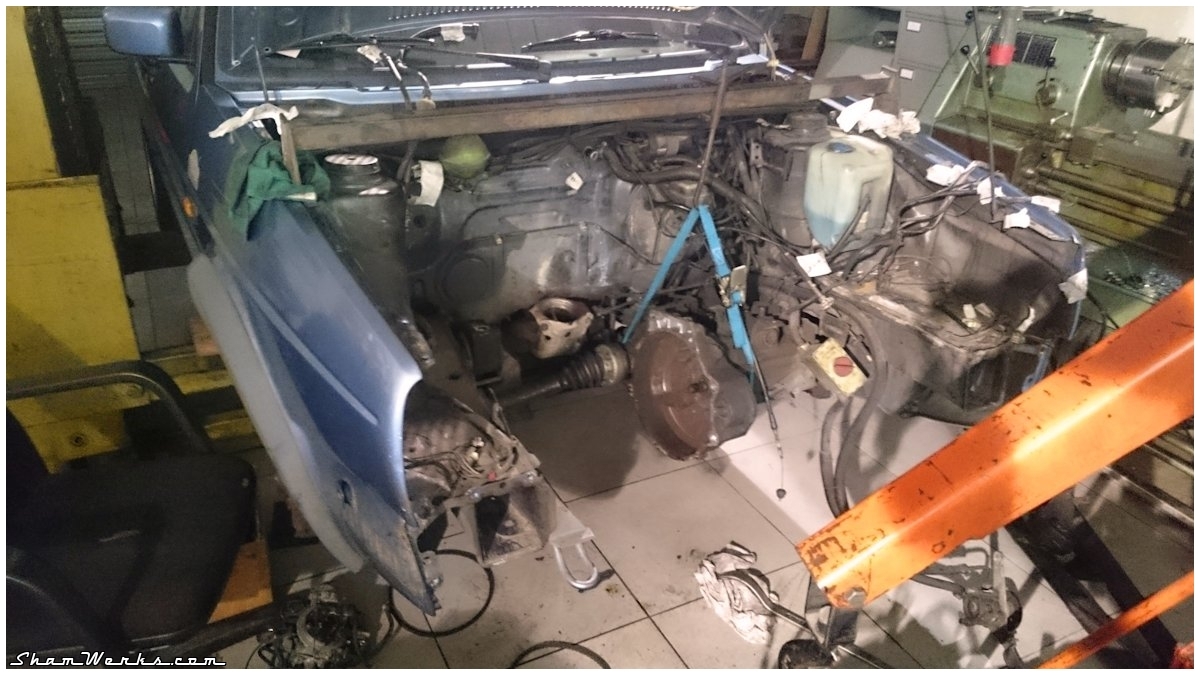
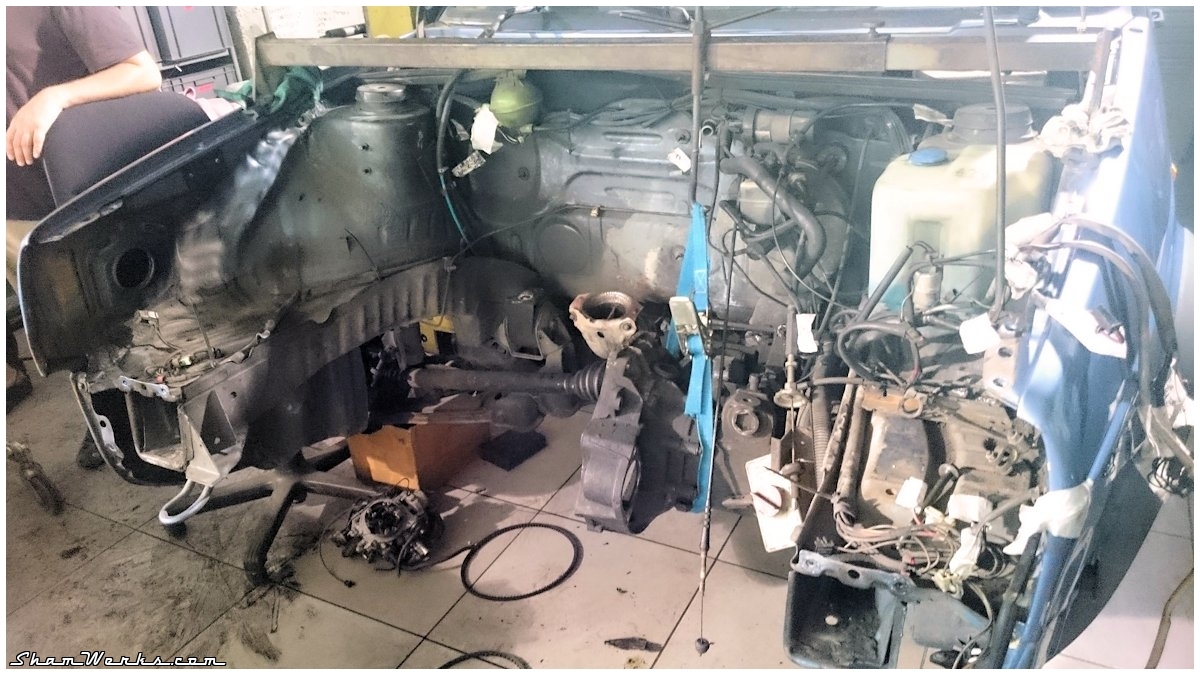
With the engin out, I had room to clean the whole engine compartment from the 27 years of stratified gunk.
Up to this point, everything's going as planned ; with a bit of organisation, it's even simpler than it looks.
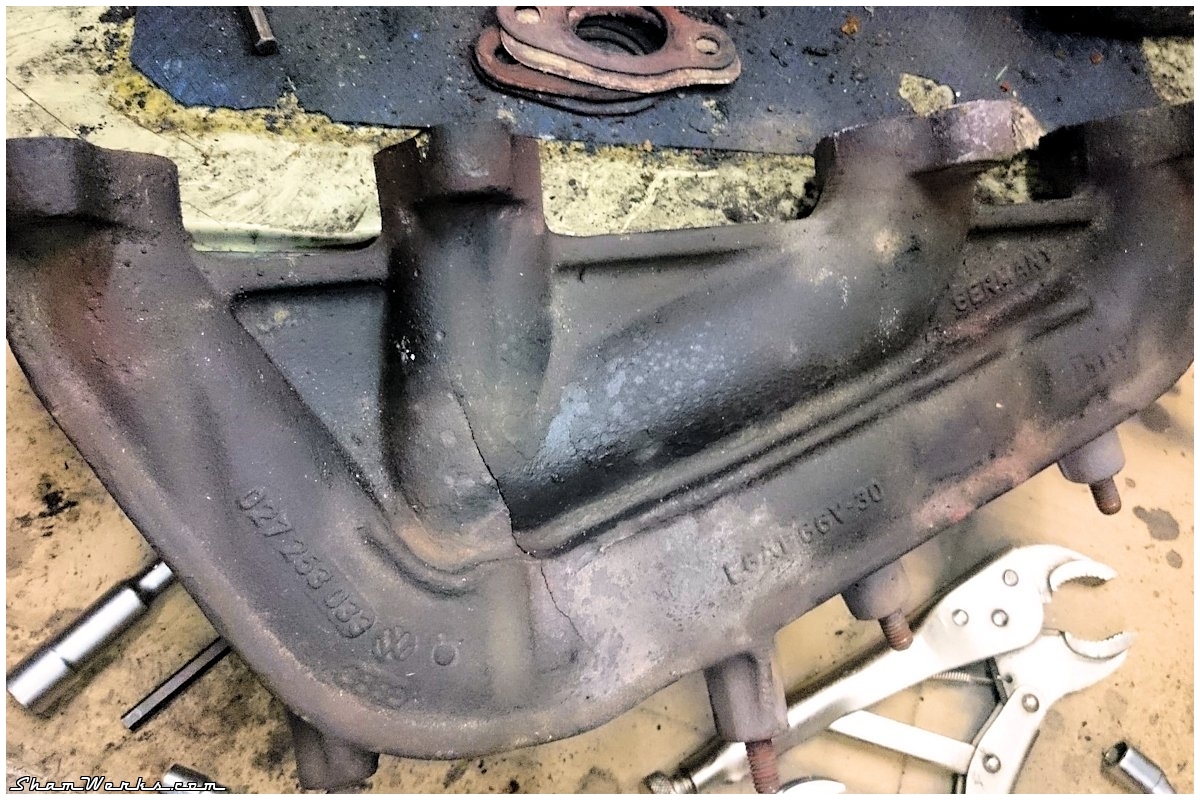
Now is time to get the new engine in (after I transferred on it the carb, clutch, flywheel, exhaust manifold, and a couple of things more) : it goes pretty swiftly, except for the exhaust clamps that are a PITA to install when you don't have the specific tool. Nothing a ratchet strap can't fix, though (#ratchetstrappower).
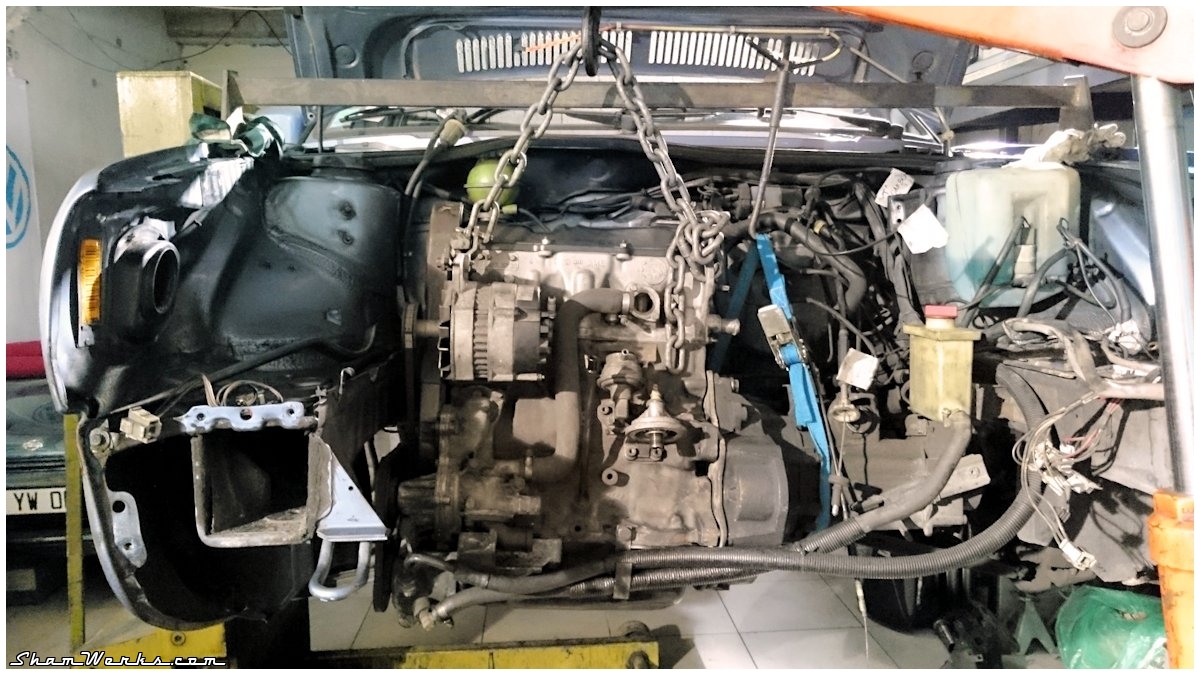
And... That's when things went sour... Argh, why is nothing ever simple!
1st start : the engine starts right on, that's the good news! In the other hand, an heavy water leakage appears on the side of the engine, Bellagio fountains like. Probably because the engine got a shock while being stock or transported (that's highly probable, I had nothing to strap the black in the rental truck, it was a bump ride!)...
I've been told that "when you've got a mechanical problem, the best solution is to do mechanics" (is it Confucius or Plato, I can't remember?) : we get the head out, and put it on the mill, fearing it may have warped. The joint plane is cleaned with only 12/100th of mm, so no, the head was fine, and it can go back on the engine with a new head gasket. Let's give it another try!
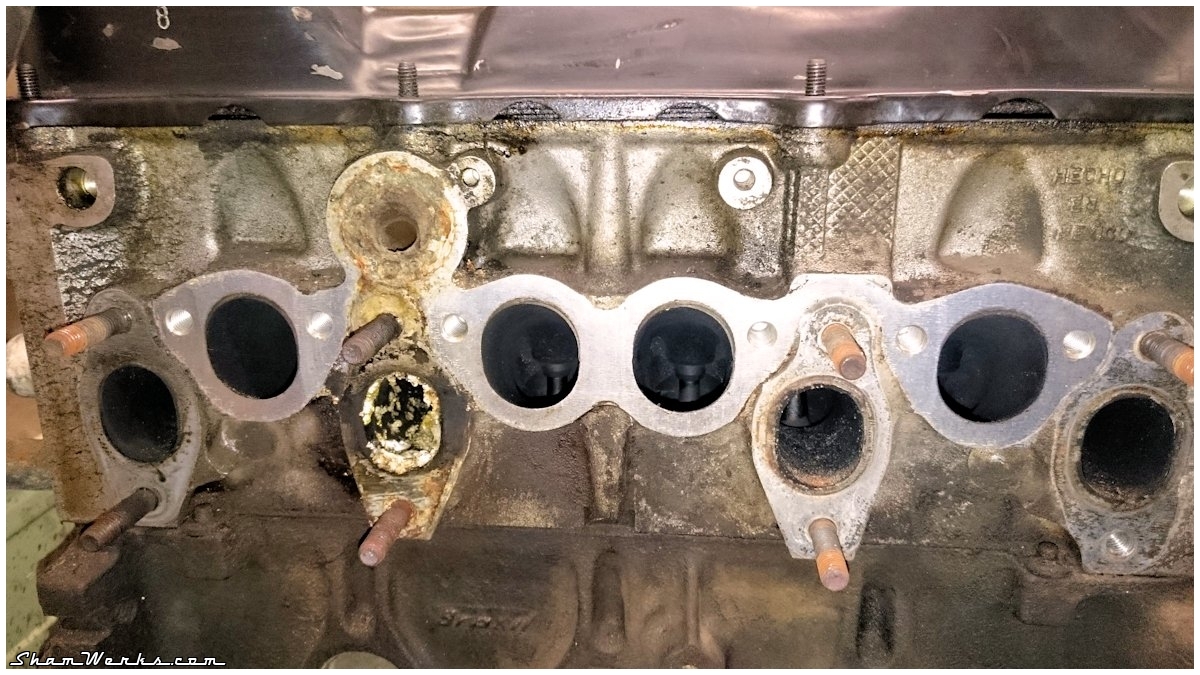
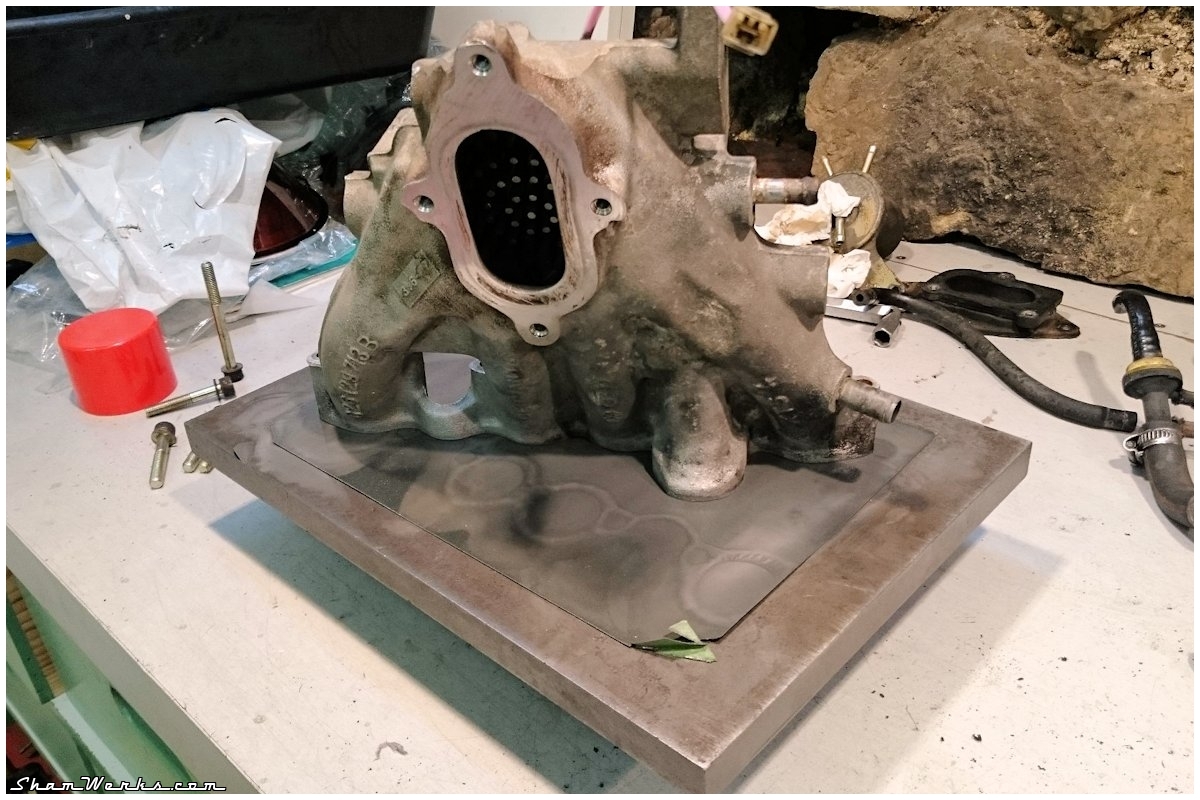
I take the intake manifold out, order new gaskets, reinstall everything with sealing compound, making sure it's tight...
I'll have to admit, from this point on, I took way less pictures, I was too busy to play the paparazzi!
3rd start : intake manifold still leaking. Less than the first time, but still leaking anyway.
Re-removing it, re-reinstalling it with again new gaskets and compound...
4th start : the manifold is not leaking anymore! Alleluia!!!
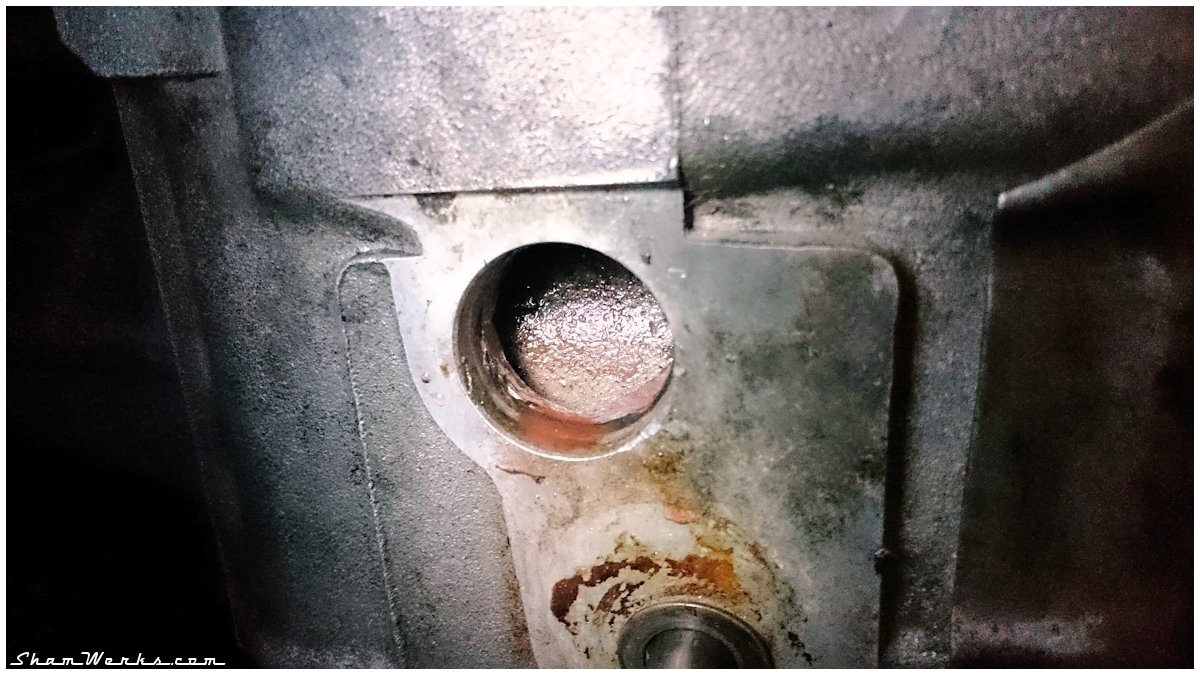
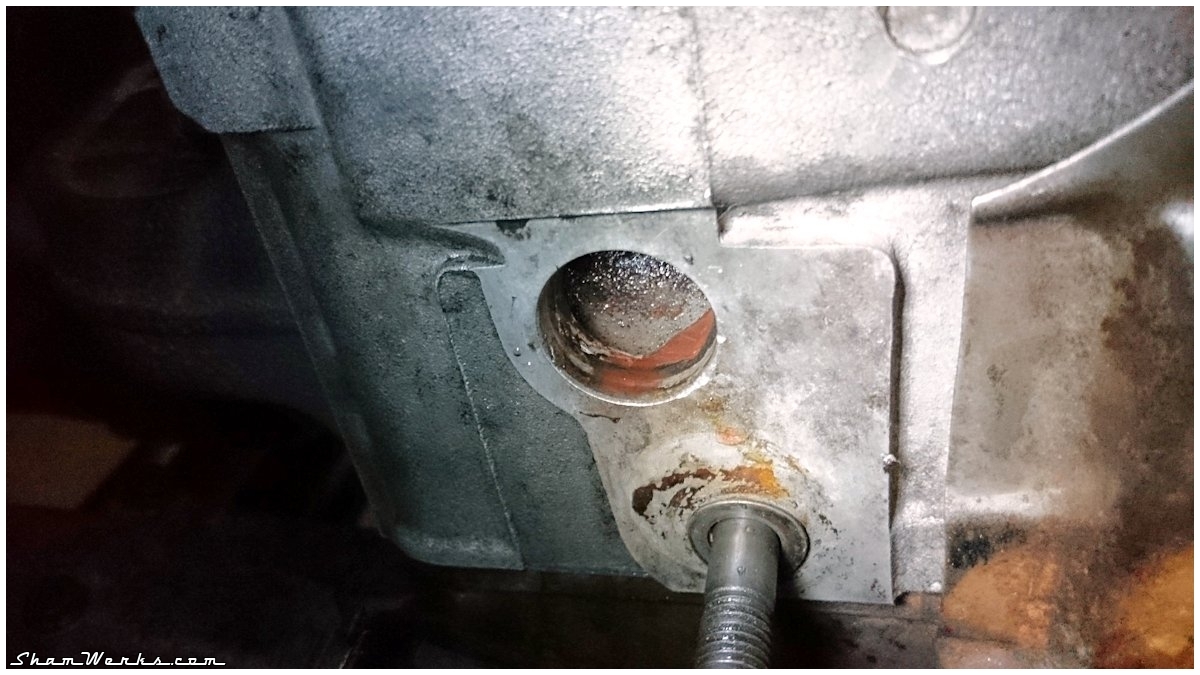
But now, I have a water leakage on the side of the block, behind the timing belt cover... Once again, we remove the distribution, to find out it's a bloody core plug! Has anyone seen this before?? It's not an heavy leak, more like a fast drip, but still...
So we find a new core plug, extract the old one, install the new... And here we go again.
.
.
.
But the radiator is. HOLY MOTHER OF FUUUUUUUUU...!!!!
I mean, not much, a slow drip, but it's leaking nonetheless. It didn't like being taken off... Classic.
Long story short, I order a new radiator, purge the coolant for the Nth time, replace the radiator....
6th start : IT IS NOT LEAKING ANYMORE! At all! Woooohooooo!!!
I was about to call that car "Pissing Bitch" instead of "Krapo Bleu"!
In the end, the operation that was supposed to take us 3 days took 3 weeks (counting the ordering parts back and forth). Oh joy!
A huuuuuuuuge thank you to Laurent/Dangerous for his help, his time... And his workshop that I made a total mess of pouring so much coolant everywhere!
As you can guess, I still had some work to do after this, as the bloody Pierburg 2E2 carb never misses an occasion to act up... It was working perfectly before, but it has a few hiccups : some air intake (even though the flange is brand new), the choke doesn't work any more, etc...
In short, it needed a bit more tinkering around to get it to work neatly : changed the choke dilatation element, put a thin film of sealing compound on the carb flange, changed the head cover gasket that was leaking oil (it was brand new too...), replaced the 3 temperature probes...
But here it is, finally! Working as if it was new! Well, almost!
Posted on 07/02/2016 at 18:11
Elvira : Rebuilding the 36hp, part 3 : Closing the engine
Sorry! This article has not yet been translated in english! Please come back later!
part 3 : Closing up the engine case
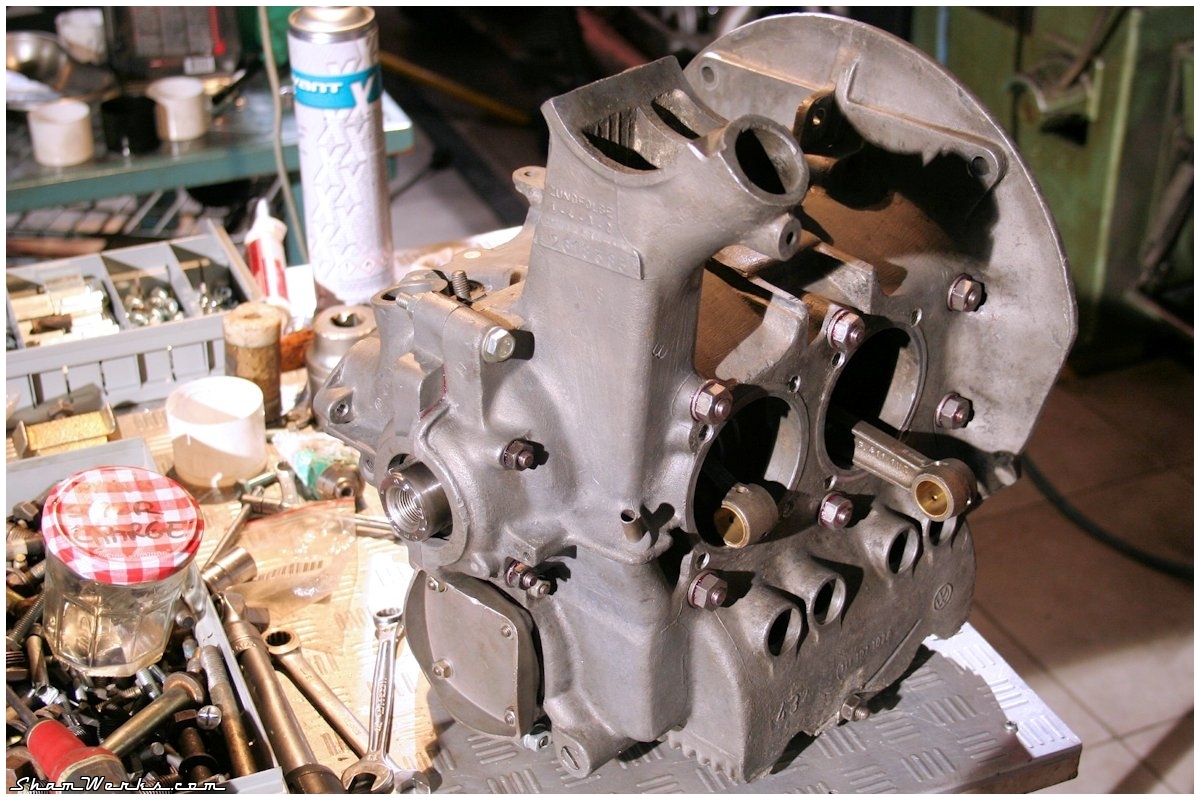
Carter moteur
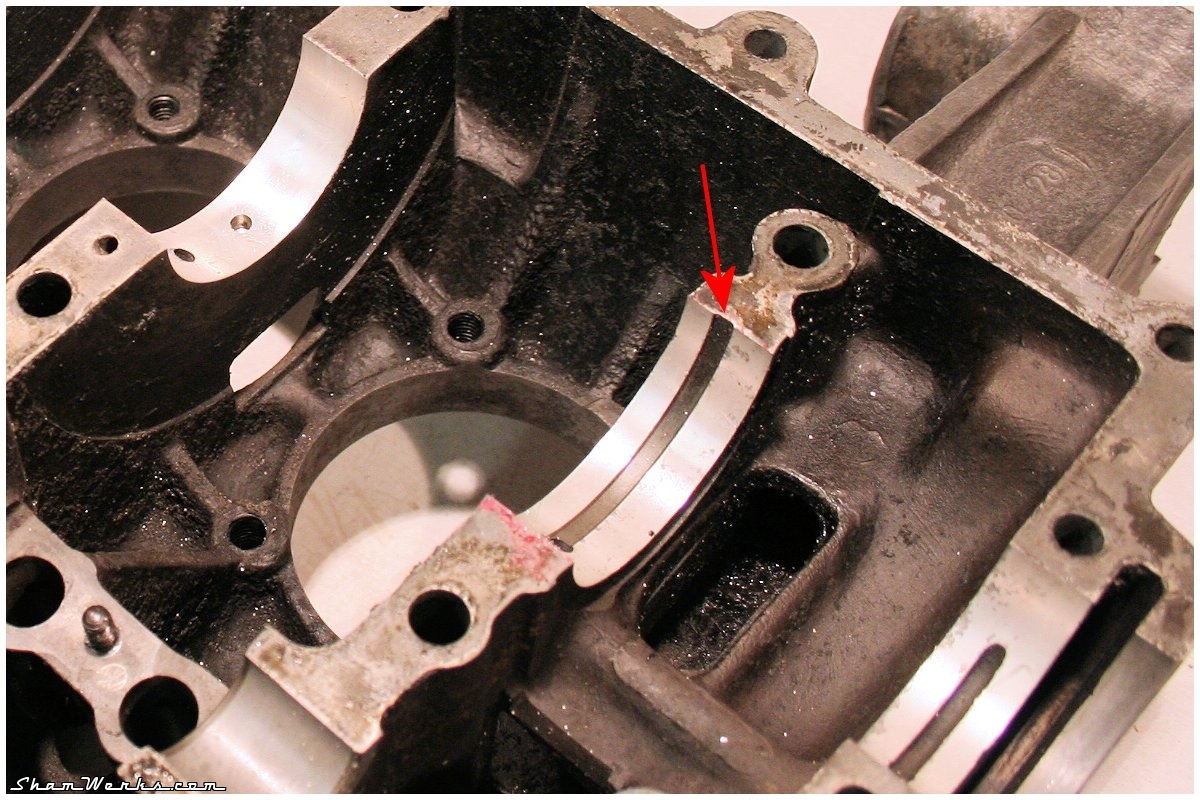
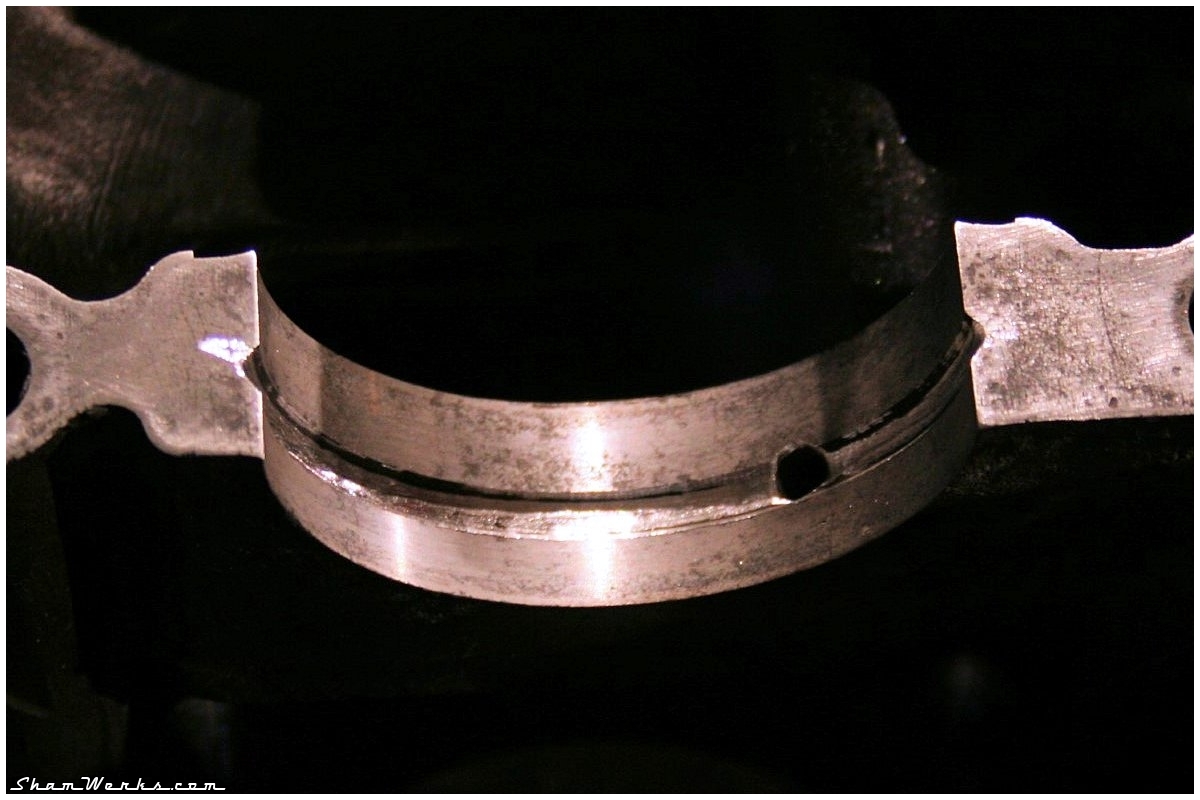
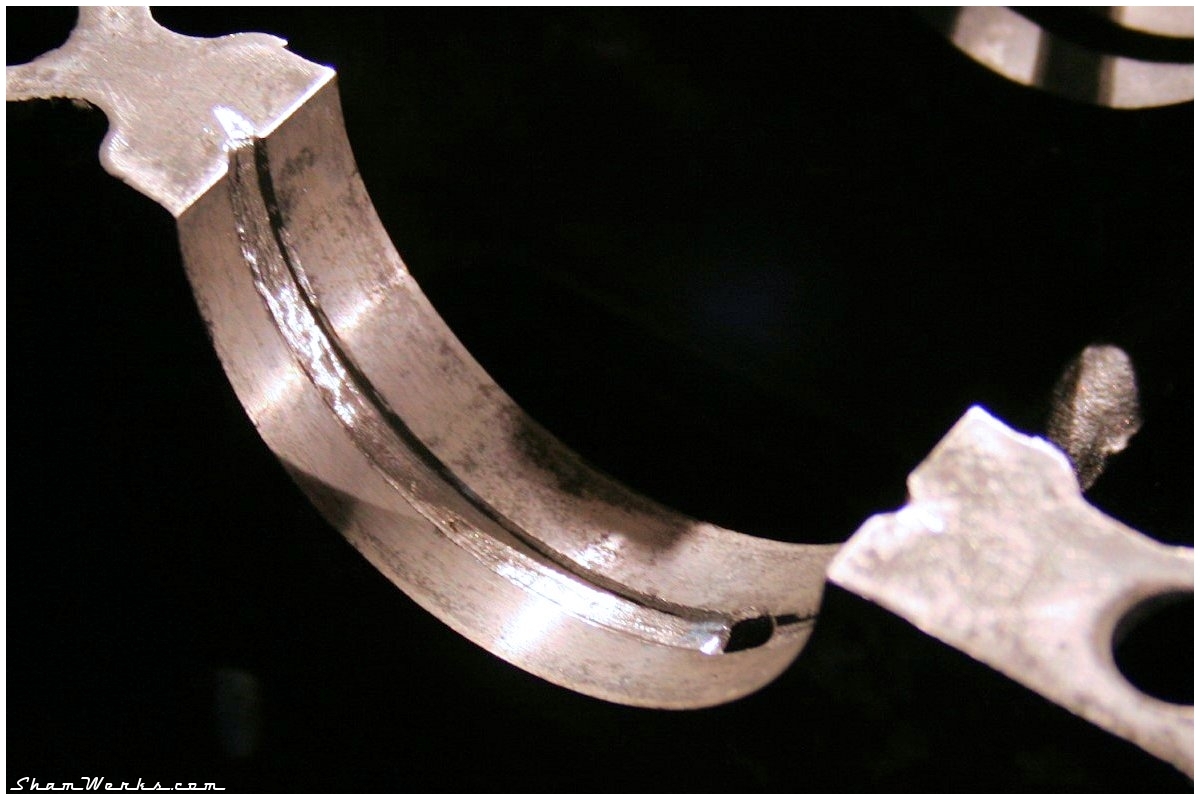
Contrairement à ce que j'annonçais dans mon précédent post (en mars 2012...) sur le sujet, la métrologie du bloc n'était en fait pas si bonne.En la reprenant à tête reposée avec mon nouveau matériel, je me suis aperçu que les paliers vilo étaient hors-cote ovalisation. Pas de beaucoup, mais j'allais pas remonter le carter comme ça, avec toutes les pièces que j'ai, c'aurait été du gâchis : Bielles NOS, axes de pistons NOS, coussinets de vilo NOS, coussinets de bielles NOS, tubes enveloppes NOS, tôles sous cylindres NOS (!), AAC "Okrasa" Joe Ruiz...
Du coup, j'ai envoyé le bloc chez Feller pour une ligne d'arbre en +0.5mm. Et là, il m'a fallu trouver des coussinets en cote réparation (dommage, j'avais des NOS VW en cote origine dans leur boite!)... Pas évident pour les pieds moulés! Classic-Store en a en stock, mais de piètre qualité (Sintermetal, fabriqué en Argentine), même eux recommandent de ne pas monter ça! ("mais ils ont le mérite d'exister")
Après 18 mois de recherches, je les ai finalement trouvés en Allemagne. NOS VW, 150€ le jeu hors port (ouch!), mais bon, pas vraiment le choix... On est déjà fin 2013, et entre-temps je me suis lancé sur le moteur du KG. Le pied moulé a alors sagement attendu sur son étagère...
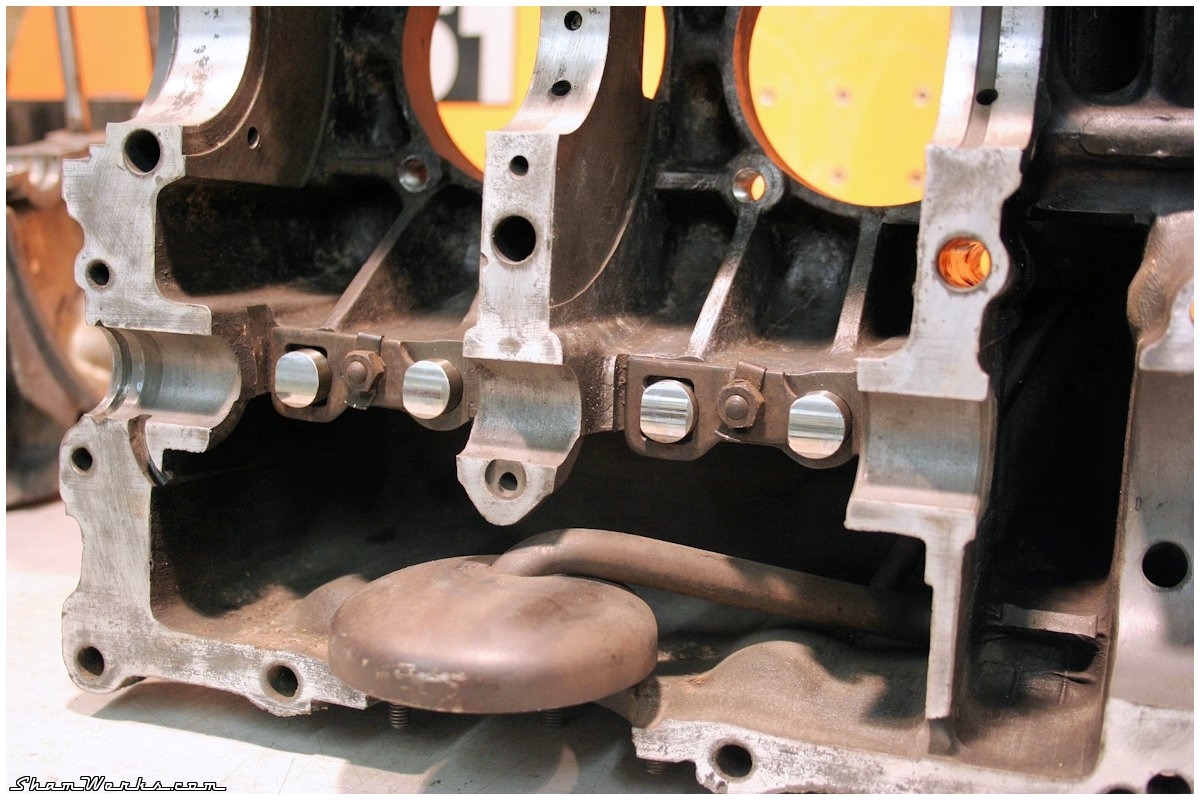
Mais c'est fini, il est temps de refermer le bébé!
Janvier 2016, je vais chez Laurent (Dangerous - merci ma caille!) fermer le bloc : il a plus l'habitude que moi, et on sera pas trop de 2 cerveaux pour tout vérifier au montage. Ce qui ne nous empêchera pas d'oublier la tôle sous cylindre au culassage ceci dit...
Ca veut dire aussi un peu moins de photos étape-par-étape, conditions d'éclairage pas idéales dans son atelier.
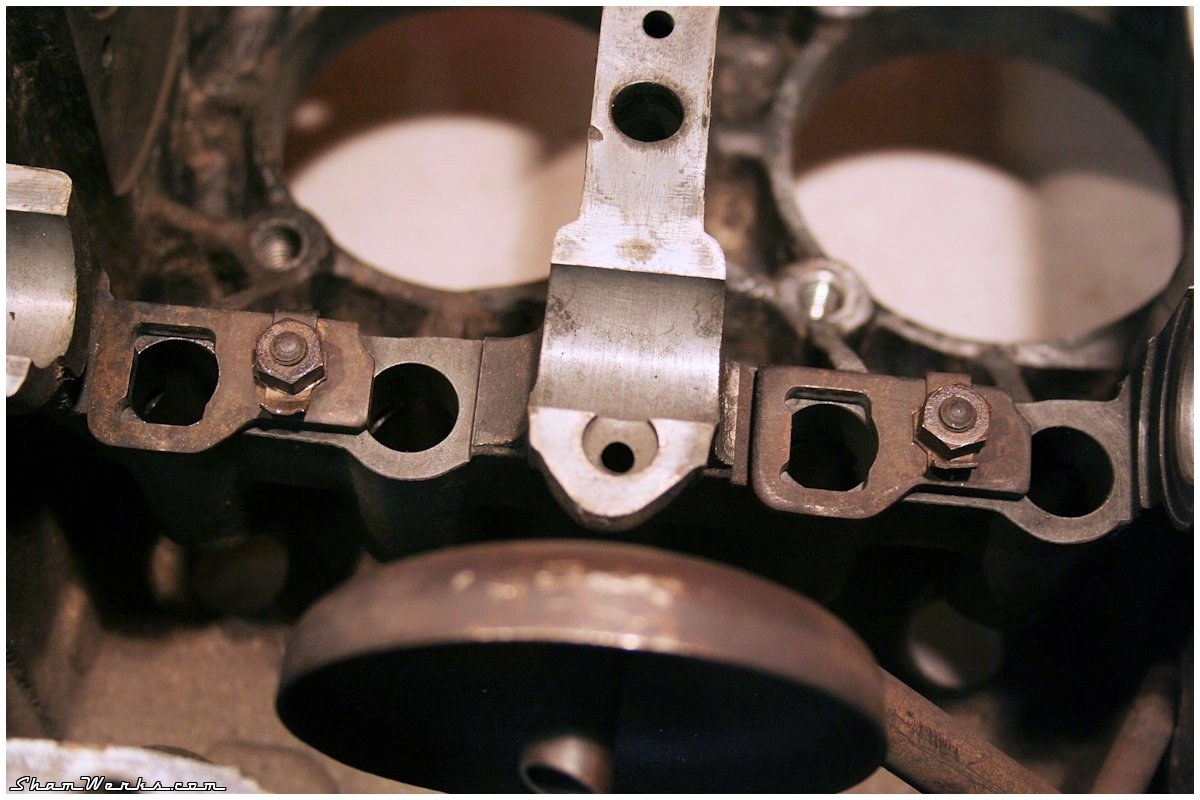
Mais avant d'oublier, je replace les petites plaques de guidage des poussoirs (qui ont un méplat et ne tournent pas sur pied moulé). Serrage léger avec une goutte de frein filet, et je replie la patte de blocage sur l'écrou. Ca se fait un peu au feeling, le poussoir doit coulisser gras avec un très léger jeu.

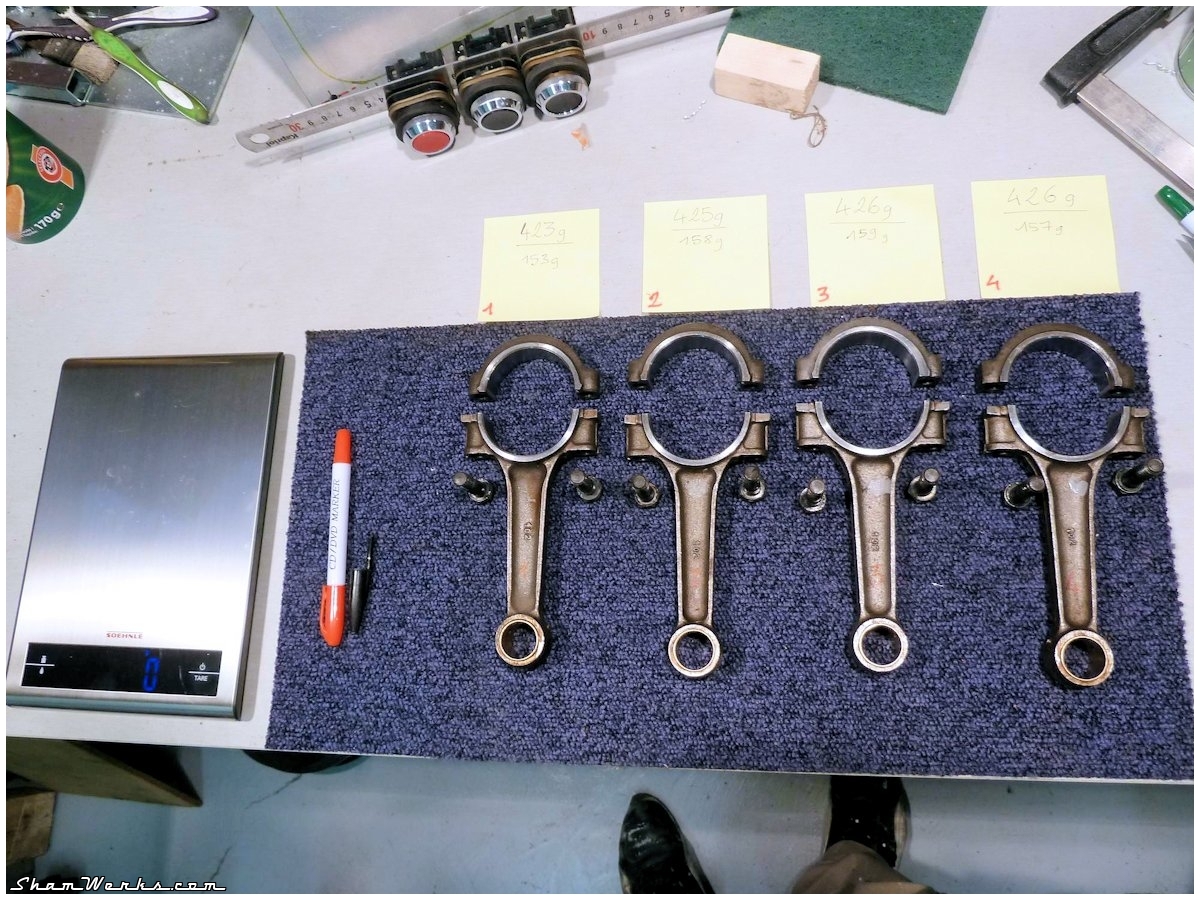
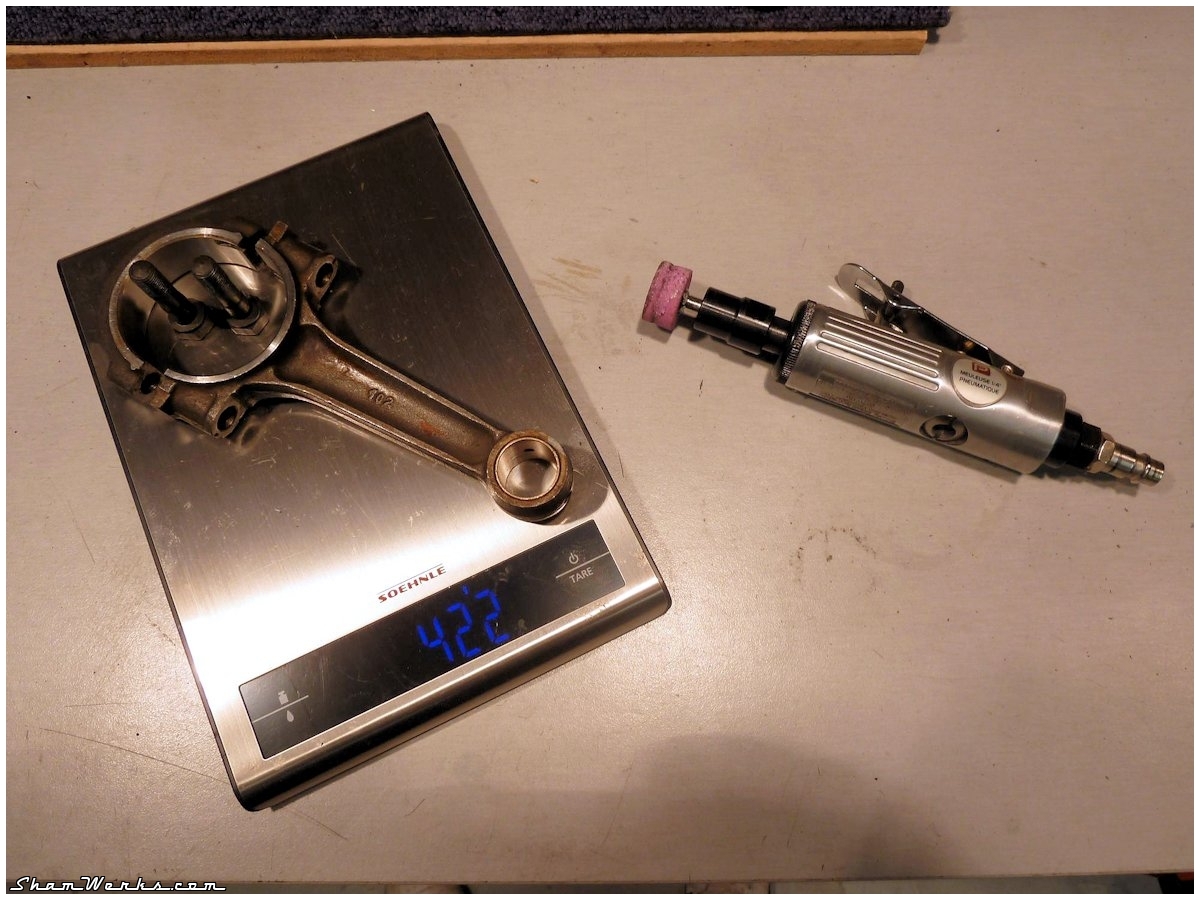
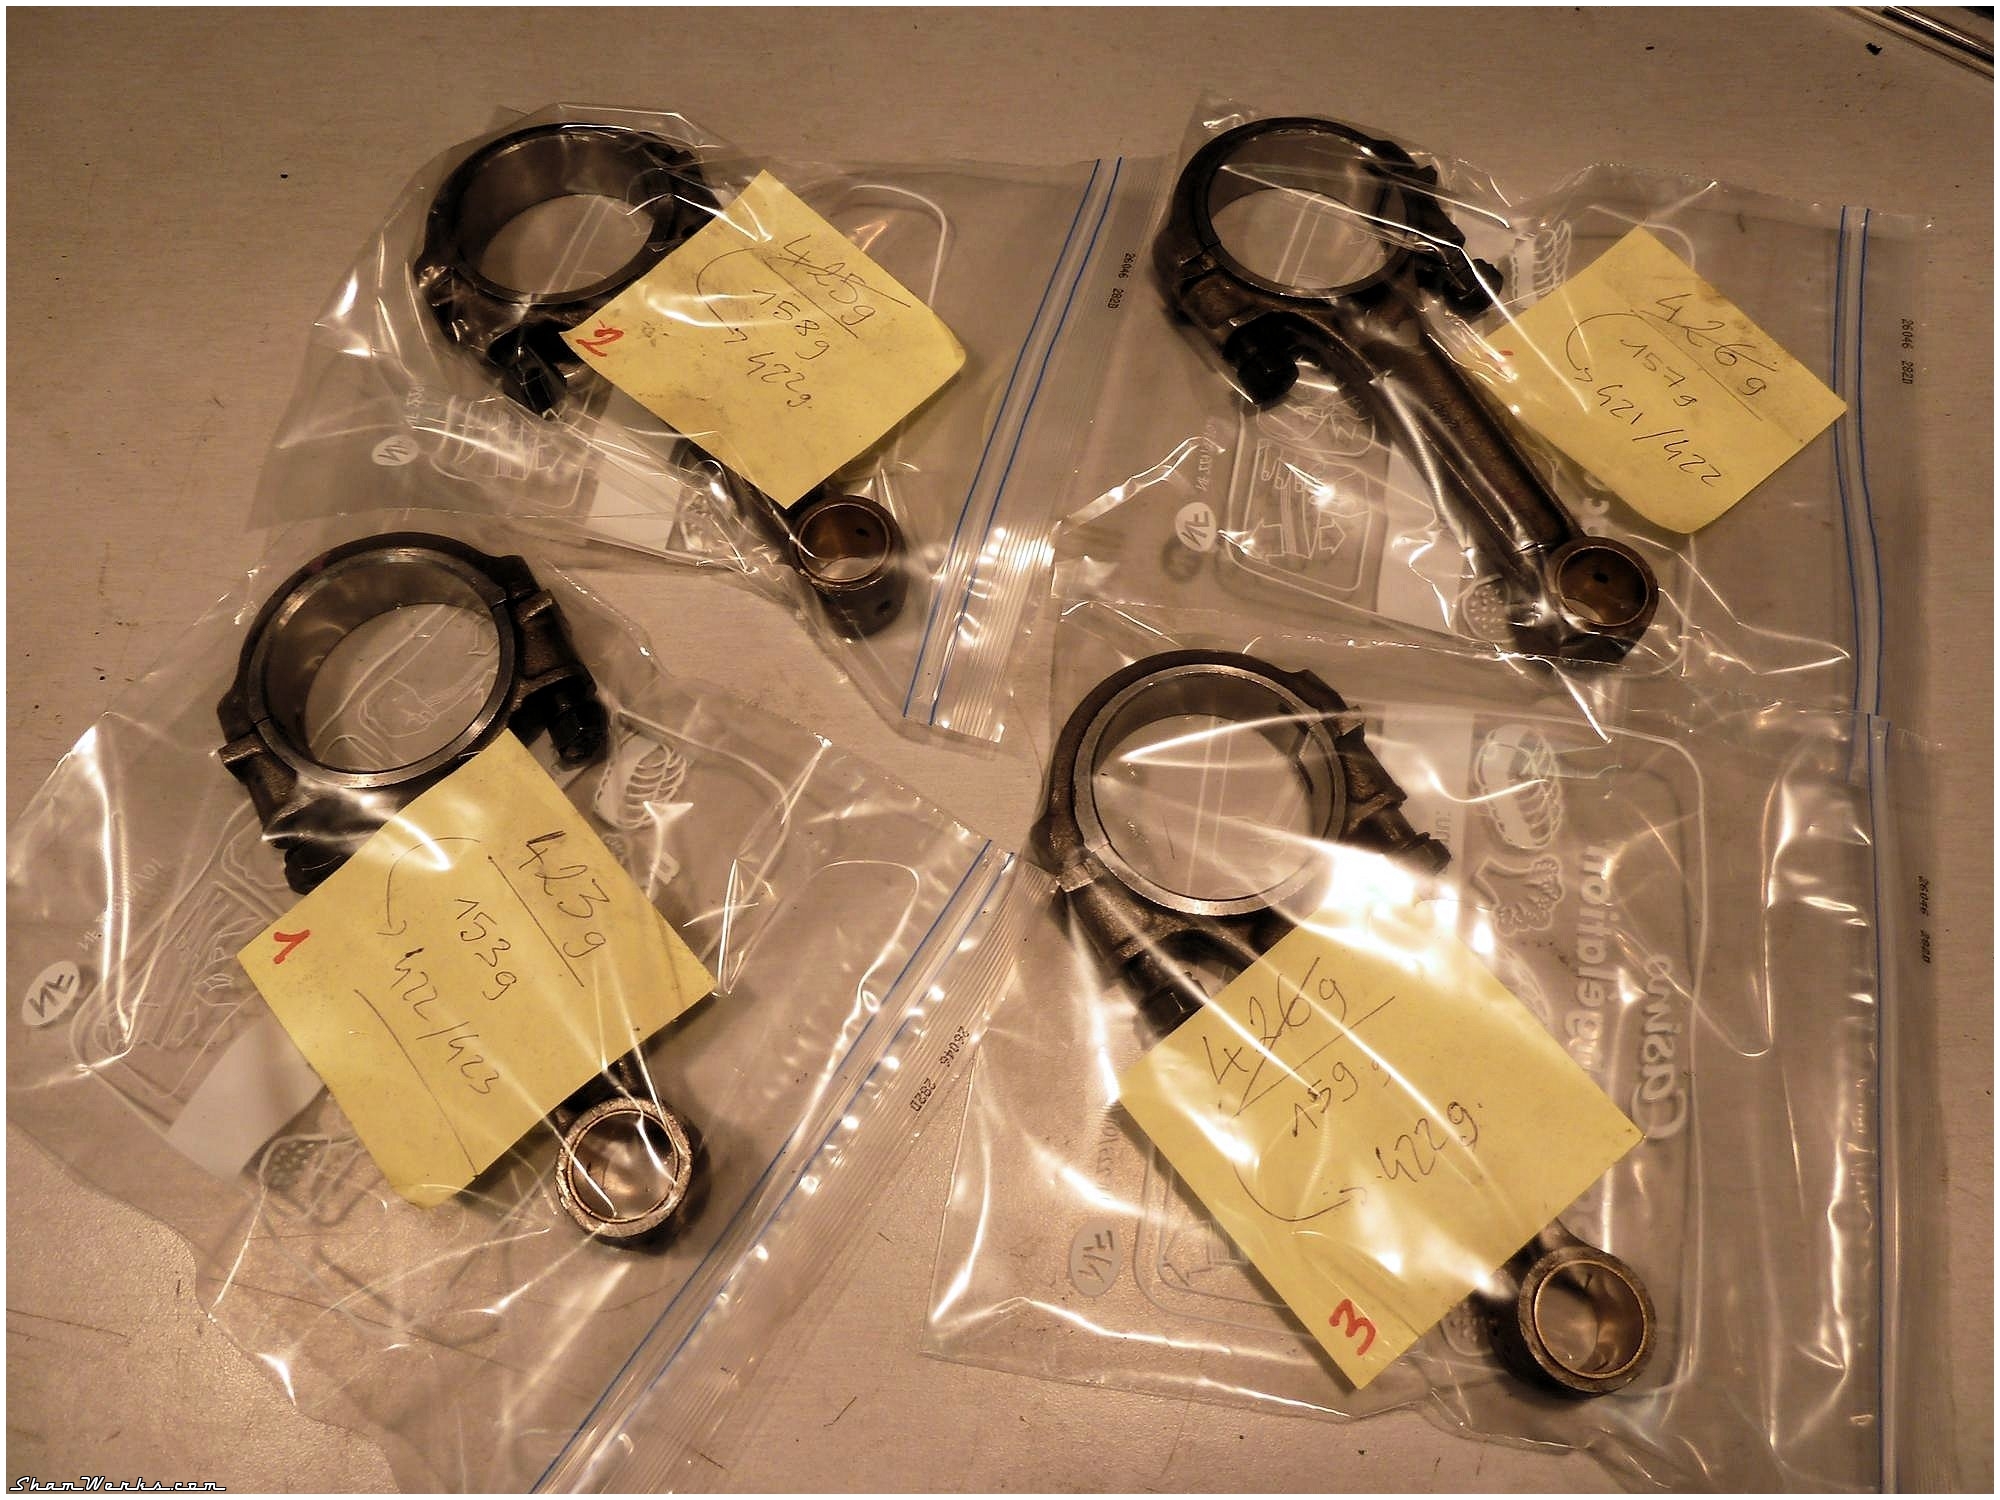
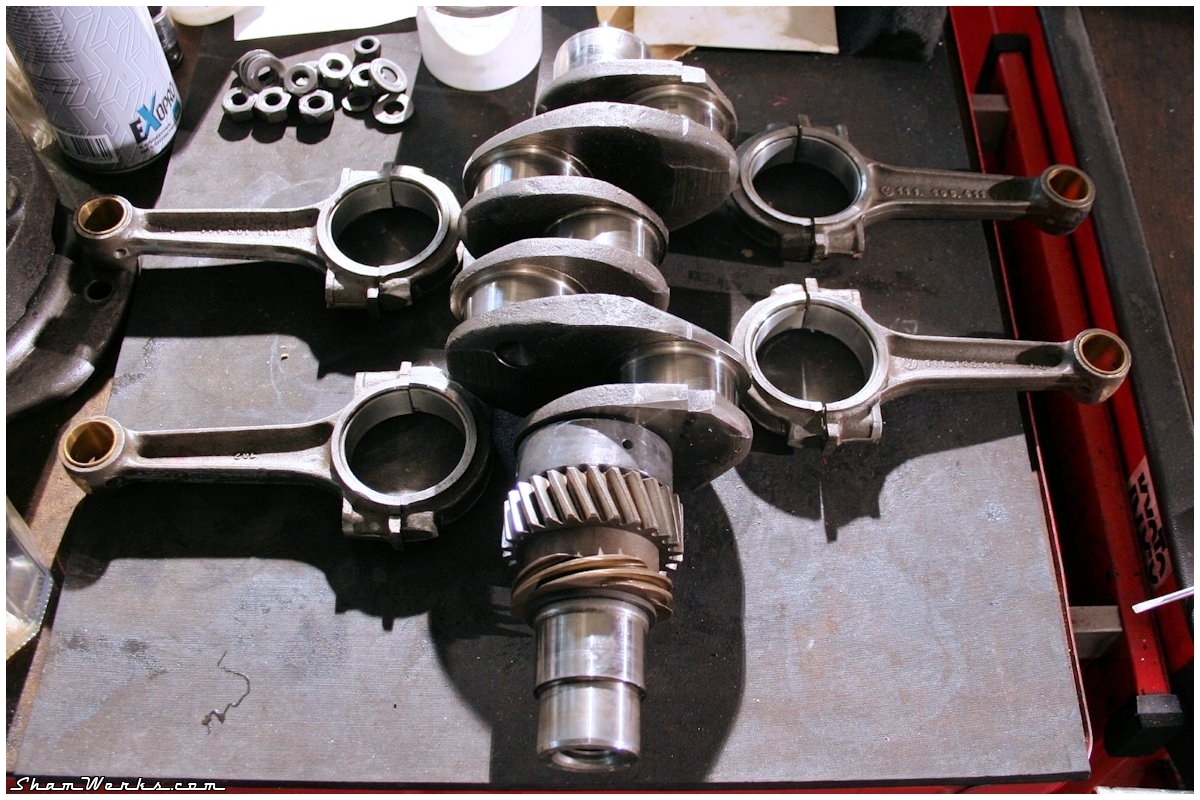
Bielles
Les bielles NOS sont d'abord mises au poids, dégrossissage à la meuleuse pneumatique, et finition à la lime électrique : j'ai 0.7g d'écart entre le plus lourde et la plus légère.Leurs coussinets (NOS eux aussi) sont déglacés avec un bout de tampon Jex usé (à l'huile), installés, et le jeu avec le maneton de vilo vérifiés au Plastiguage.
Au montage, je lubrifie les manetons au Wynn's Supercharge, pour assurer la lubrification lors du montage et jusqu'au premier démarrage. Comme c'est très visqueux et collant, ça ne se fera pas la malle comme de l'huile...

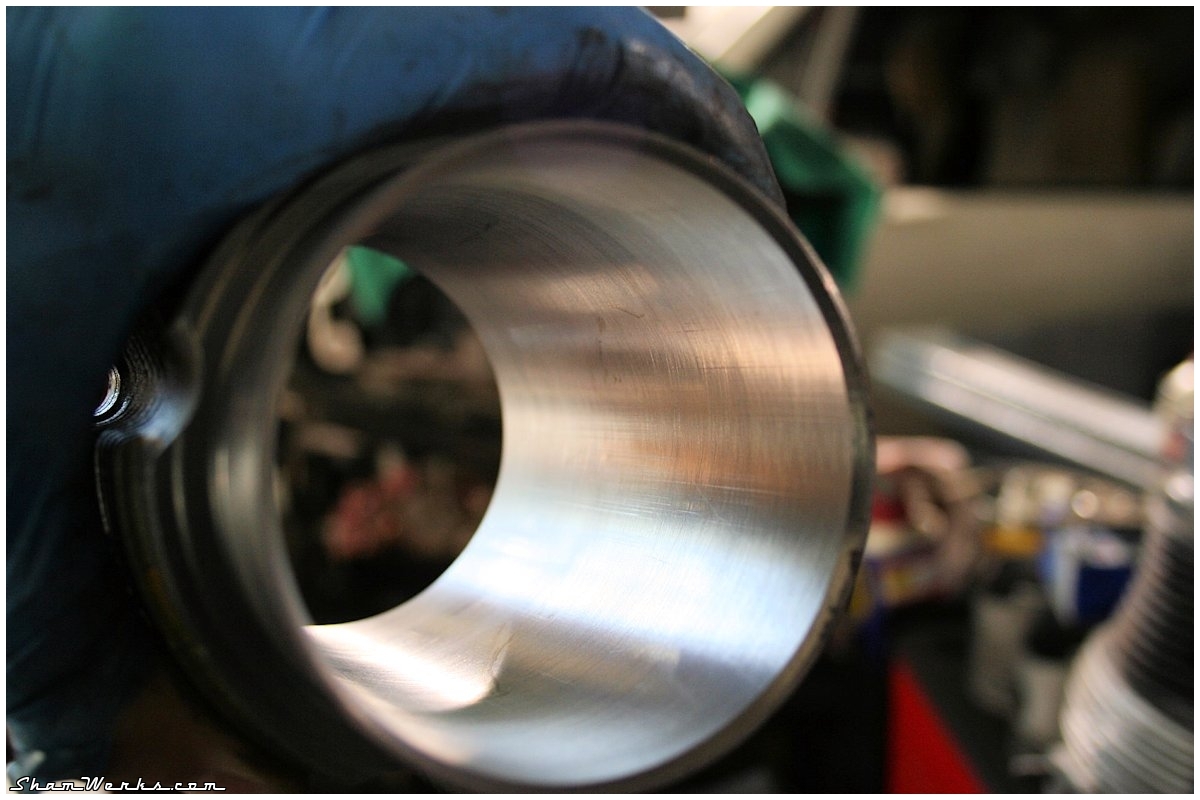
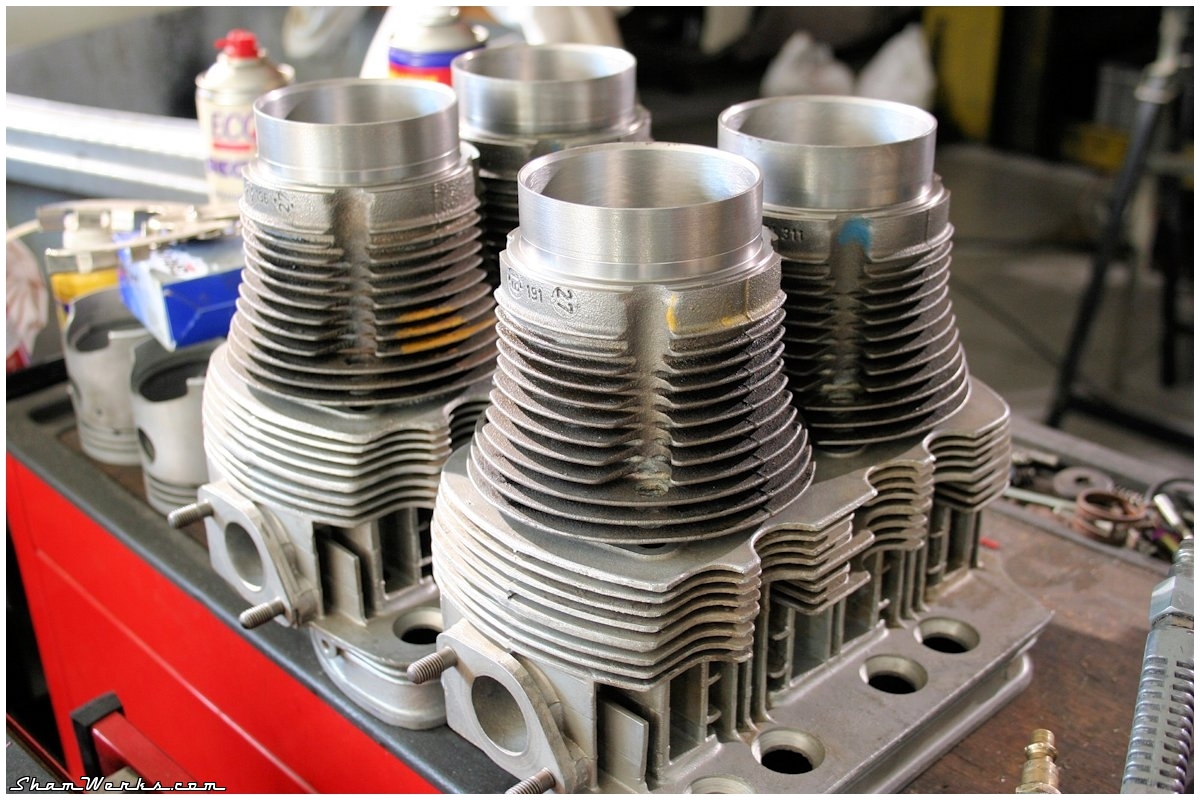
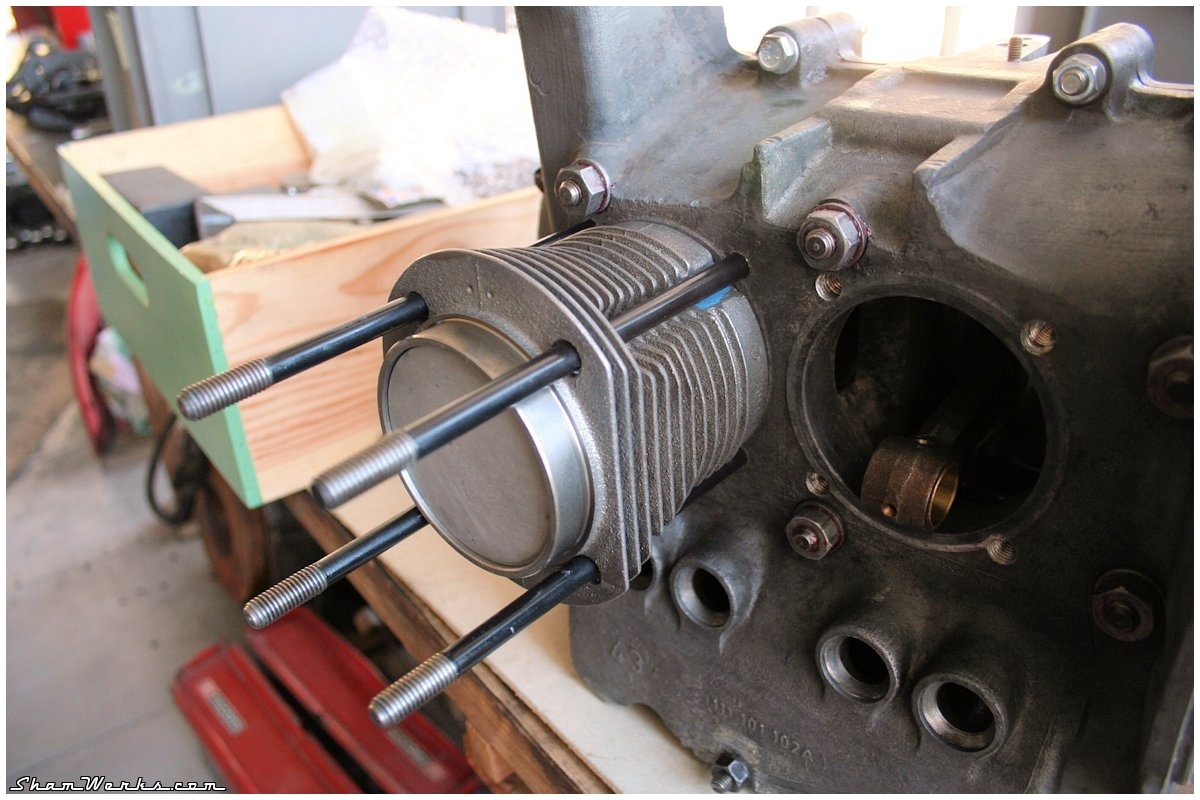
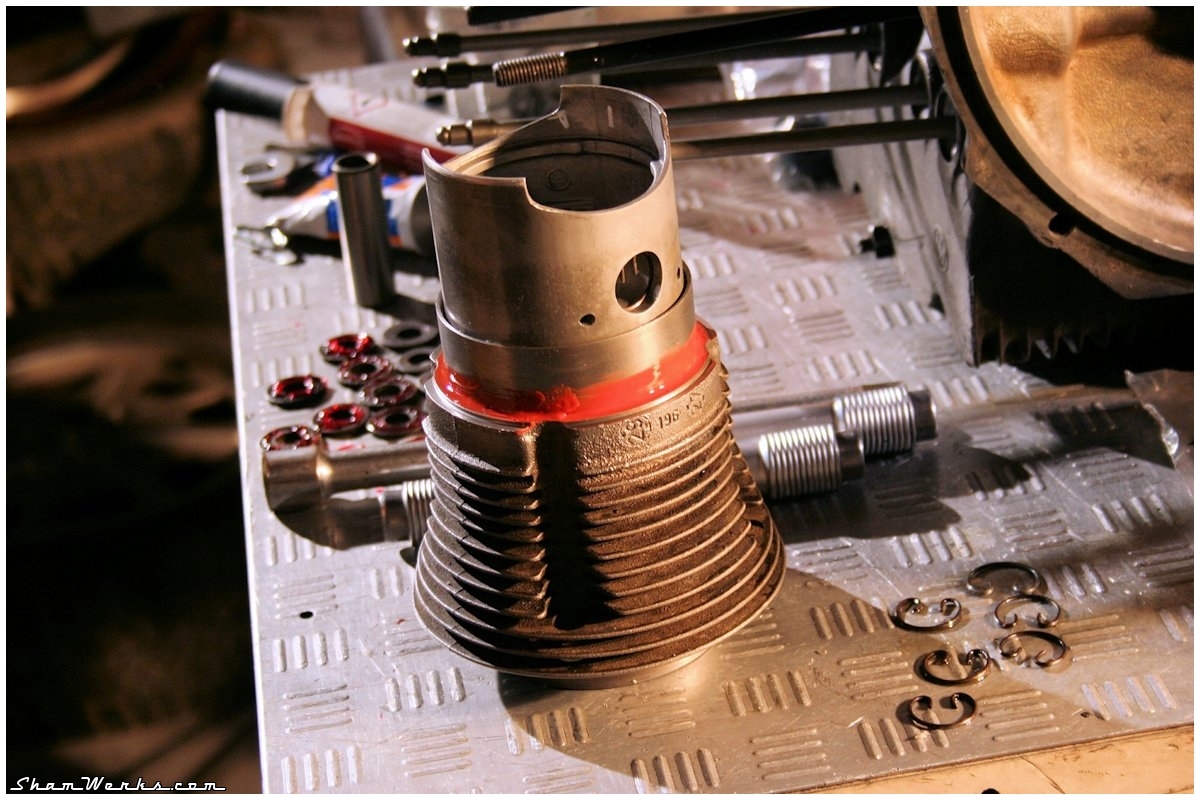
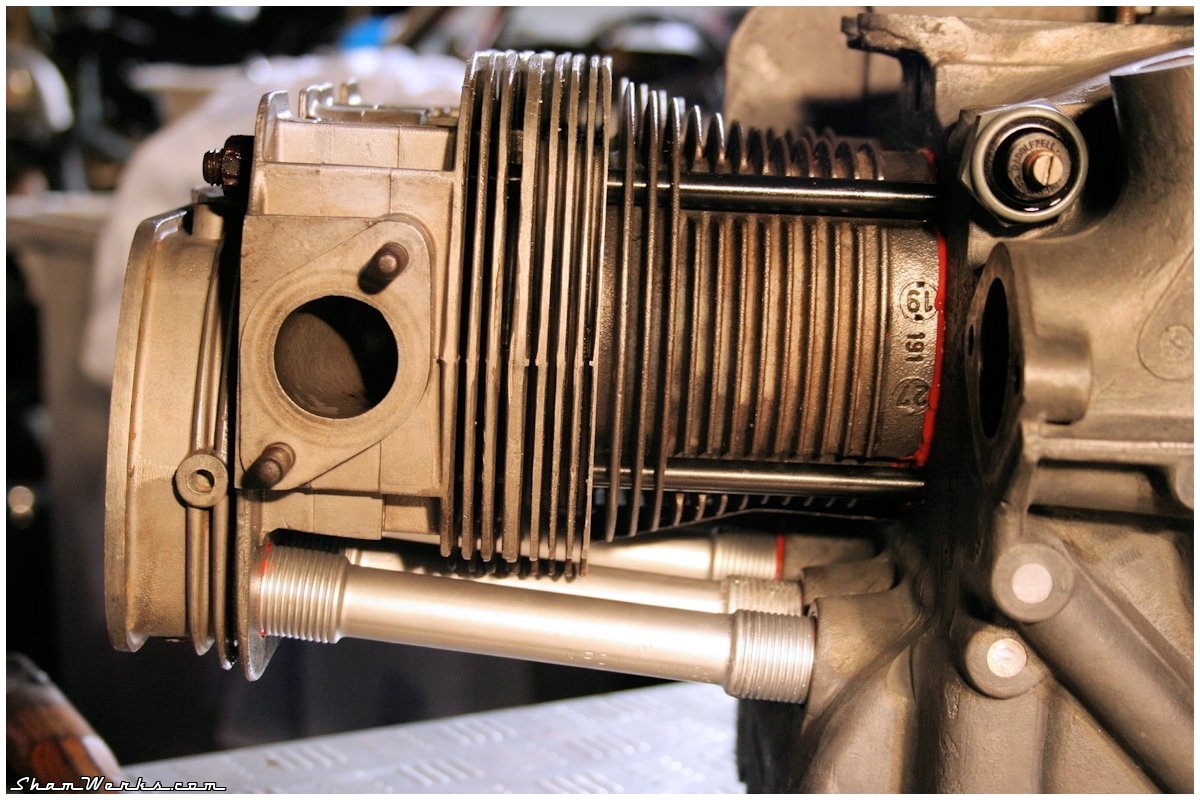
Cylindres / Pistons
Les têtes de pistons sont passées au marbre : polissage pour limiter le transfert de chaleur.Les cylindres ont été contrôlés en même temps que les pistons : tout est dans les cotes. Clairement le kit n'a que très peu roulé : perso j'ai du faire 2000km max avec ce moteur, je suppose que les chemises/pistons avaient été montés neuf dessus.
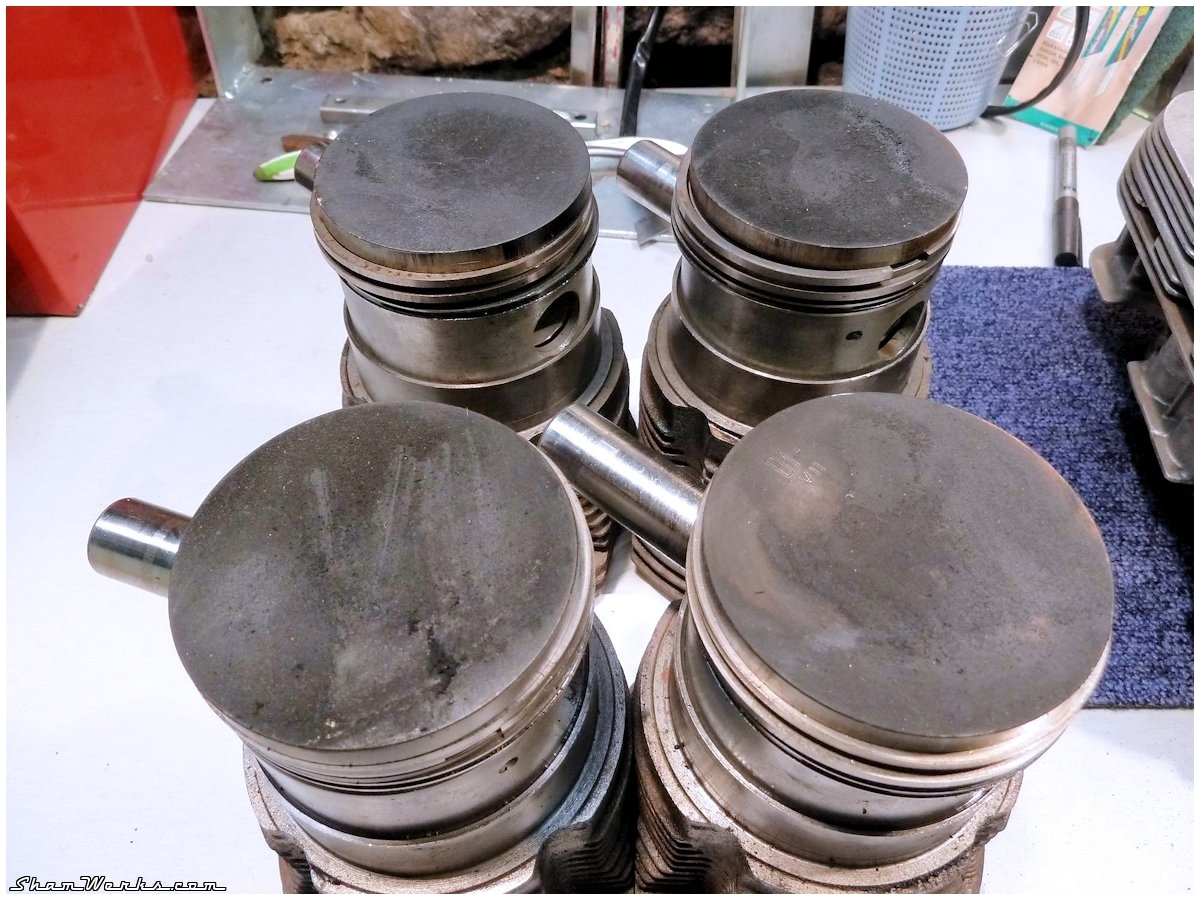
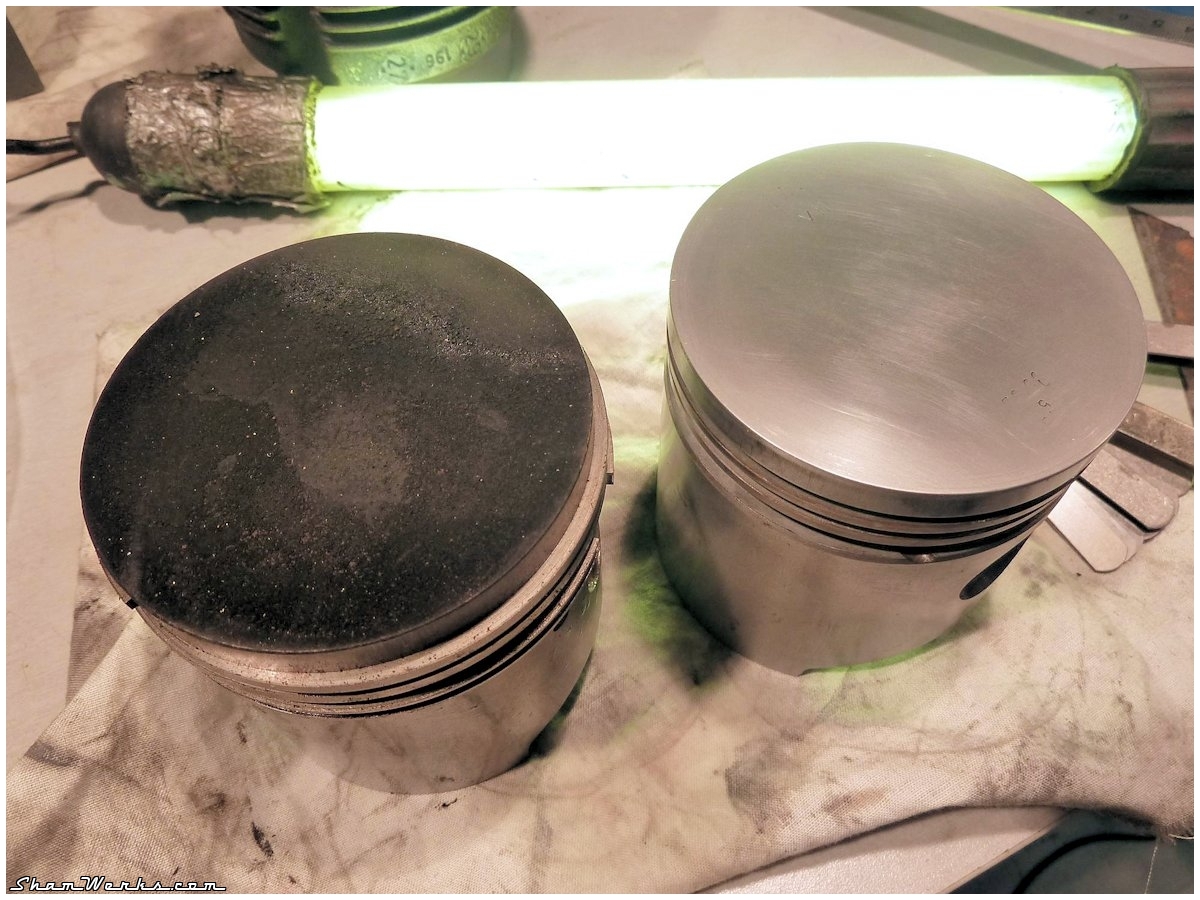
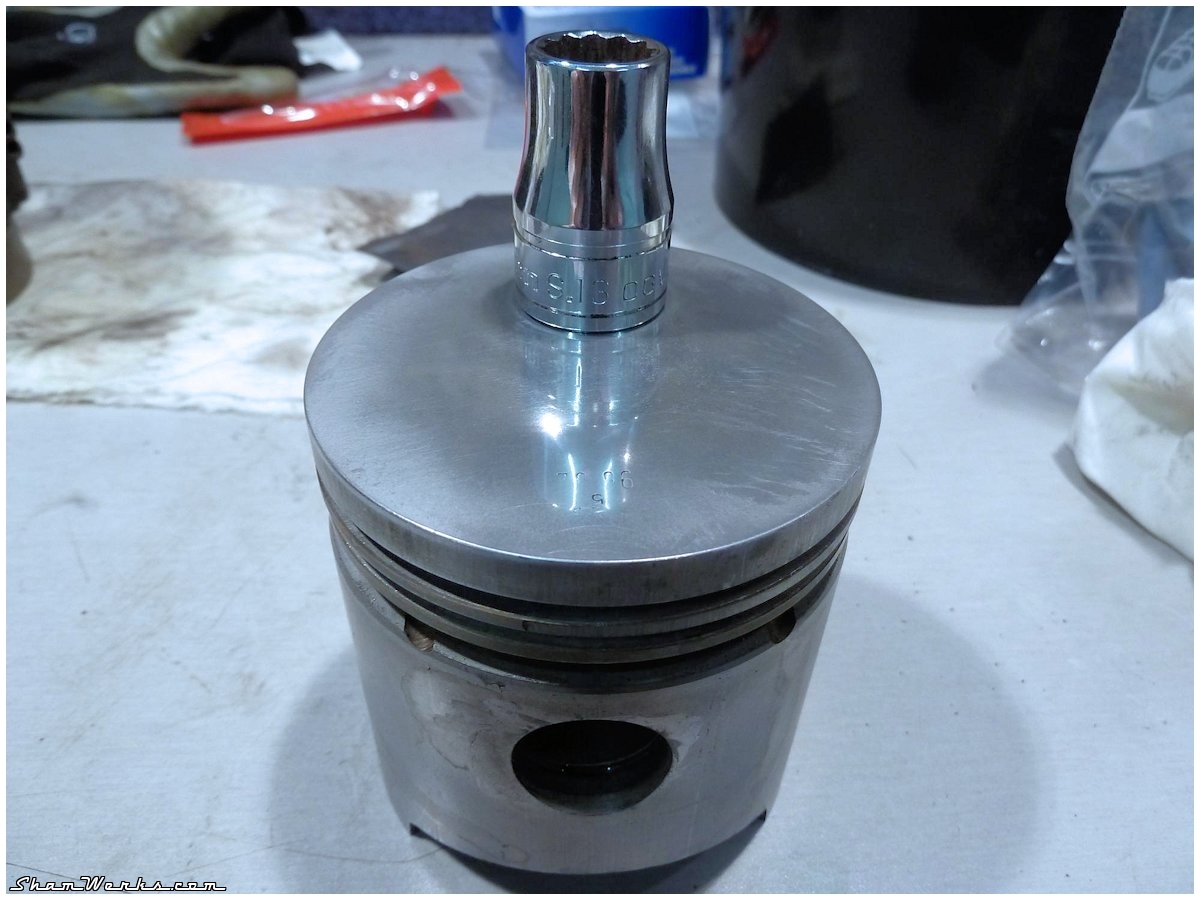
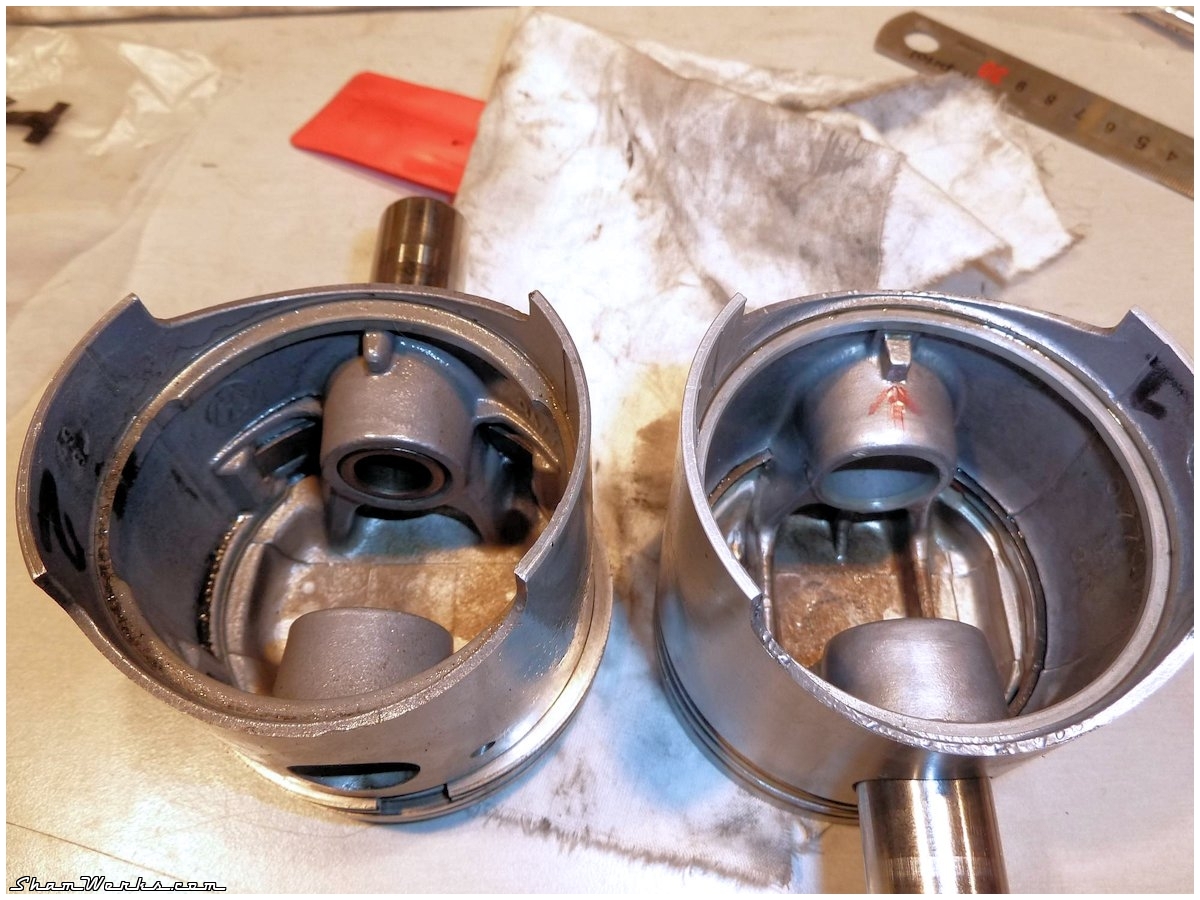

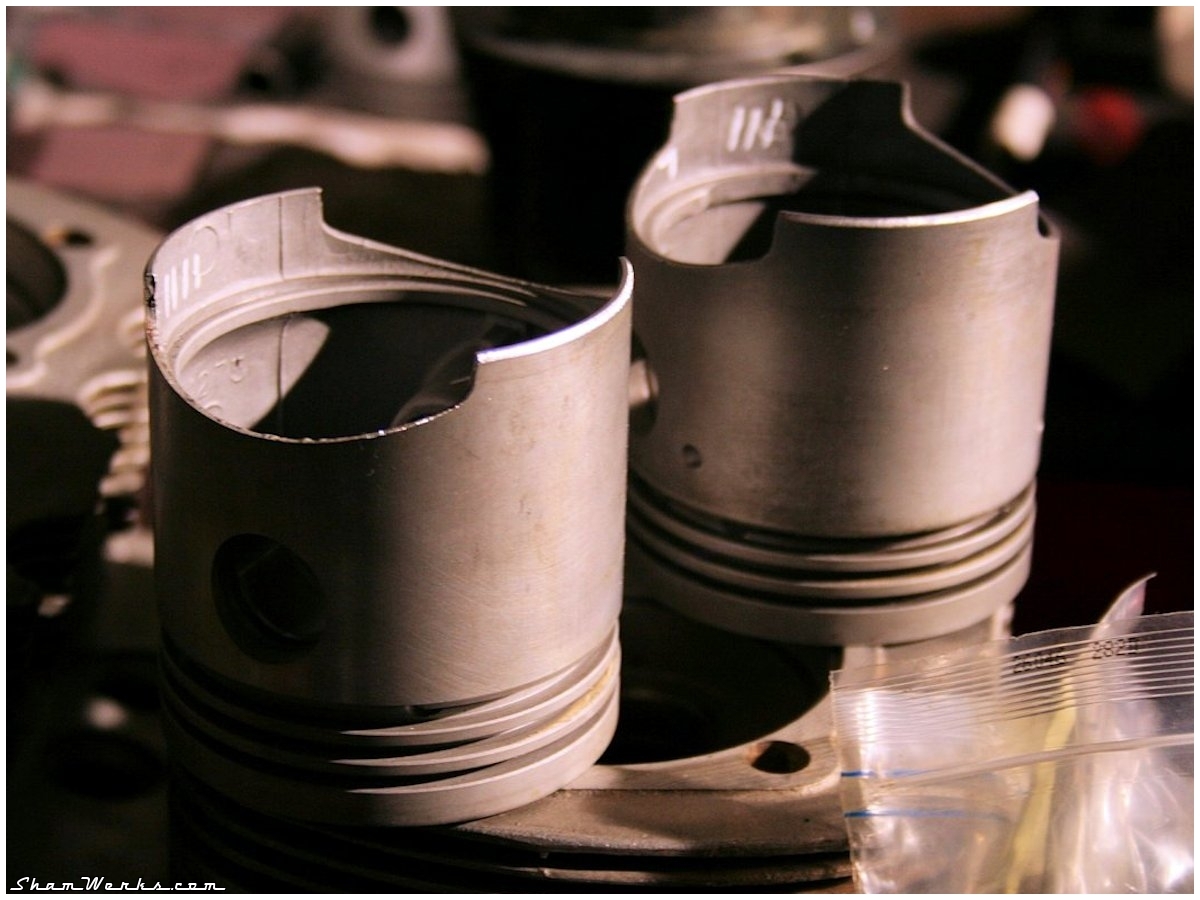
Les pistons sont gentiment préparés : un petit chanfrein sur le bas de la jupe (à la lime electrique : super outil, il m'en faut une!) pour aider la création du film d'huile, angle cassé à la tête (doucement au papier de verre 800), et mise au poids (pas évident, 2 fonderies différentes, j'ai du me résigner à avoir deux plus lourds et deux plus légers, chaque couple mis en opposition 2 à 2).
Je contrôle derrière le jeu à la coupe des segments : la RTA donne entre 0.35 et 0.62, j'ai 0.35 serré sur les 8 segments d'étanchéité, parfait. Je les monte en y allant doucement sur la pince à segments, et en huilant tout bien ; on vérifie bien que l'inscription "top" est vers le haut, on tierce en tenant compte de l'orientation vers le VM (deux ouvertures du segment racleur en haut, décalées de 45°, deux ouvertures segments d'étanchéité en bas à 120°).
Finalement, les pistons sont emmanchés dans leur cylindre respectif avec un compresseur de segments, et beaucoup d'huile.

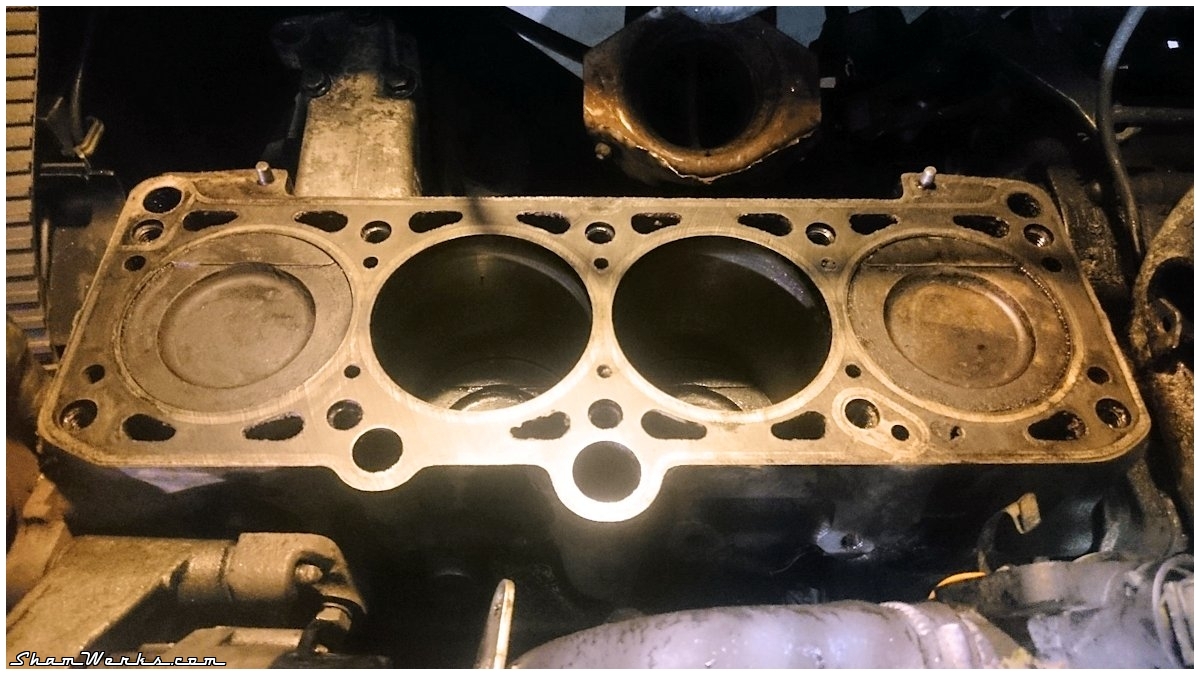
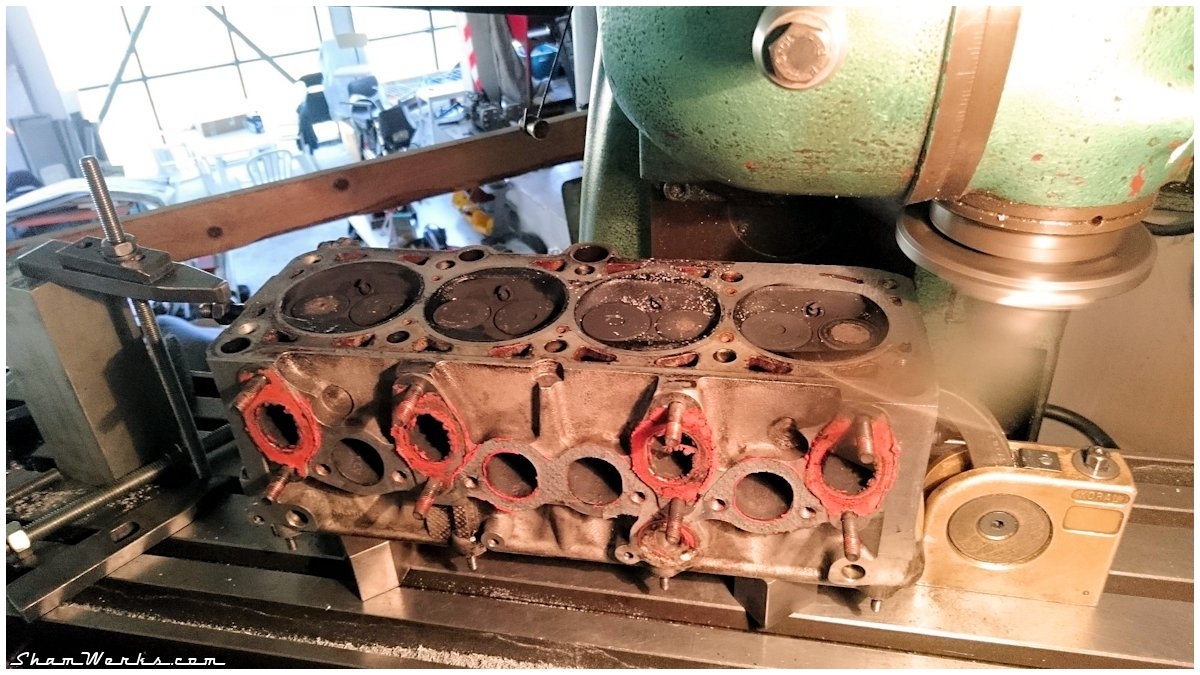
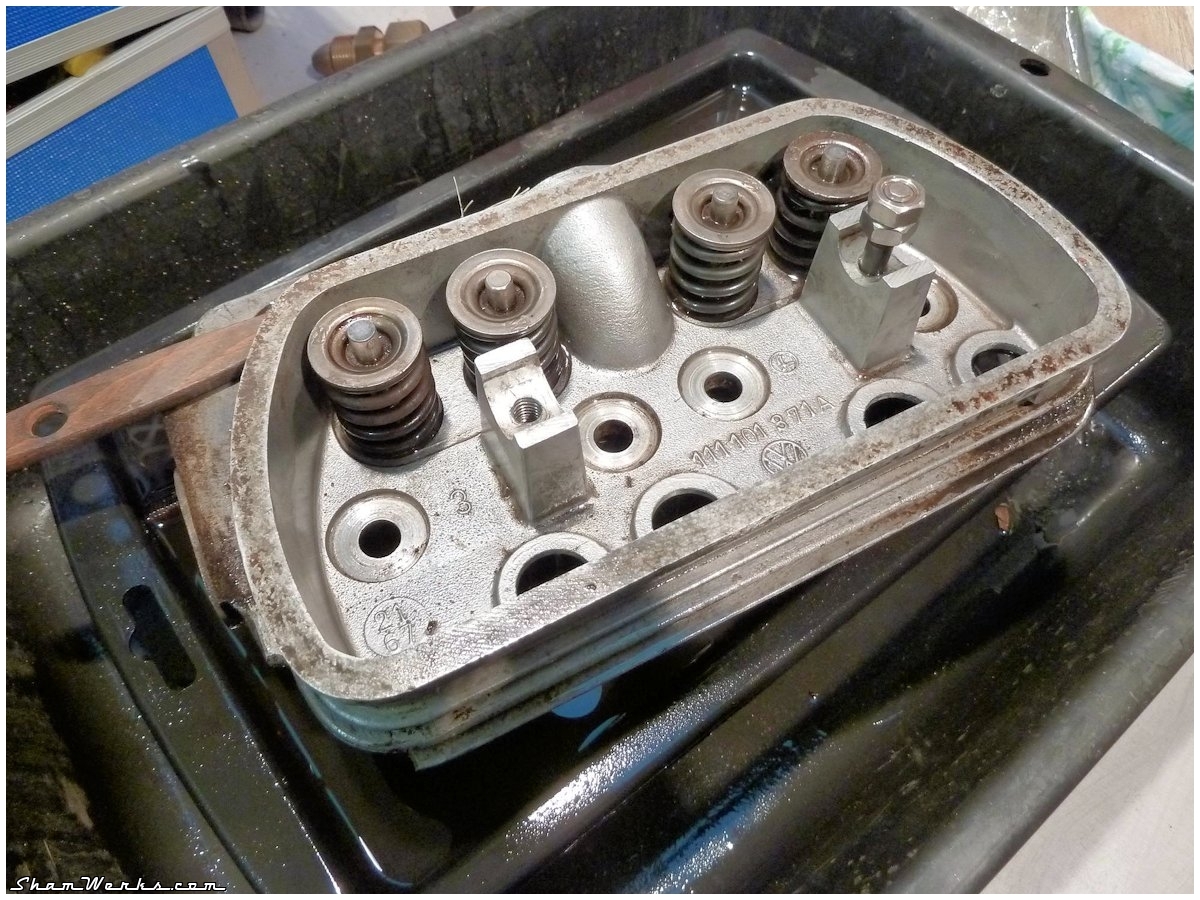
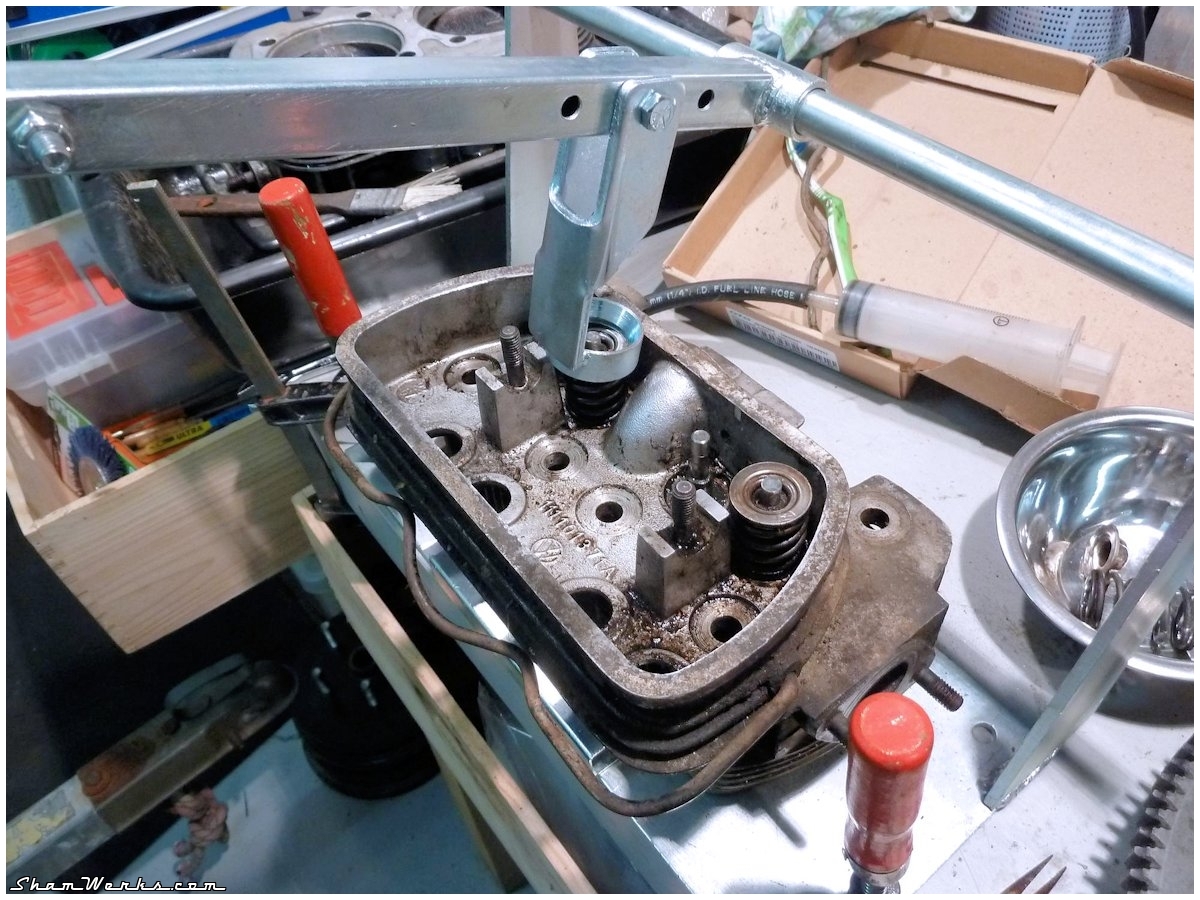
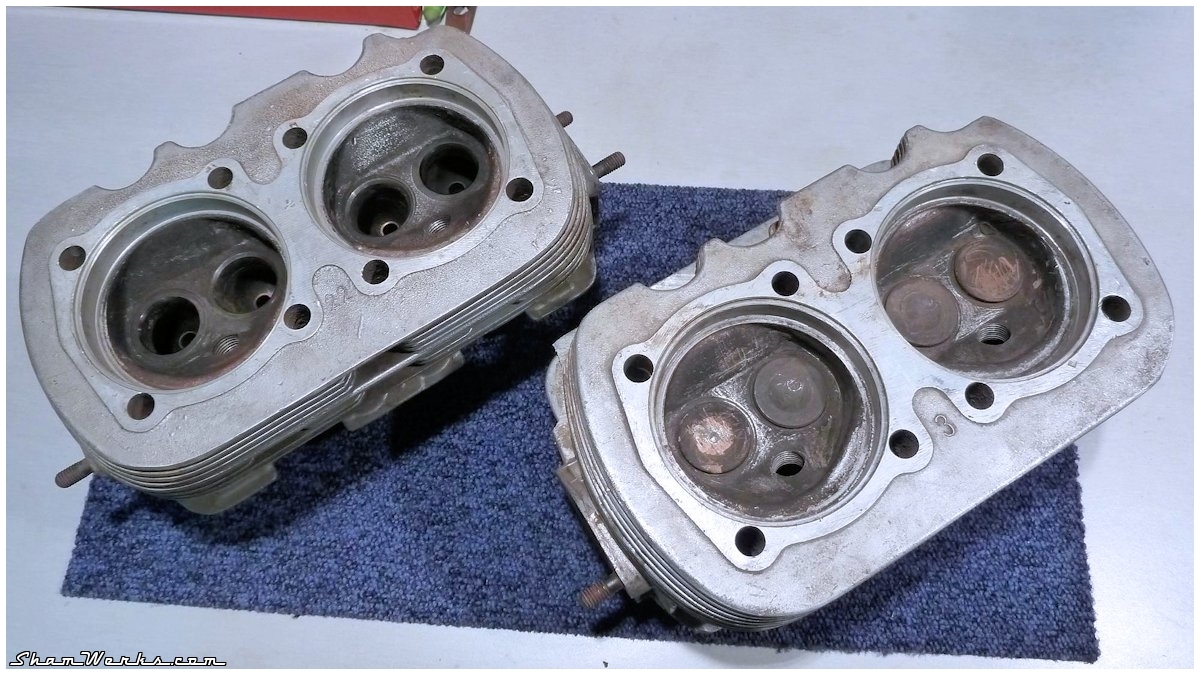
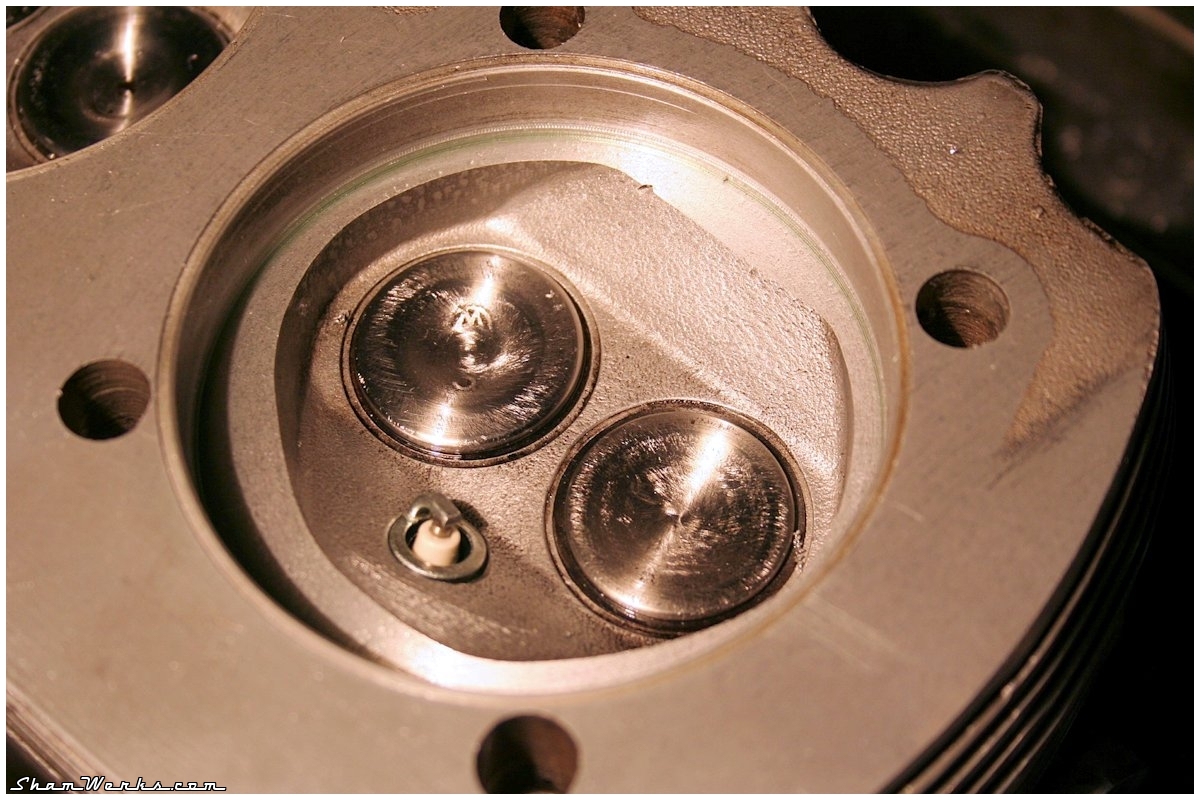
Culasses
Beaucoup de travail sur les culasses que j'avais trouvées à Valence...Après un nettoyage en règle à l'essence F, je les ai microbillées pour y voir clair. Pas de mauvaises surprises, un micro-bout d'ailette cassé, rien de méchant ; et surtout, aucune fissure. Banco! ("je l'entends encore... Banco..." : un cookie pour celui qui capte la référence).
A propos : il vaut mieux boucher les guides de soupape pour le micro-billage : un bon plan pour ça, c'est les bouchons d'oreille jetables en mousse!

Alors on se retrousse les manches et on y va!
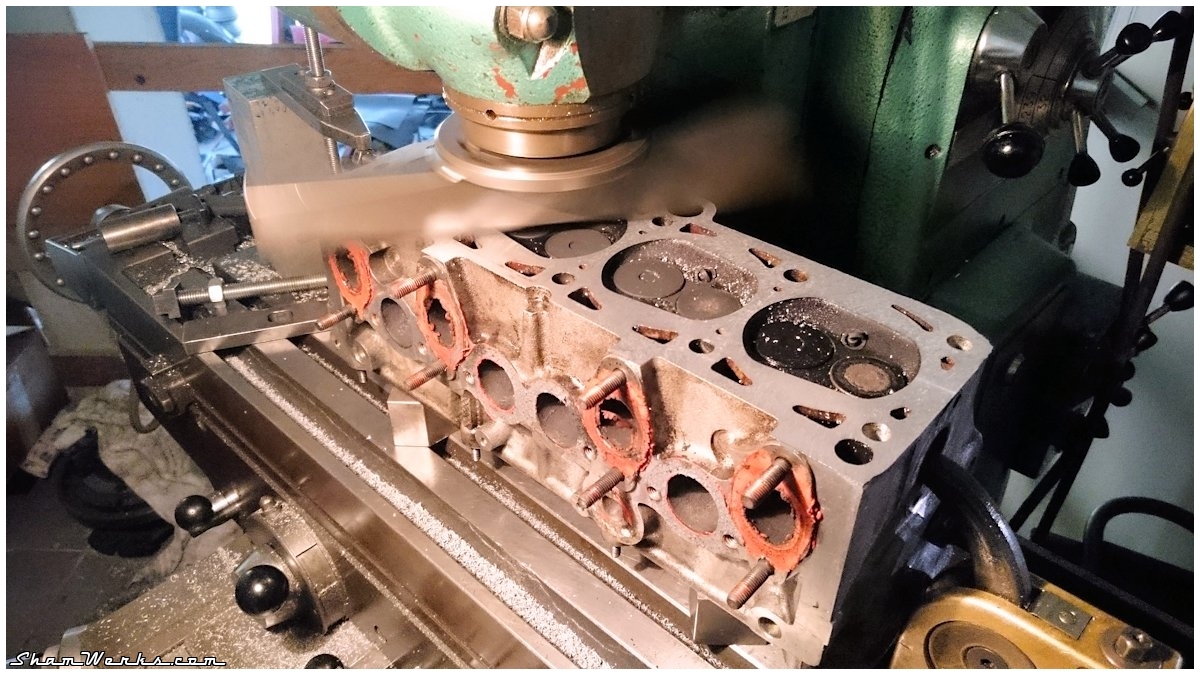
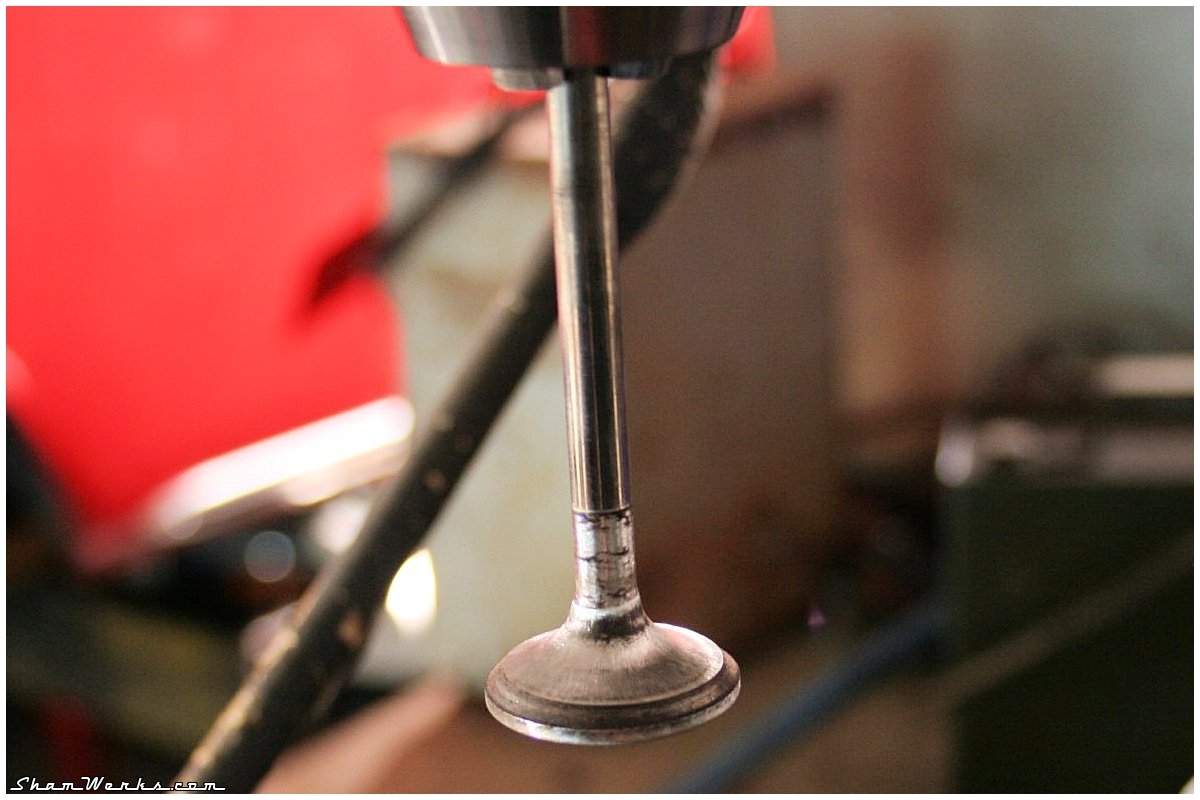
Pour commencer, les sièges de soupapes sont retouchés trois angles pour améliorer le flux (il y a une vilaine marche d'origine) : faut y aller tout doux, y'a pas beaucoup de viande pour travailler.
Ensuite, les soupapes sont nettoyées et légèrement modifiées : montées sur une perceuse à colonne, et retouchées à la lime électrique. Lissage, la tête un peu diminuée pour retirer le bossage... Le but est toujours d'améliorer le flux ; tout doux encore, y'a pas beaucoup de matière.
Les soupapes sont rodées sur leurs sièges, et les demi-clavettes de queues de soupapes réduites (au niveau du plan de contact, pour bien plaquer sur la soupape ; les clavettes se touchaient et du coup avaient du jeu sur la soupape).
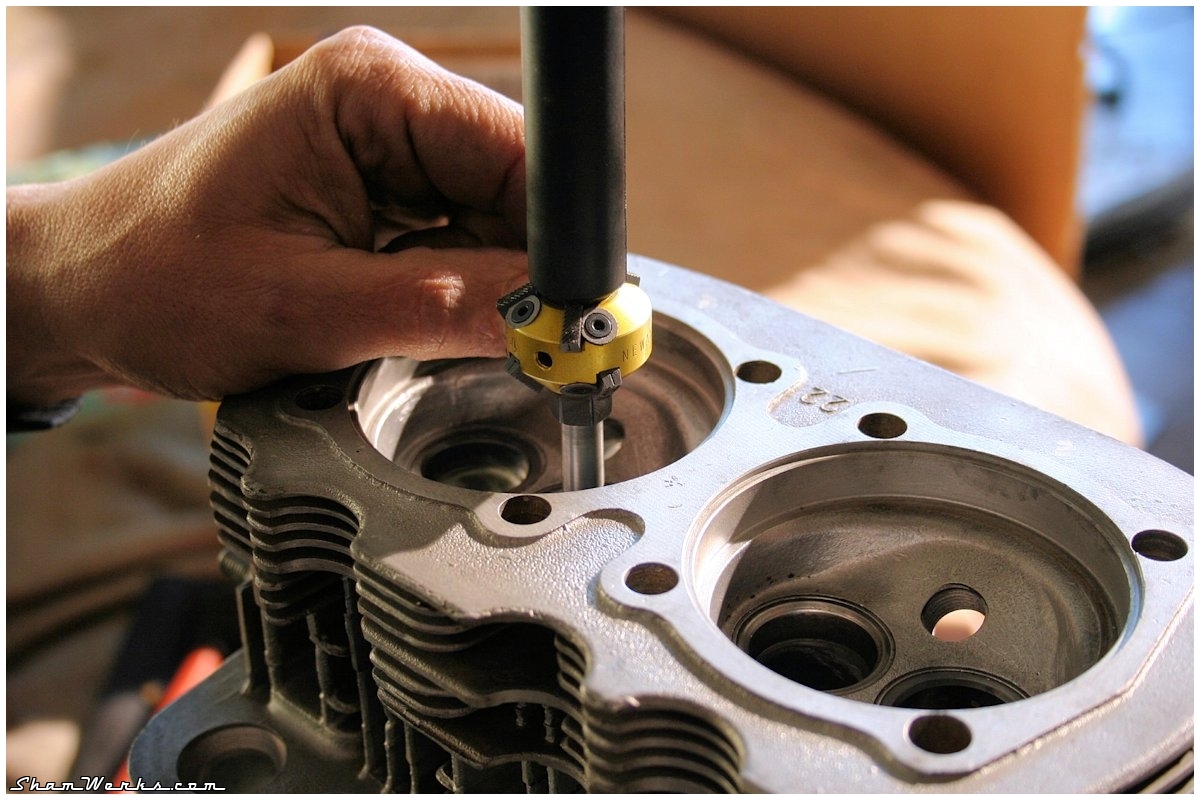
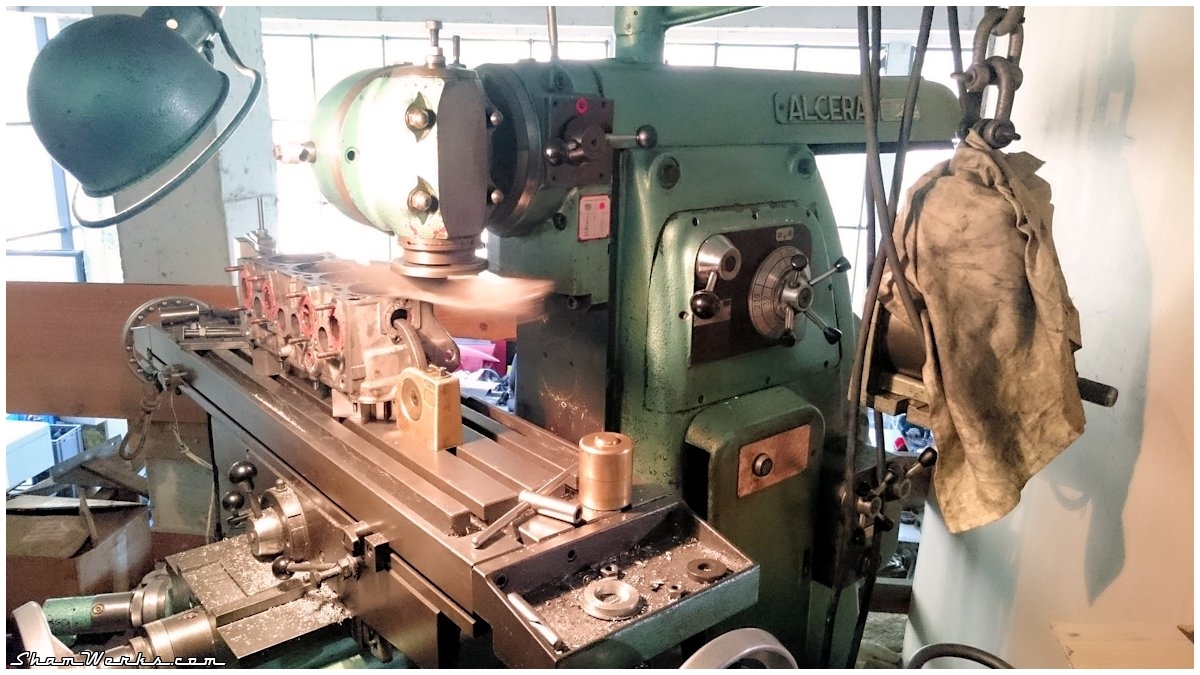
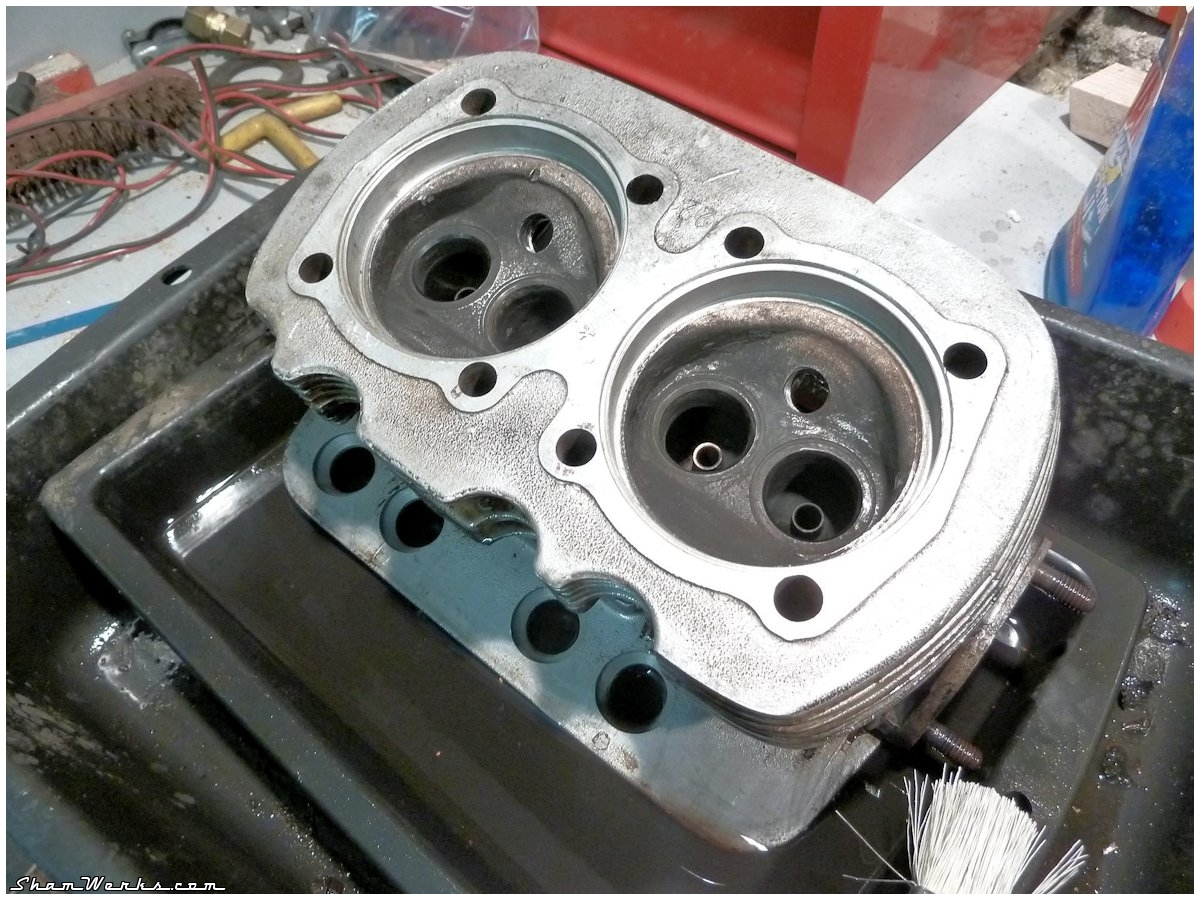
Ensuite : d'origine, le rapport volumétrique était de 6.6 (d'après la RTA), ce qui était ok avec les carburants des années 60, mais franchement dépassé avec notre Super 98 : un 8.5 serait mieux, pas de risque de cliquetis, plus de watts et meilleur rendement.
Je mesure donc mon deck height (0.88mm) et le volume de chambre d'origine (48.75cm3) : je tombe sur un RV à 6.64, ce qui correspond bien à ce qu'annonce la RTA.

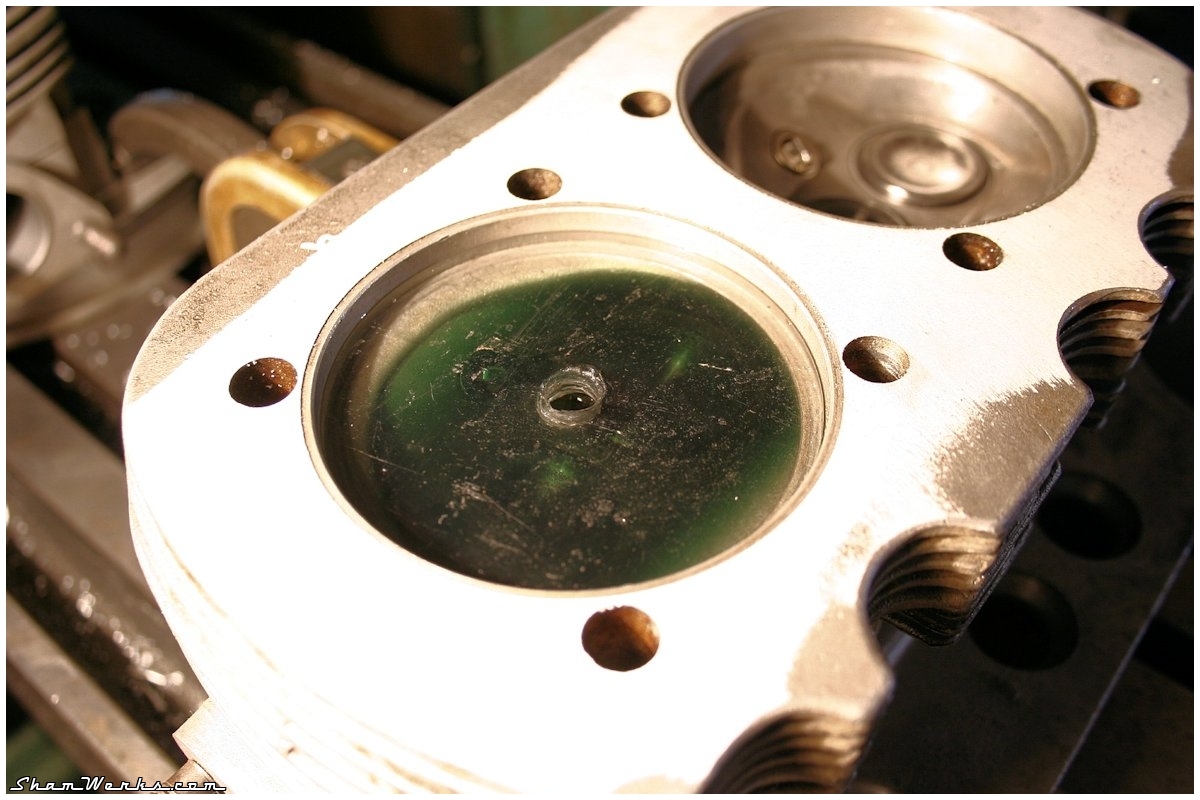


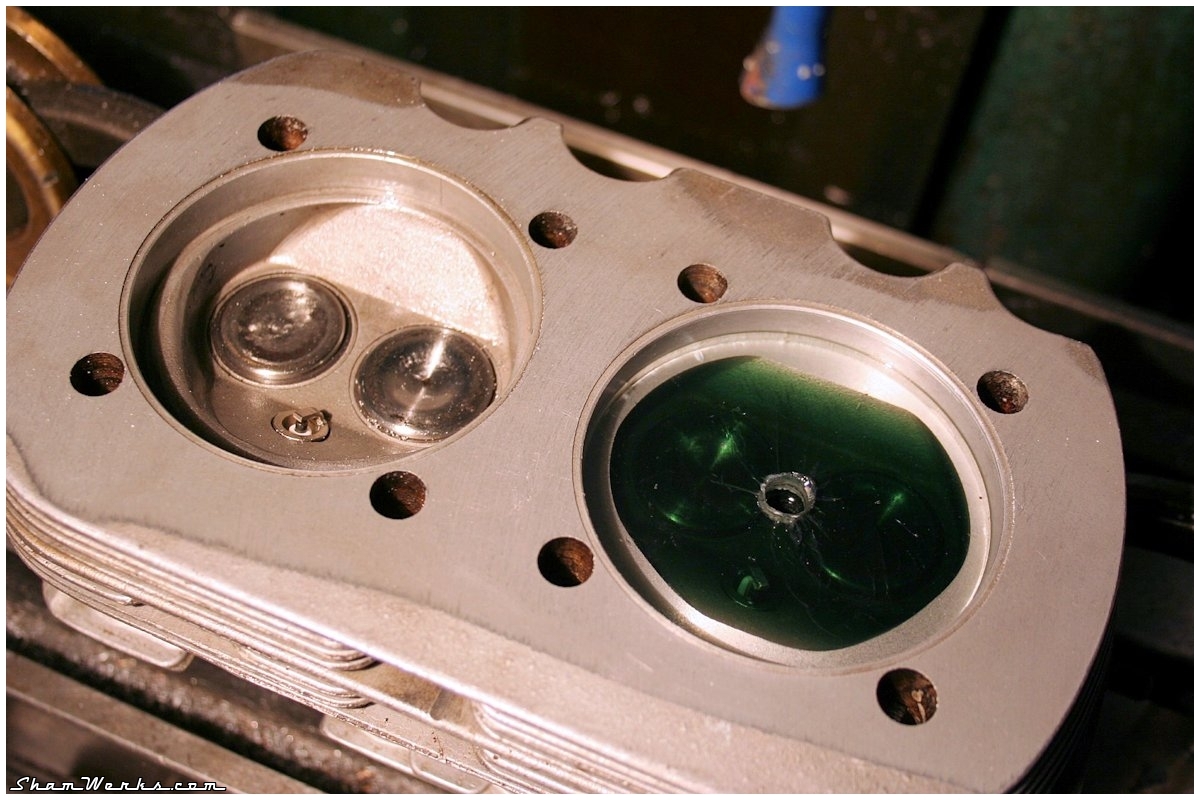
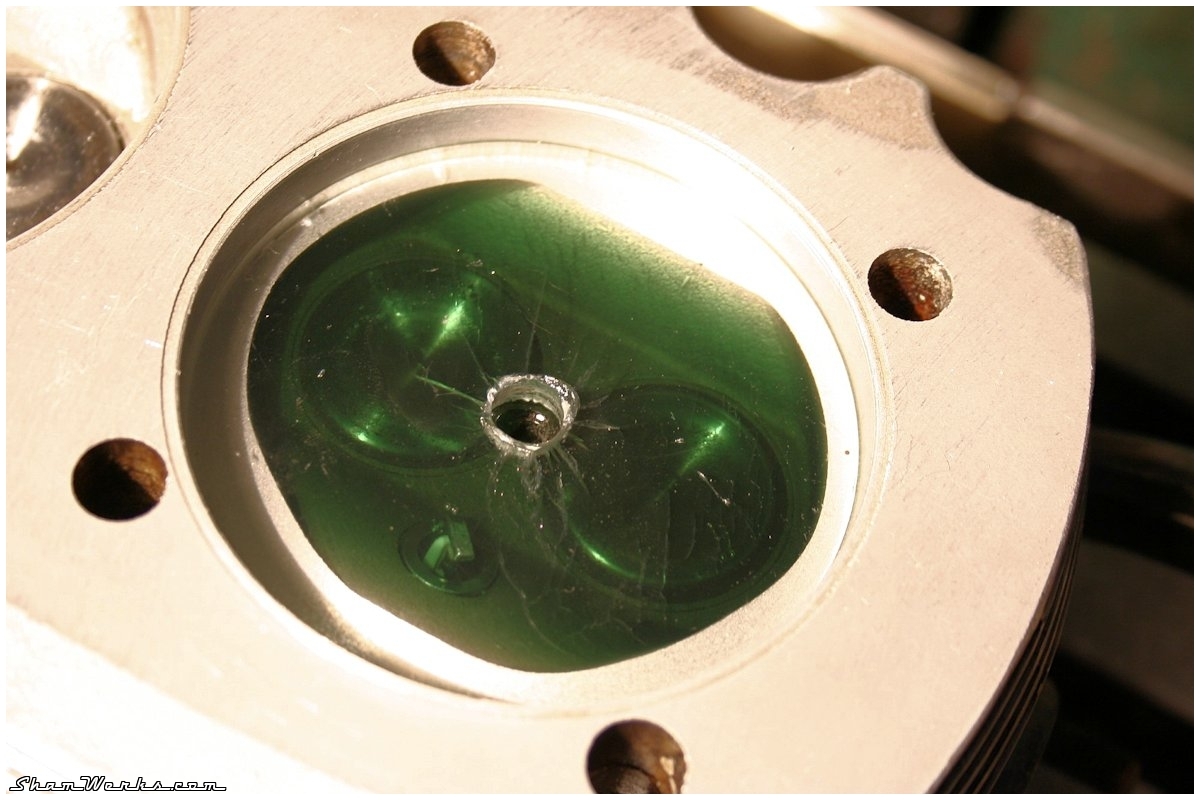
Au final, en descendant de 3.2mm, on est arrivés à 35.6cm3 de volume de chambre, et donc un RV de 8.51. Woohoo!
Même punition pour l'autre culasse, descendue de 3.15mm pour avoir les mêmes chambres.
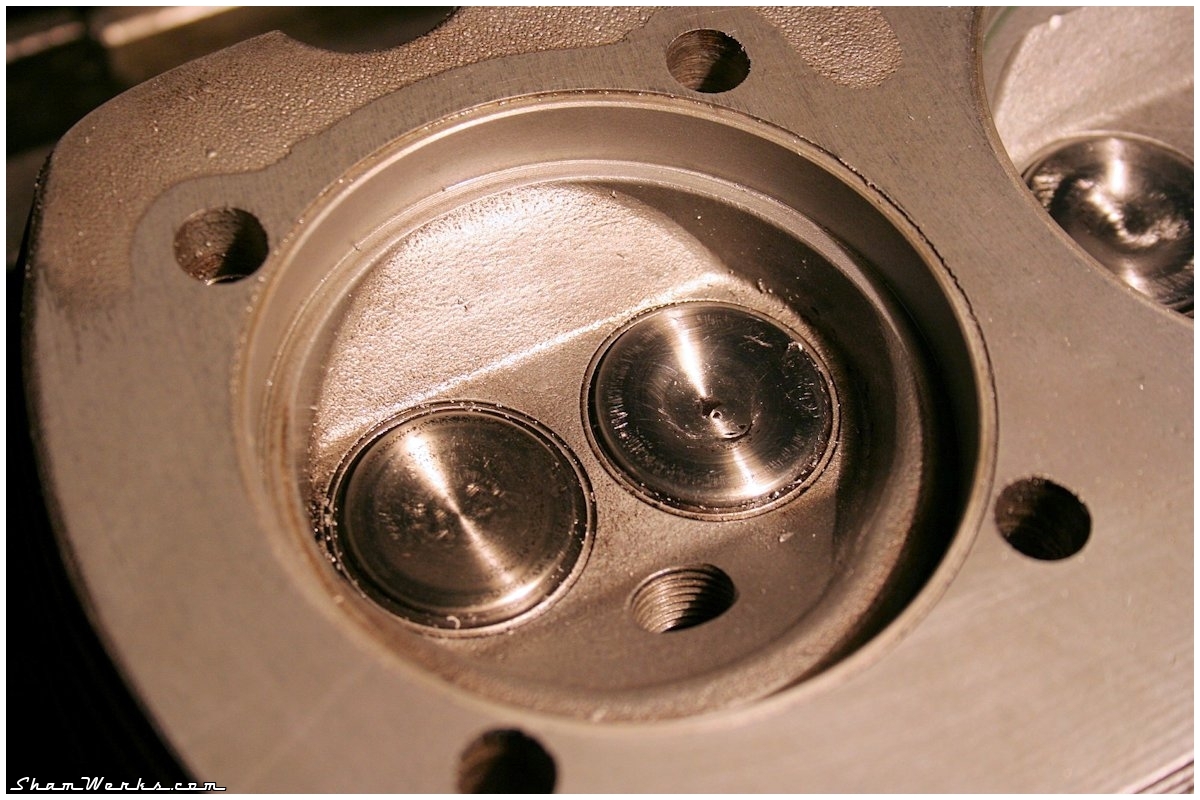
Evidemment, avant de se lancer dans cette modif, il faut vérifier la levée des soupapes pour ne pas qu'elles touchent les pistons à pleine levée... Dans mon cas pas de soucis, il doit bien me rester 5mm, je suis large.
Sauf que maintenant, les fûts de cylindres ne touchent plus au fond de la chambre, mais en haut sur la première ailette de la culasse ; on sort donc la "bête à corne" et on rabote de 1.2mm, jusqu'à ce que les cylindres plaquent bien au fond des chambres (on vérifie avec un jeu de cale, 0.2mm de jeu entre cylindre et culasse, tout va bien!).

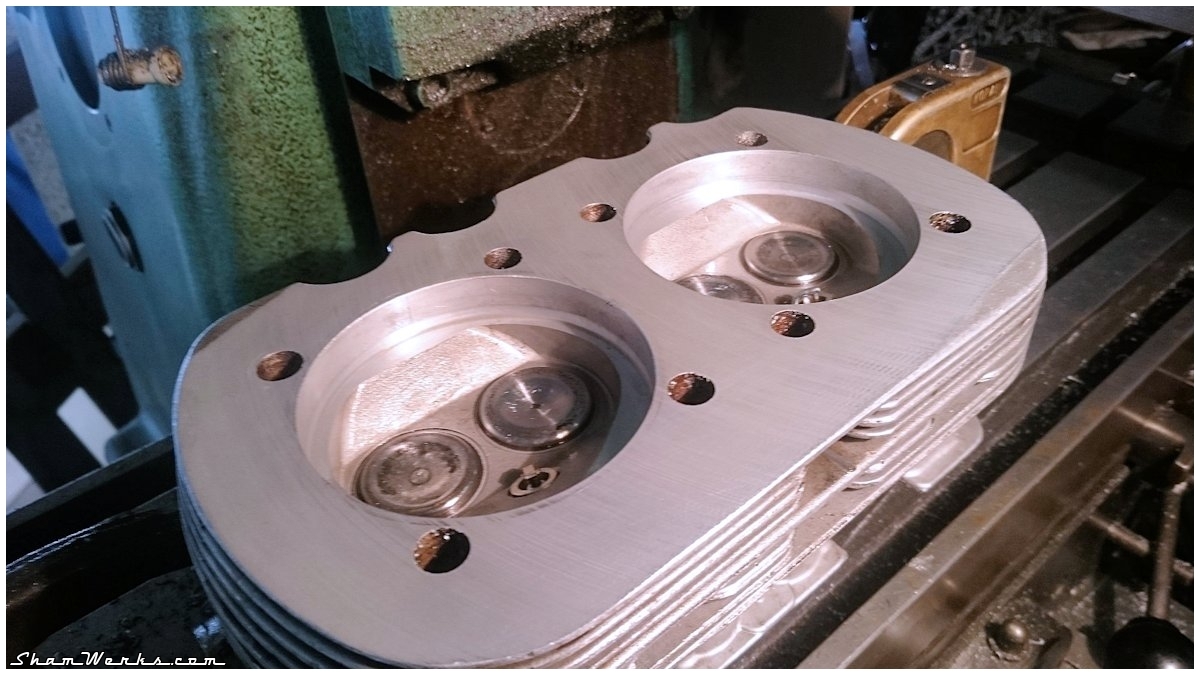
Finalement les chambres sont légèrement retouchées à la Dremel pour supprimer les angles vifs que l'usinage a créés (sources de points de chauffe et de cliquetis), et ça y est, elles sont prêtes à monter!

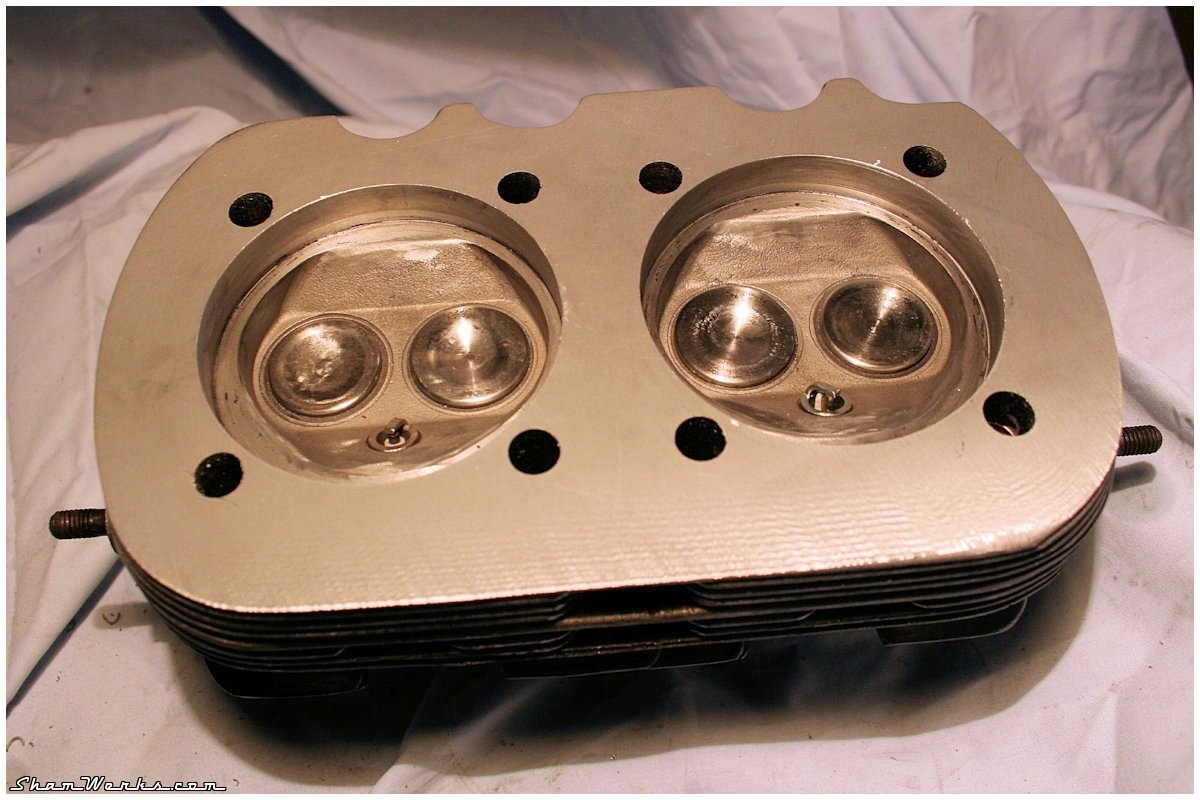
Sur ces photos, on voit un effet de "vaguelettes" sur la culasse après usinage : l'ailette commençait à devenir un peu fine et se mettait à vibrer sous l'outil se la fraiseuse.
C'est bien beau tout ça, mais du coup le moteur est plus court de 3.2mm de chaque coté! Il faudra donc retailler les tiges de poussoirs pour prendre en compte cette réduction, sinon la géométrie de la culbuterie sera dans le sac... Mais ça, ça peut attendre pour le moment, je reviendrai dessus plus tard.
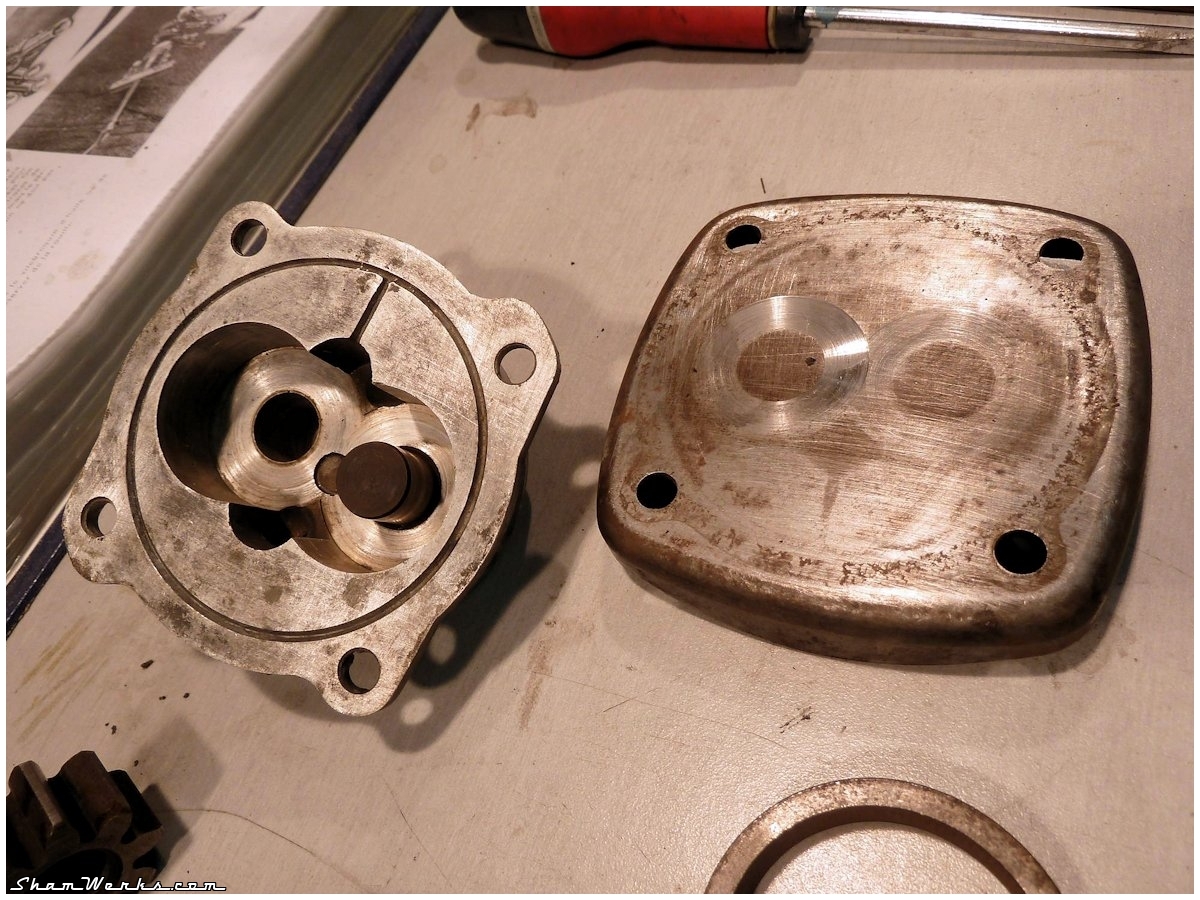
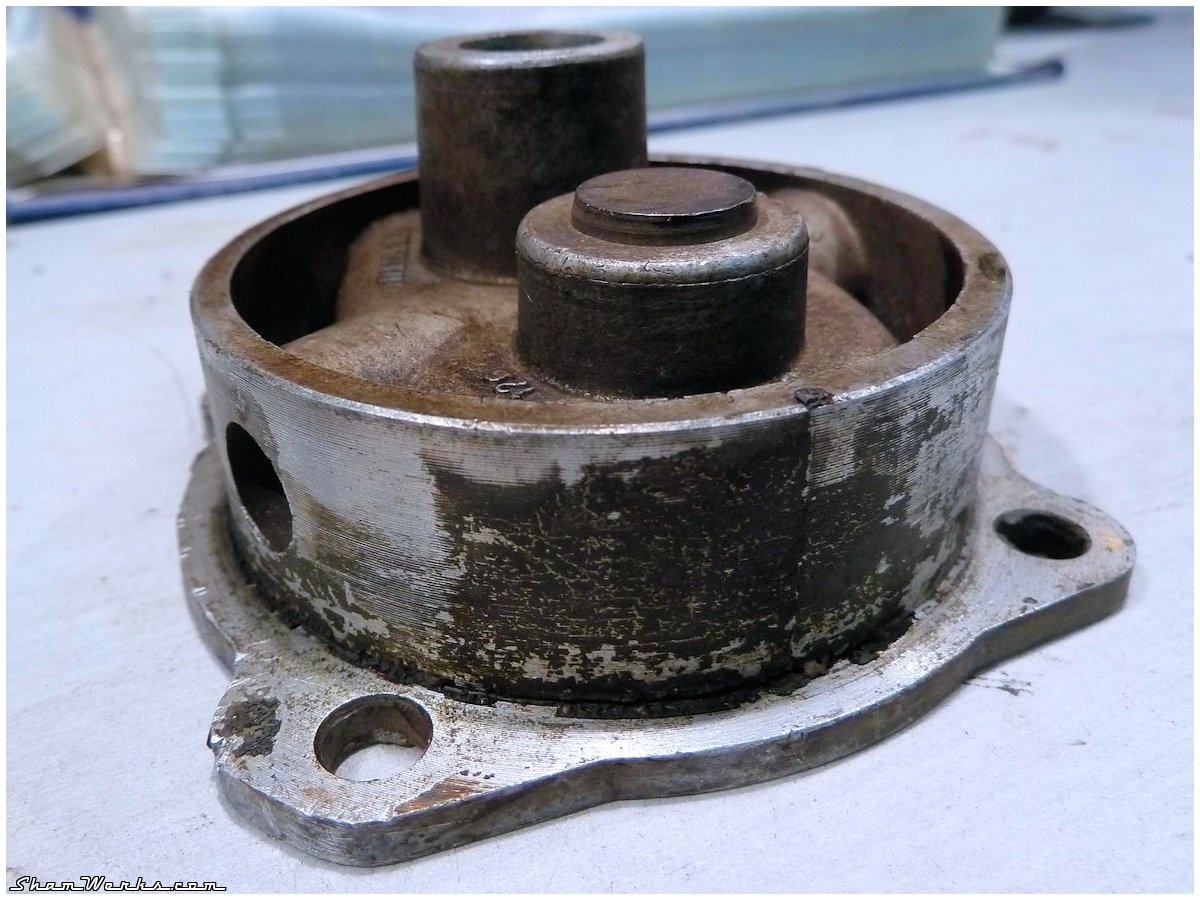
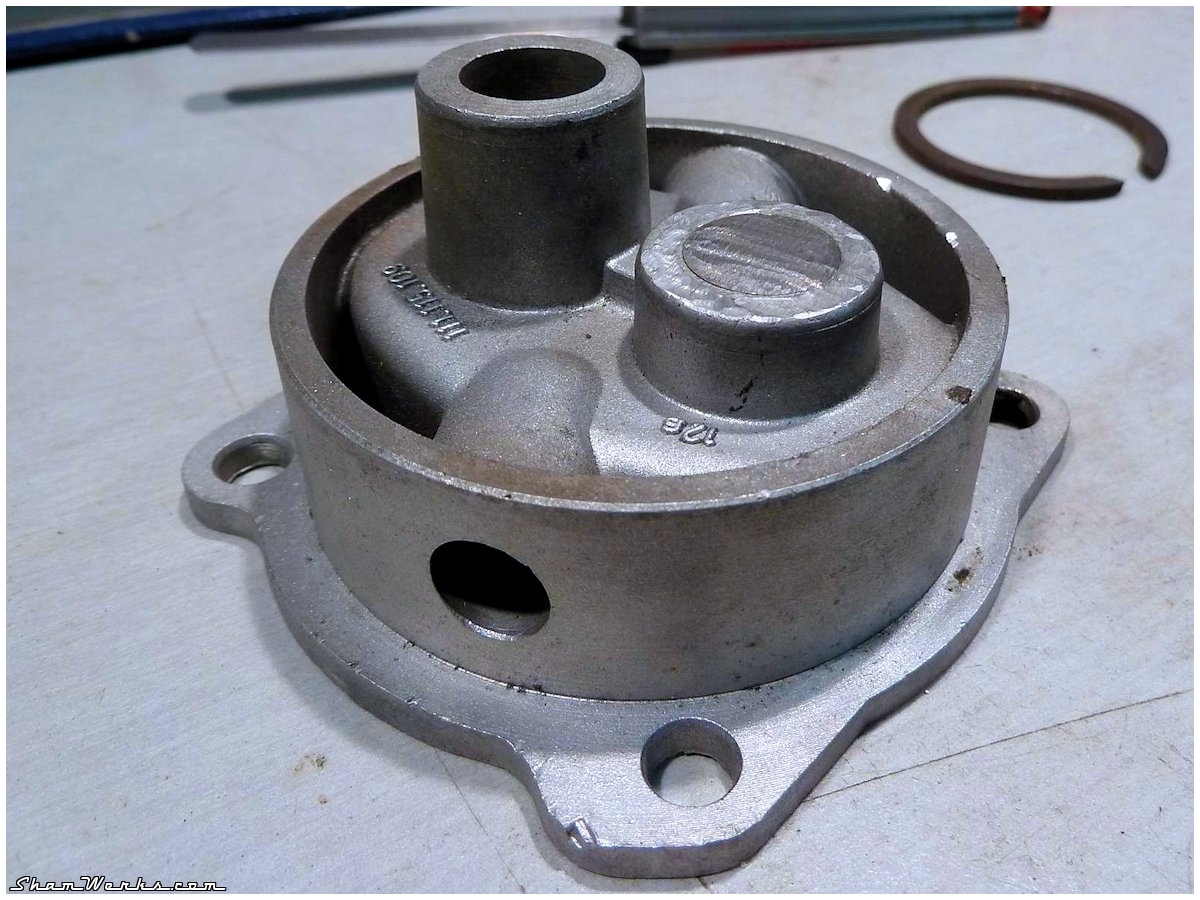
Pompe à huile
Le couvercle de pompe à huile était bien marqué... Je l'ai plané sur marbre au papier verre à l'huile pour lui virer ces marques vilaines d'usure.Le corps de la pompe à huile est microbillé, son tenon meulé pour éviter toute interaction avec l'AAC, et ses conduits alignés avec ceux du bloc. La face est légèrement planée aussi, juste pour virer les traces d'oxidation, elle était propre.
Bonne pour le service!
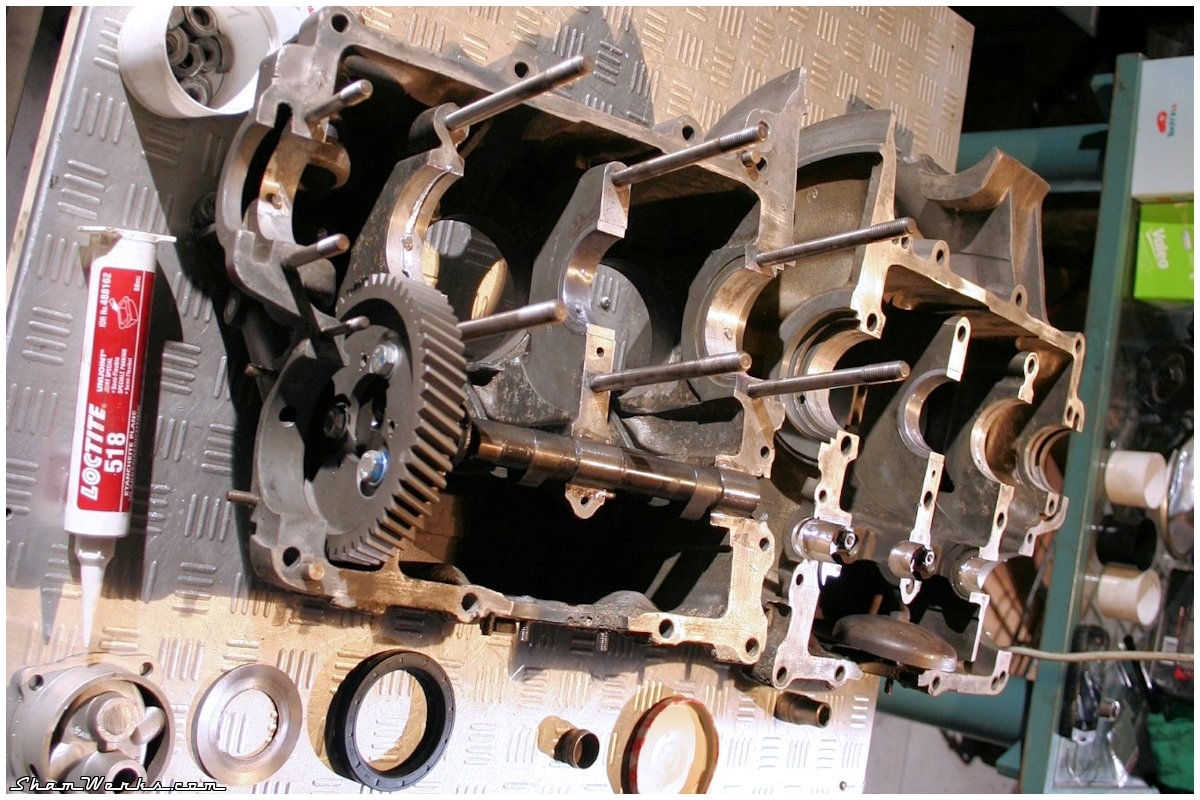
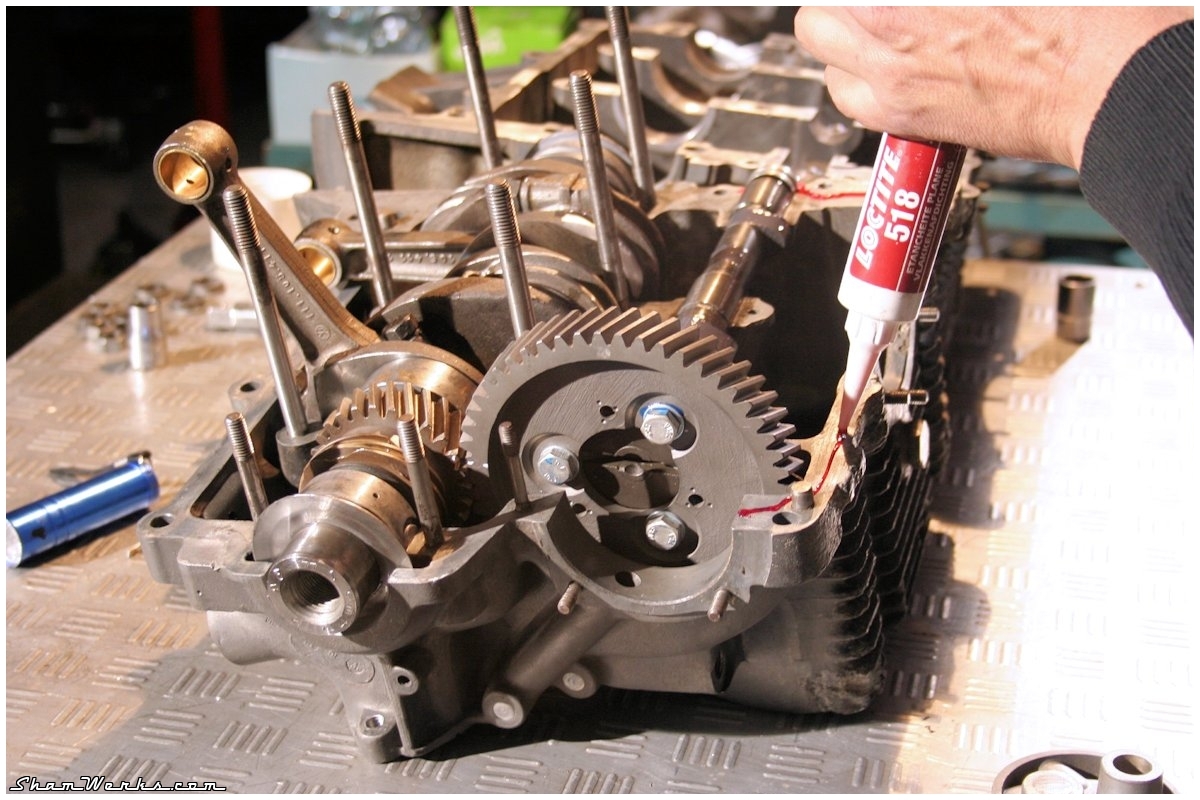
Fermeture du bloc
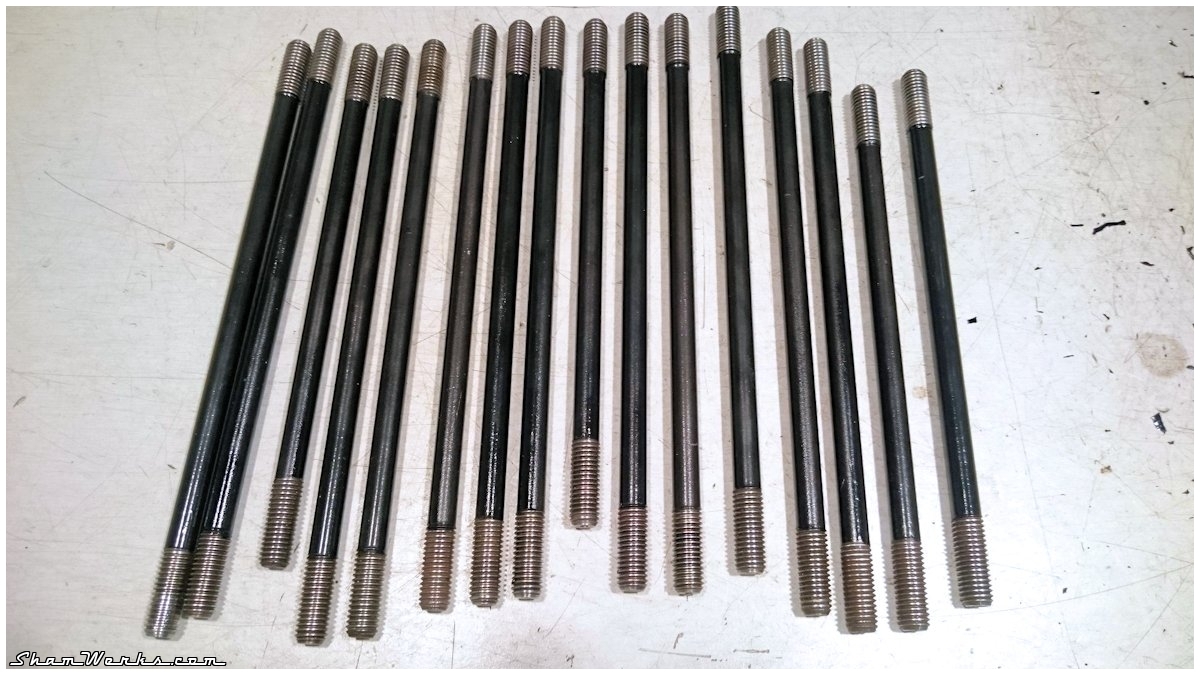
Pour bosser propre, j'avais déjà microbillé toute la visserie (ouais, je vais me faire un T-Shirt "I ? microbilleuz"), et j'ai passée tout ce p'tit monde au taraud/filière. Les goujons de culasses ont été décapés (au tour, ça va vite), passés à la filière, et peints pour éviter la rouille (dans la famille Overkill je voudrais le fils).


On prépare donc la fermeture :
- Pour l'étanchéité, le plan de joint d'un demi-carter est enduit de pâte anaérobie Loctite 518. Super produit : on peut prendre son temps pour travailler (elle ne sèche pas à l'air), elle est miscible dans l'huile (pas de risques de bouchage de galeries comme avec les pâtes silicone)... et j'adore son odeur!
- Les coussinets vilo, et les paliers arbre à cames (pas de coussinets AAC sur pied-moulé) sont copieusement lubrifiés à la Wynn's Supercharge.
- Les cames de l'arbre à cames reçoivent une couche de ZDDP ; un peu overkill encore au vu des ressorts, mais bon, tant que j'y suis...
- Le bas des cylindres reçoit un petit congé de CAF ; idem pour les joints des tubes enveloppe.
- Les écrous et rondelles de culasse qui se trouvent sous le cache-culbuteurs reçoivent une couche de 518 aussi, pour éviter les fuites d'huile par les filetages.
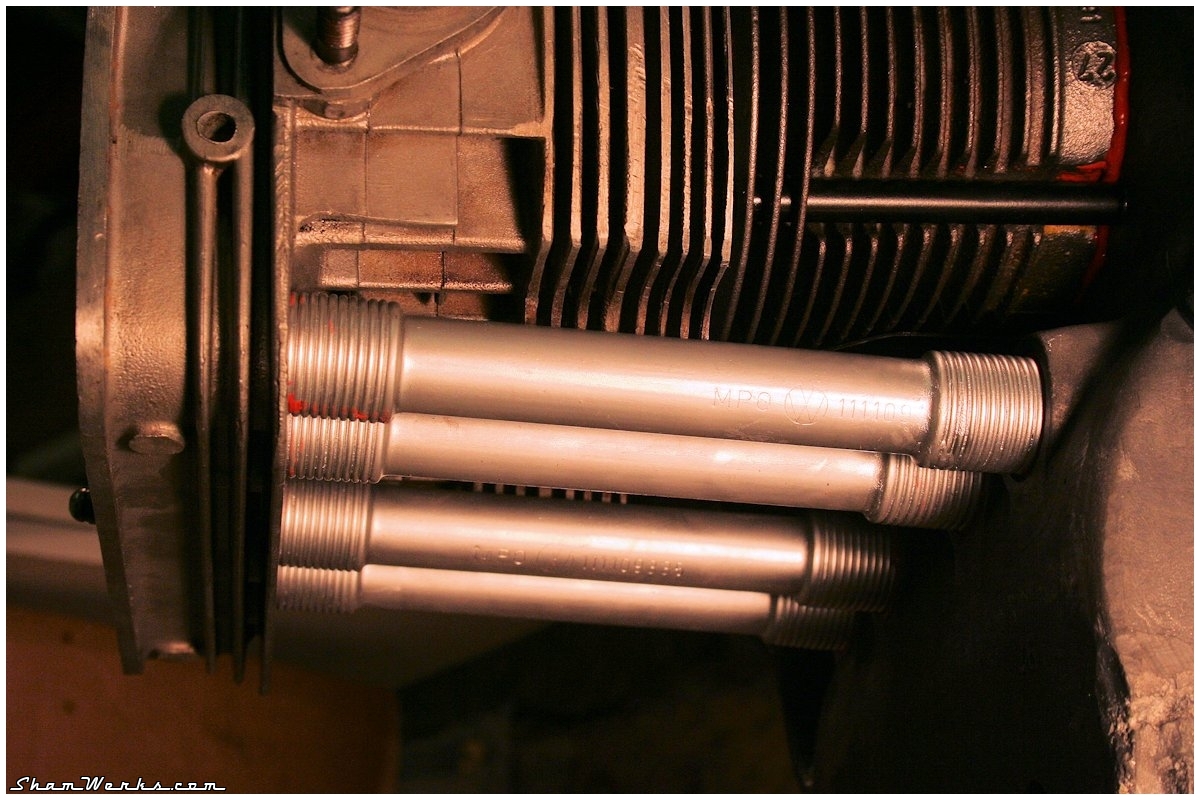
- Les tubes enveloppe NOS (merci VW Classic via Slide Perf/Classic Store : 8,30€ pièce, ça pique, mais belle came) sont dégraissés et prennent une fine couche de peinture haute température couleur alu, histoire qu'ils ne rouillent pas direct.
- Les tôles sous cylindres sont NOS aussi...
On vérifie une dernière fois, on inspire un grand coup, et y'a plus qu'à refermer :
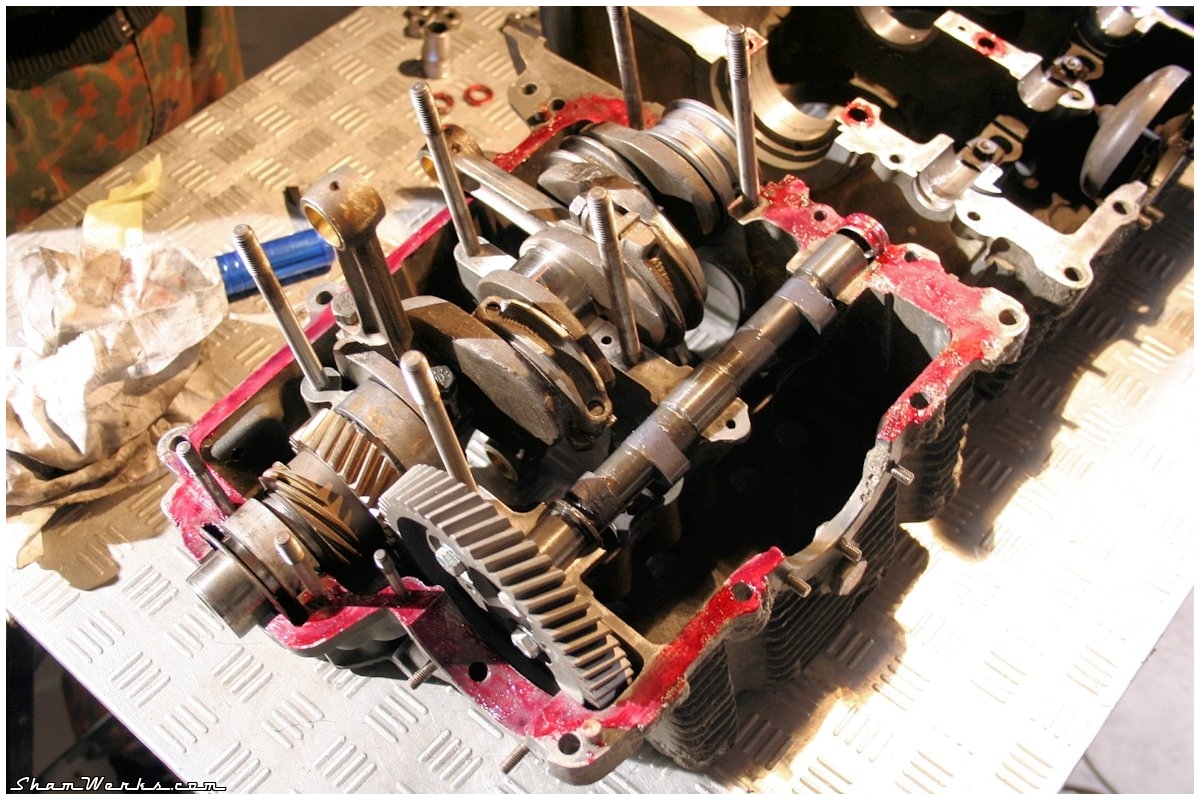
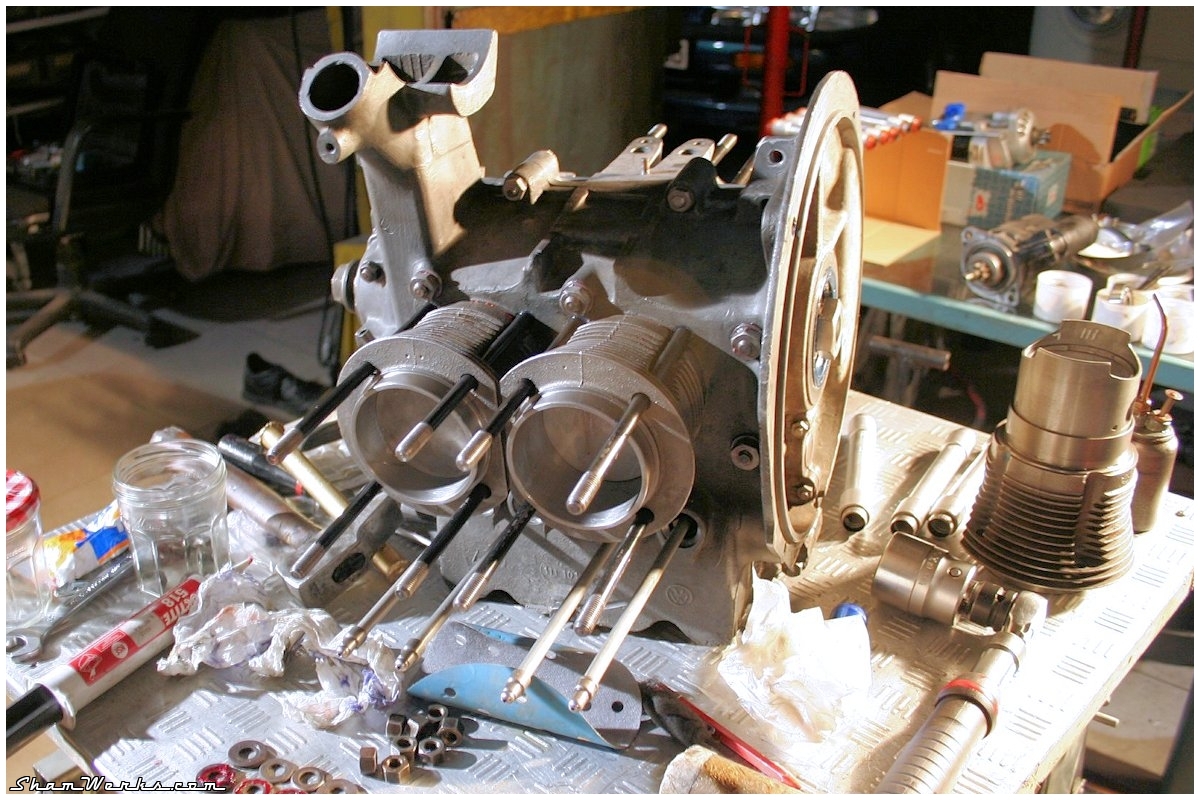
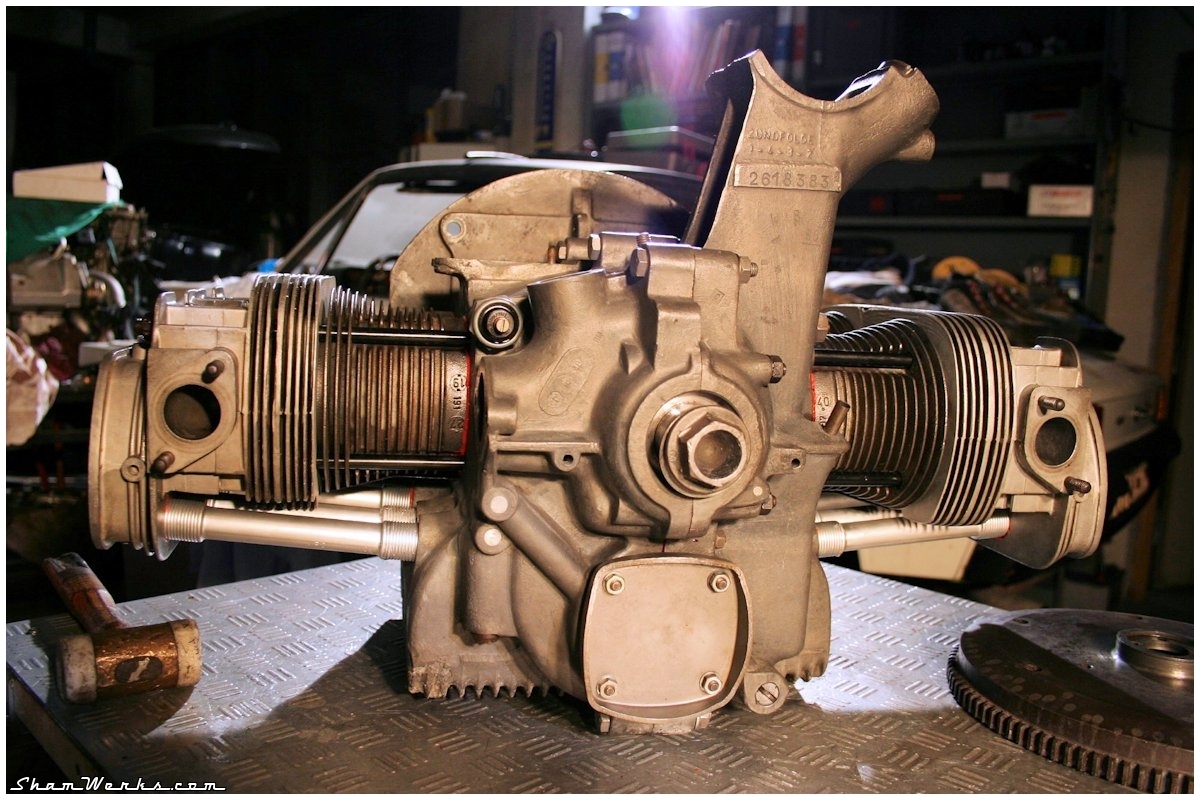
Bon, on n'est pas encore sur la route hein, mais c'est une bonne étape de franchie!
La suite bientôt!