Posted on 28/07/2016 at 16:53
Elvira : Rebuilding the 36hp, episode 5 : Fuel Pump


episode 5 : Fuel Pump
I've owned this car for 22 years now, and it has always run this very pump. It was long overdue for some TLC! After thorough disassembling, I first give it a good cleaning with a brush and some brakes cleaning fluid, to get rid of most of the gunk. By the way, I can see that event though the pump's membrane is completely rigid, it's still in working order and not leaking! Pretty amazing quality part, I doubt the new one will last that long!
Next, just as for the carburetor earlier, I dump all the parts into the ultrasonic cleaning bath, filled up with lemon juice. It looks like new when it comes out after just 20 minutes at 80°C. I rince everything thoroughly with clean water to neutralize the acid action. Before I put everything back together, I check that both pump halves are actually plane : 320 grit sand paper on my surface plate, a squirt of WD40, and I do 8 figures with each half. Right from the beginning, the sanding marks show it was far from being plane...
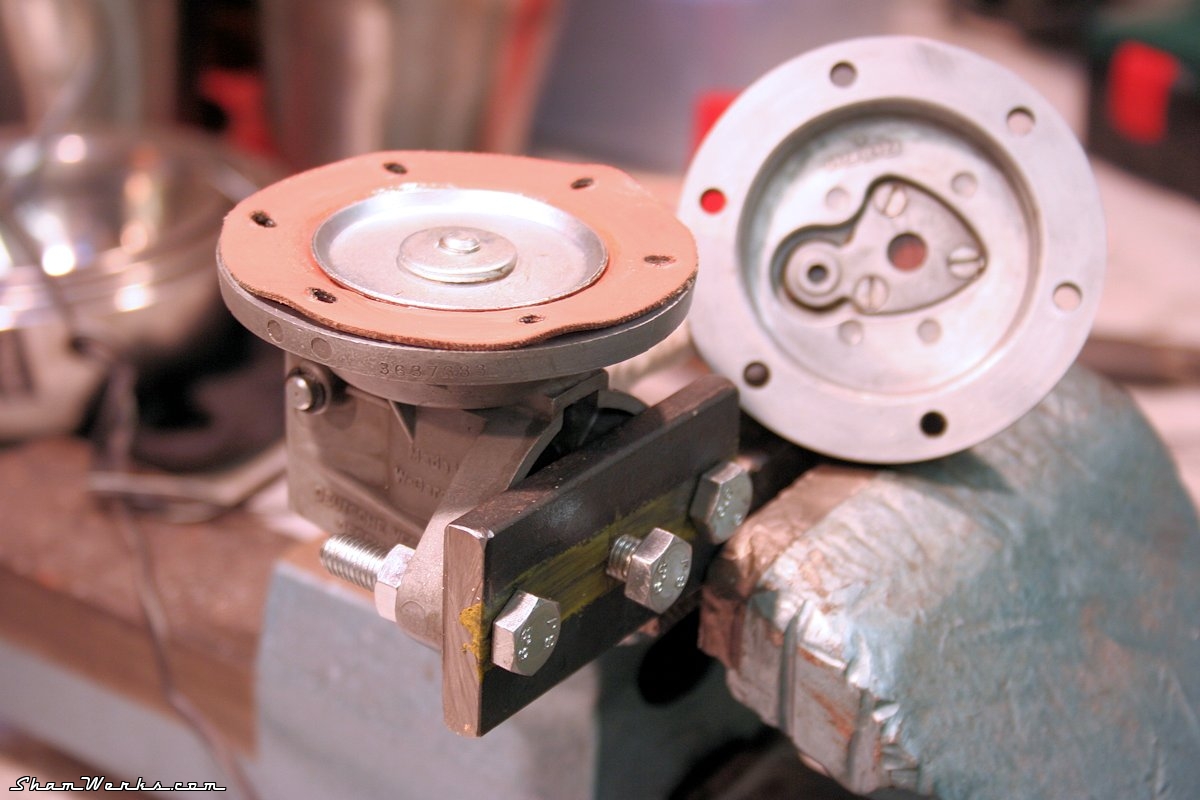
Ten minutes later, it looks much better! At least it should limit the risk of leaks right there... I reassemble everything with a BBT rebuild kit. The membrane (main part) looks good, but on the other hand, I will not use the two small levers provided in the kit (edit 20211017 : spoiler aler : I should have!), they look cheap and flimsy, I'll stick to the original ones that still looks pretty good. The main spring is much longer and strong than my original one ; I don't know if it respect the factory measurements, but if so, my spring was in dire need of retirement! In order to propermy install the membrane, you need to pre-load the pump ; this is supposed to be done using the VW328b tool (see it here on TheSamba), which I obviously do not own, so I make myself make-do one.
The 1958 workshop manual states that the pump's lever should be depressed by 35mm from the pump mounting plane ; so, a piece of laminated steel, three holes -one of which is tapped-, and there you go.
I finally just have to mount the membrane with a thin coat of grease, so that it slides smoothly in place, avoiding any "wrinkle" that may cause a leak... And BAM, an as-new fuel pump ! The inside is packed with grease, and it goes back on the engine.
NEXT!
Edit 2021/10/17
Well, finally, I should have used the lever parts from the kit... As the engine didn't start any more, I found out no fuel was coming to the carb, and I found the lever/arm thingy broken. The stronger spring may be responsible for the lever's untimely death.I put back everything together with the BBT lever, and it works perfectly (even though I still think these stamped parts don't really fill me with confidence). I also re-use my original axle, as the kit's one does look nice with its 2 circlips, but is too short for my pump's body. Anyway, back on the road!
Edit 2021/10/22
Do you remember when I was saying "The main spring is much longer and strong than my original one"?Well, I should have stuck with my initial gut felling and kept the original spring. The kit's one clearly puts way too much force on the lever... Which broke on me for the second time.
Except this time, I was on the road, for the first outing of Elvira in 14 years... And I rode back home on a tow truck.
Re-fixed, and back on the road.... Again. Hopefully I won't have to reopen this fuel pump anytime soon!
1


