

Posted on 26/03/2011 at 02:05
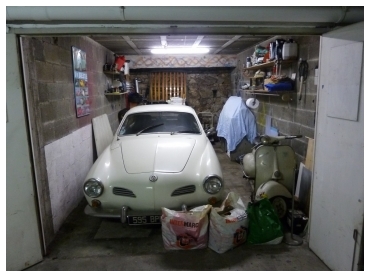
Workshop : Welcome to the Garage!
 Not so long ago, I sent an SOS, looking for a garage/workshop where I could finally work on my vehicles...
I got a handful of answers back (many thanks to all of you, you know who you are!), but nothing really matched : either small and expensive, or way too far from my place...
Additionally, I must say that watching Fabbe restoring his Oval-window in a shoe-box sized garage (full respect, Boss!), helped my putting things in perspective...
In conclusion, I've decided to renovate my current garage, in which I've been working for 15 years now... New paint, optimisation, cleaning, selling/giving/throwing away uneeded stuff, new tools, invasion of a part of my father's garage to store parts... I'll show you as well what I came up with last winter, to work at home comfy.
Anyway, the situation is far from ideal, but it gives me back some motivation, I really couldn't keep going that way.
So, here you are : a brand new section "workshop" begins on ShamWerks : Welcome to the Garage!

Posted on 30/03/2011 at 13:28
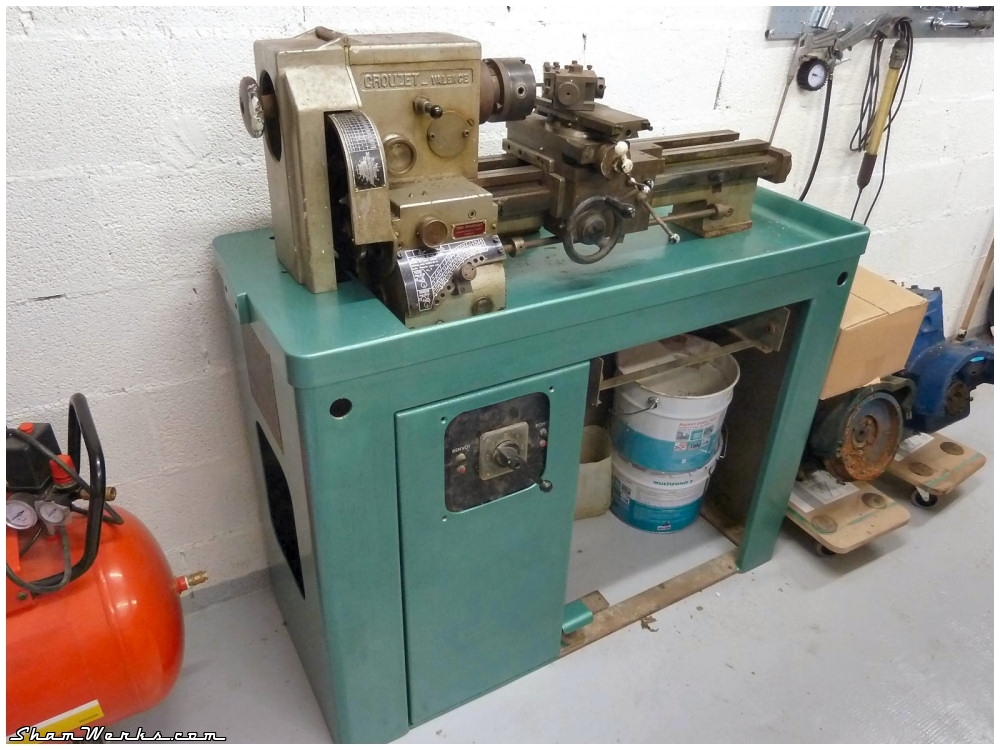
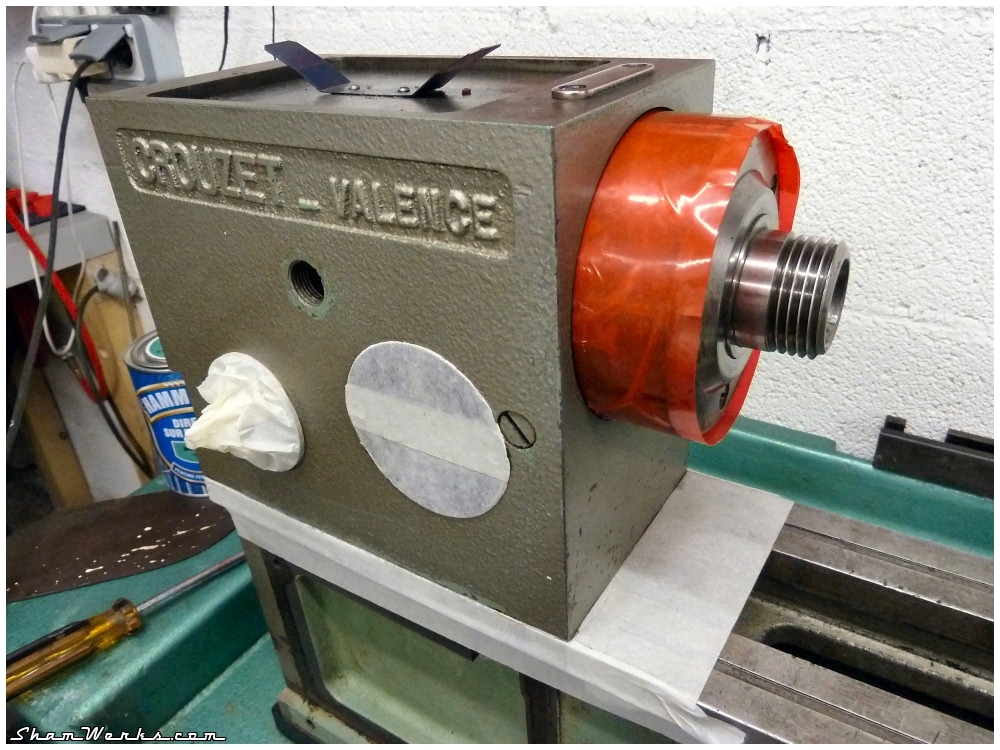
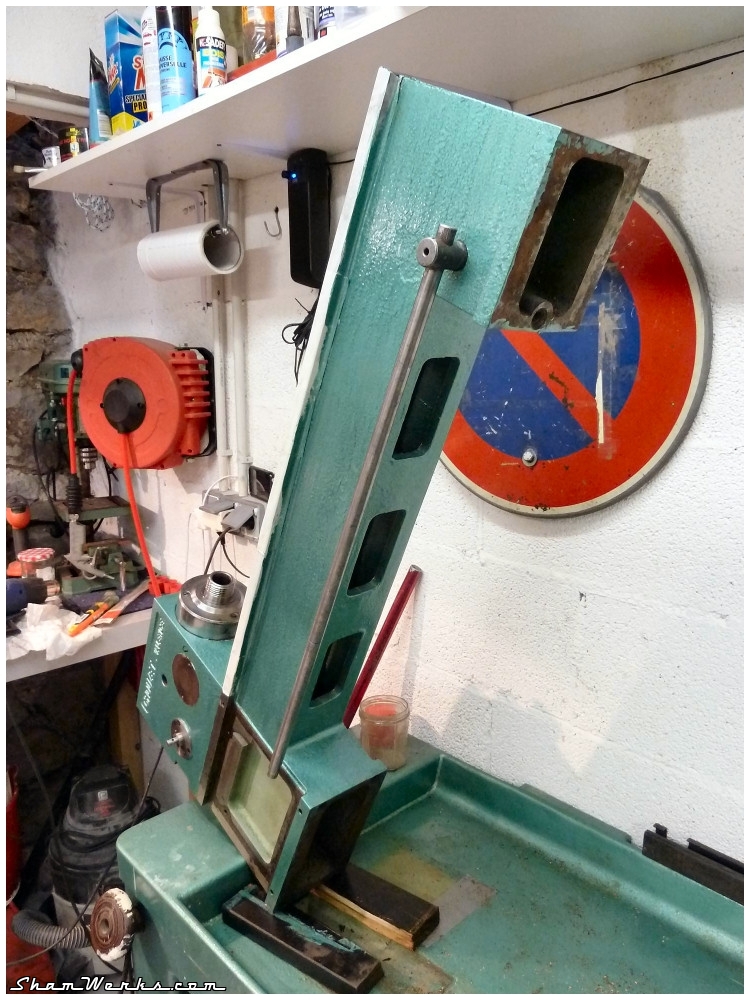
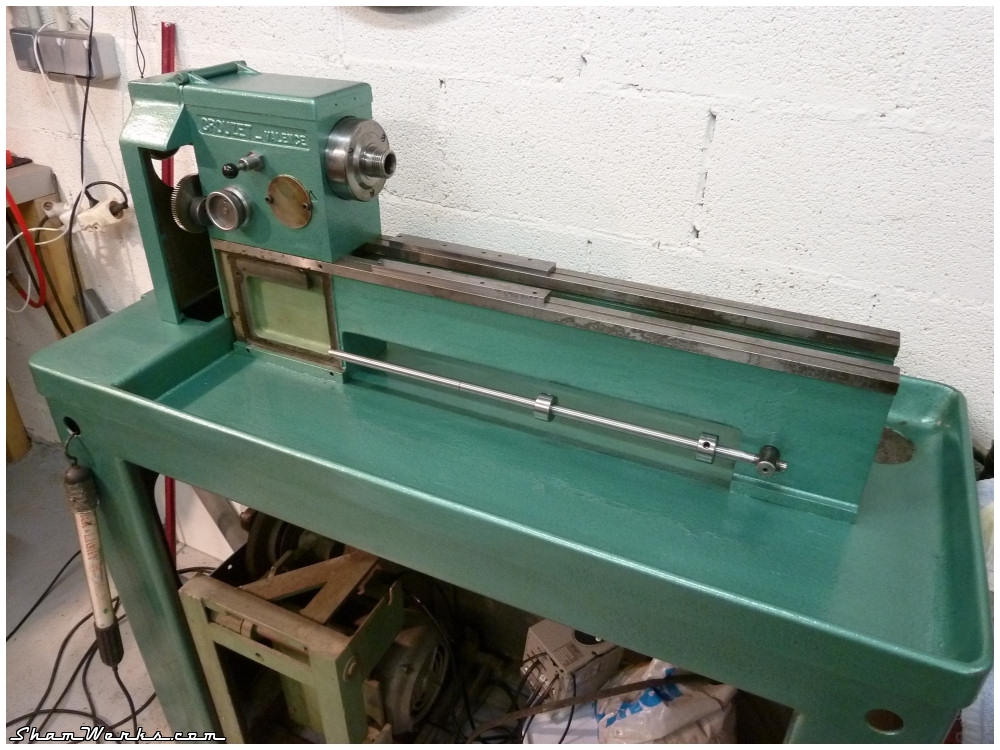
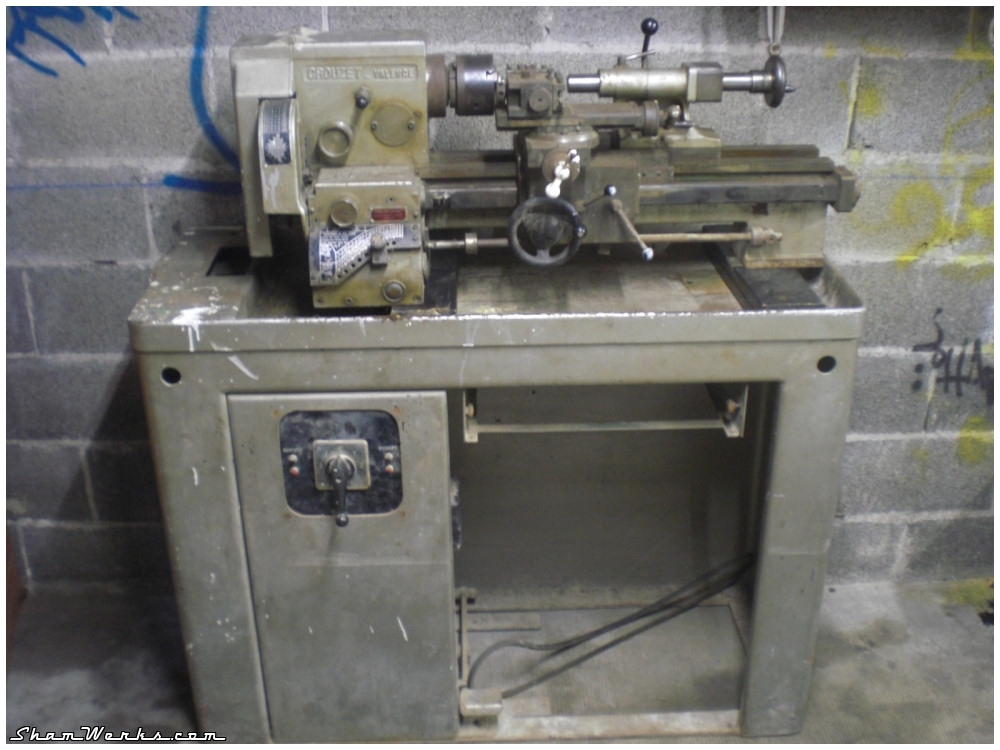
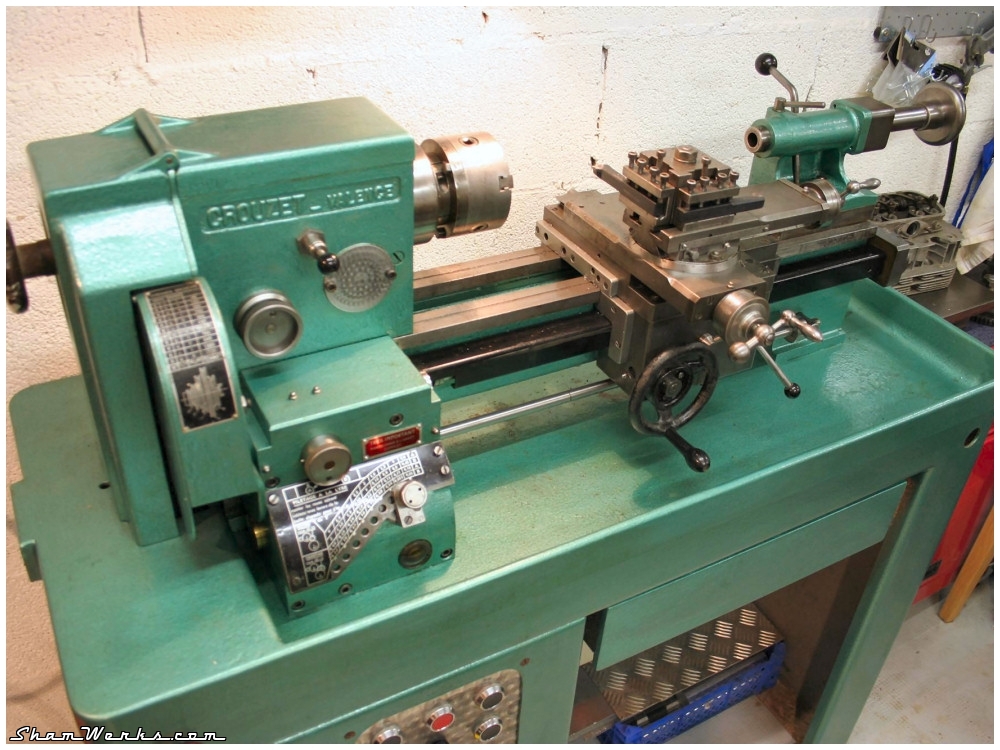
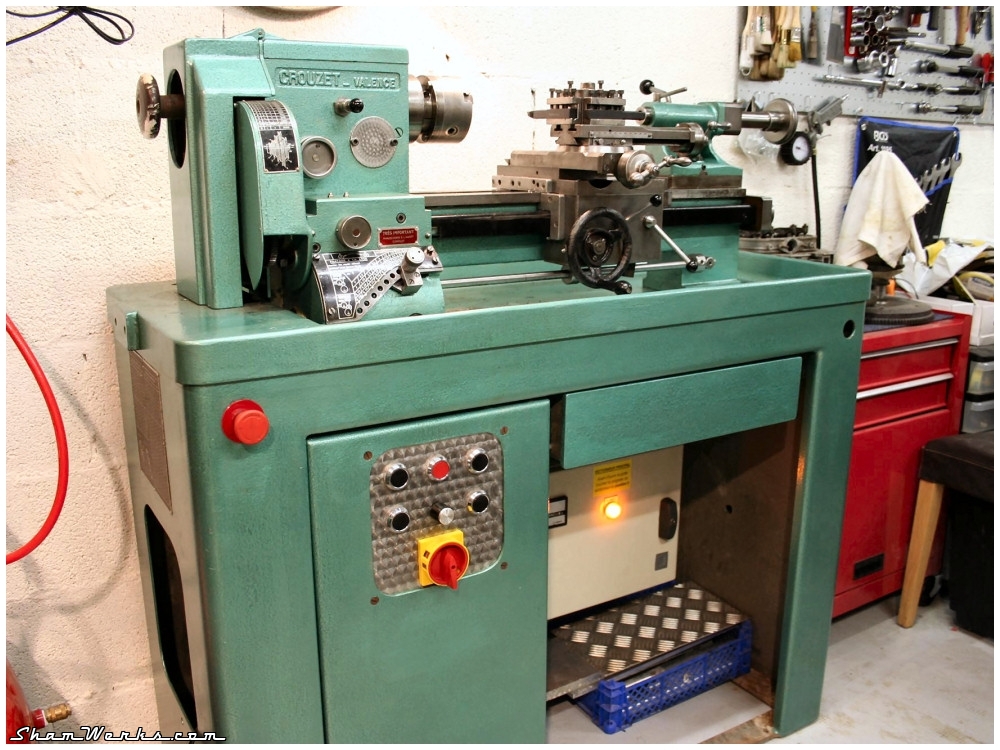
Crouzet-Valence VM125 metal lathe
Sorry! This article has not yet been translated in english! Please come back later!
 Pour démarrer le dossier "atelier", voila quelques photos du petit dernier...
 Je cherchais depuis longtemps un tour à métaux, mais d'une part ce sont des machines très recherchées (les prix s'envolent), et d'autre part si l'offre est généreuse dans le nord du pays (passé industriel oblige), c'est loin d'être le cas ici, dans le Sud-Est. Et comme on parle de machines qui pèsent lourd, la distance est un paramètre important.
Après des mois de surveillance des petites annonces, je finis par trouver mon bonheur sur eBay : un tour Crouzet-Valence VM125, du milieu des années 50!
Et vous voulez savoir le meilleur? Le vendeur se trouvait à 10 minutes de chez moi, et il me l'a gentiment livré (merci encore Fabien) avec sa remorque tractée par sa Jeep 1944 (!)... Le tout pour 200€!

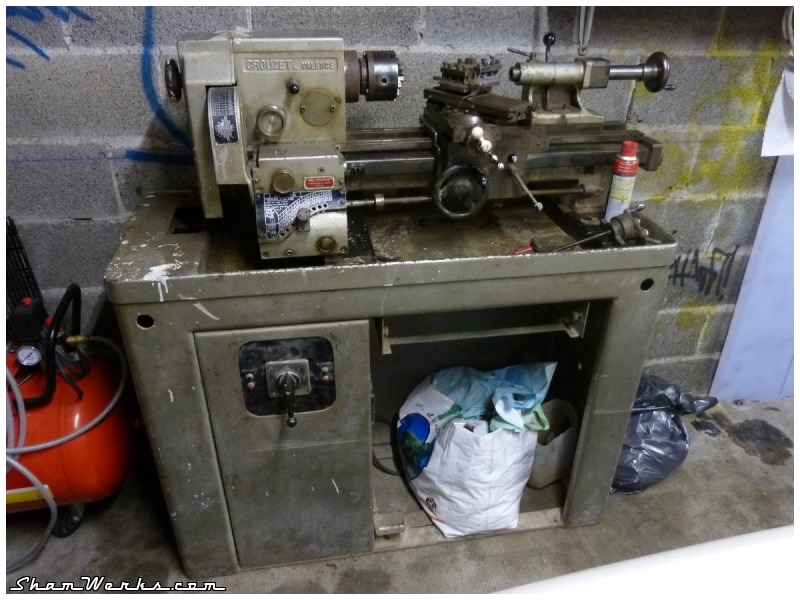
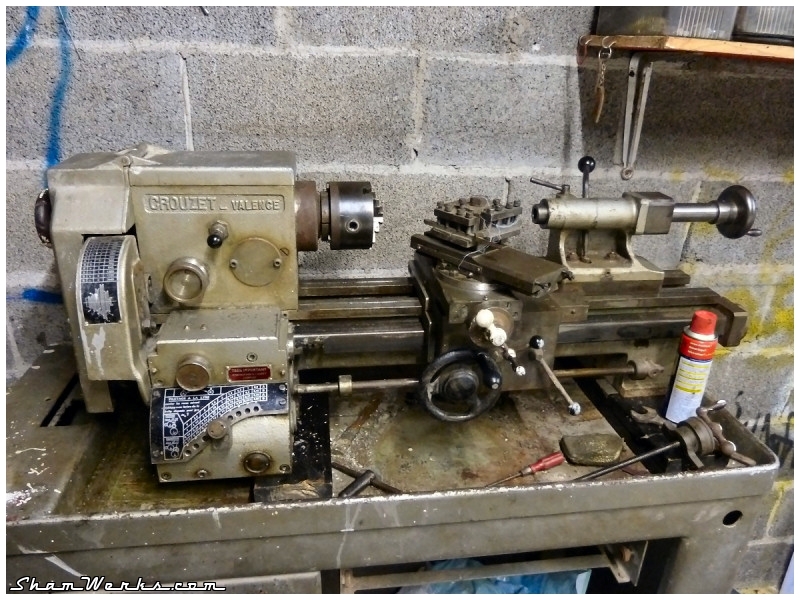
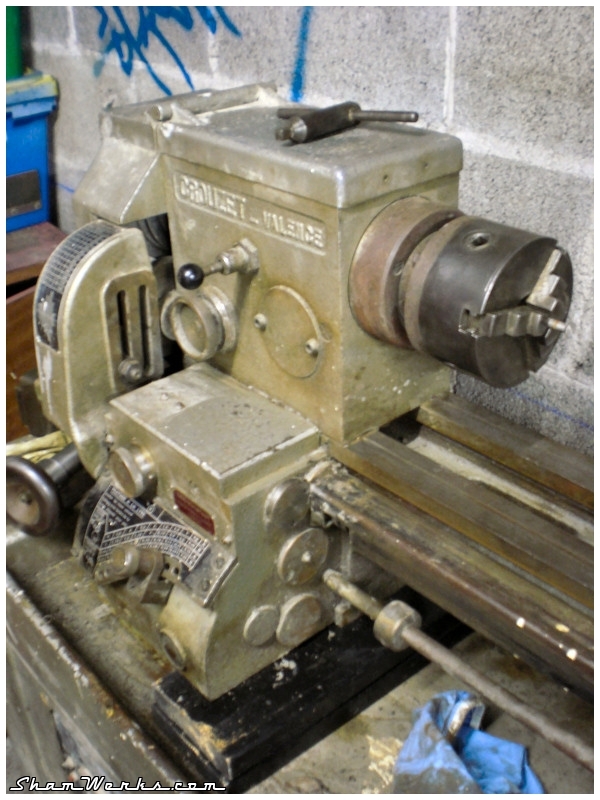
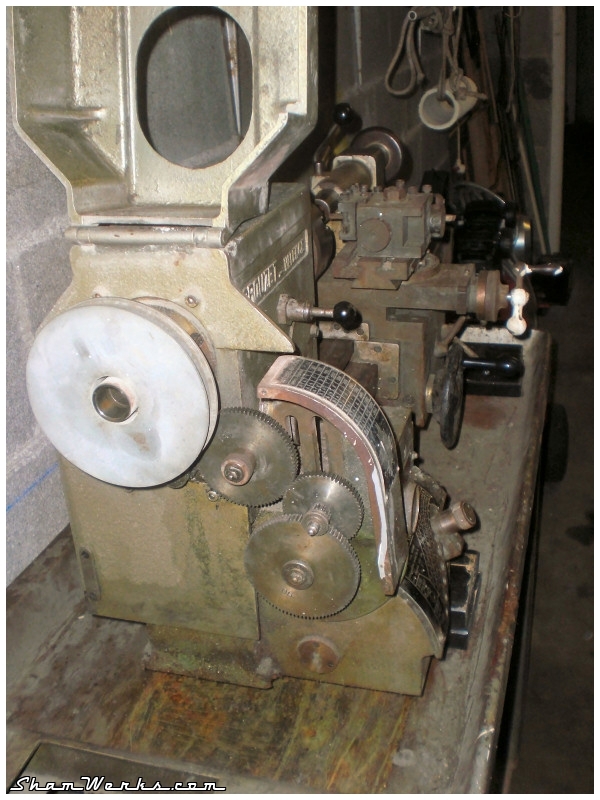

Un beau bébé qui approche quand même les 400kg sur la balance (merci les potes pour décharger), mais avec un encombrement limité à 120x50cm au sol : le petit tour dont je rêvais depuis des années!
Aaaaaaaaah, si je l'avais eu pour fabriquer mon sous marin...
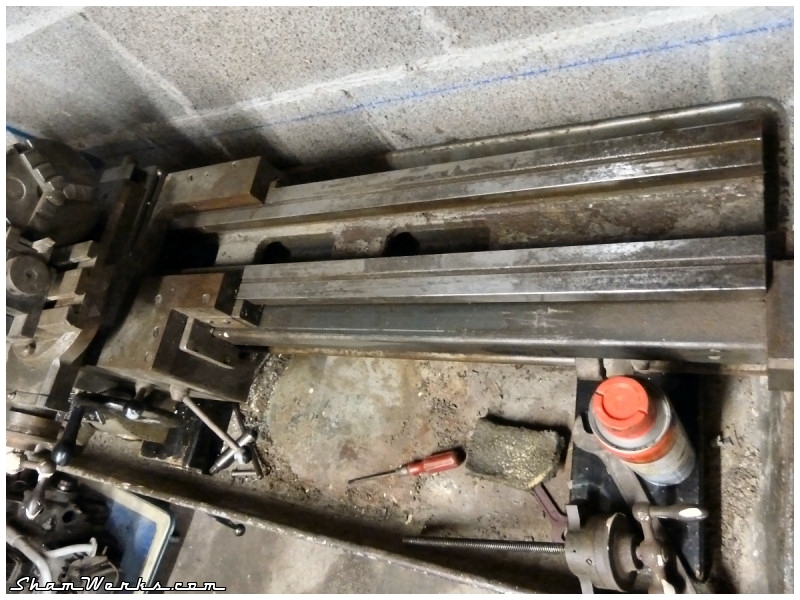
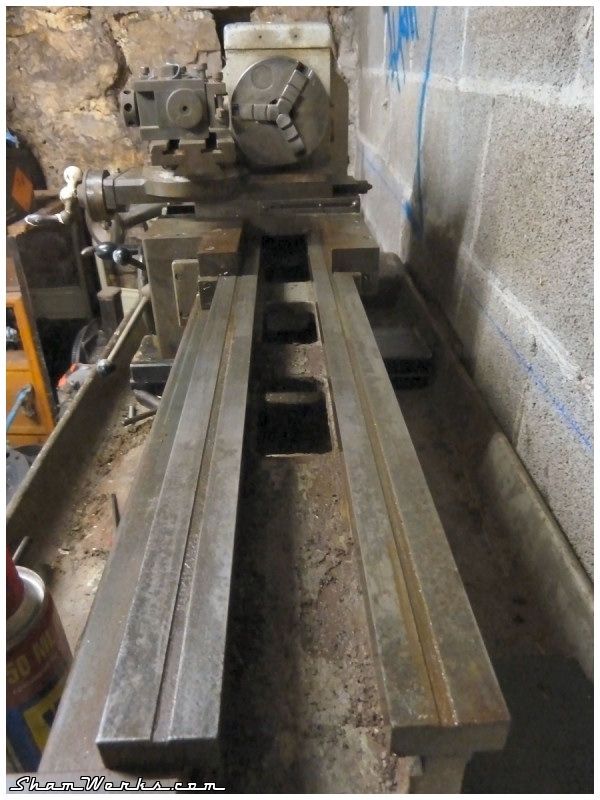

Je n'ai pas encore tenté de le faire tourner, il me faut un variateur 380V pour ça... A suivre bientôt!
Posted on 14/07/2011 at 01:08
Workshop : Garage Project
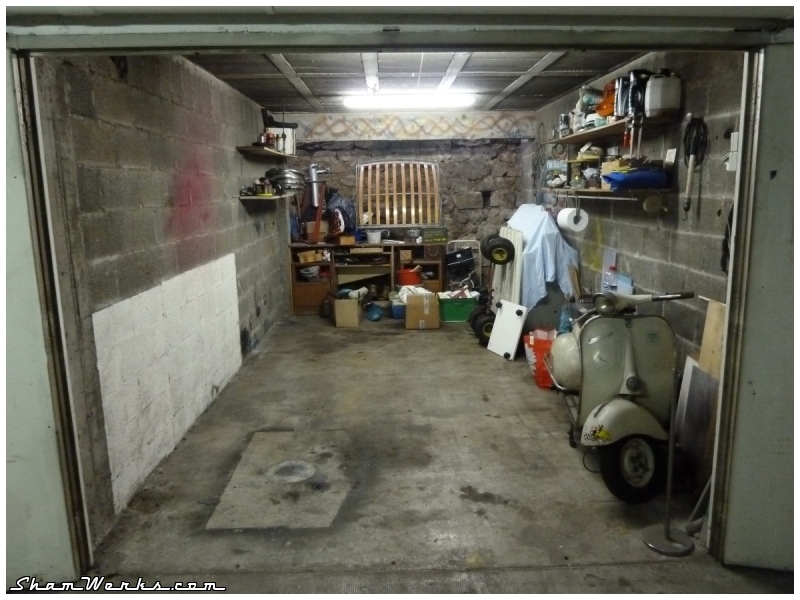
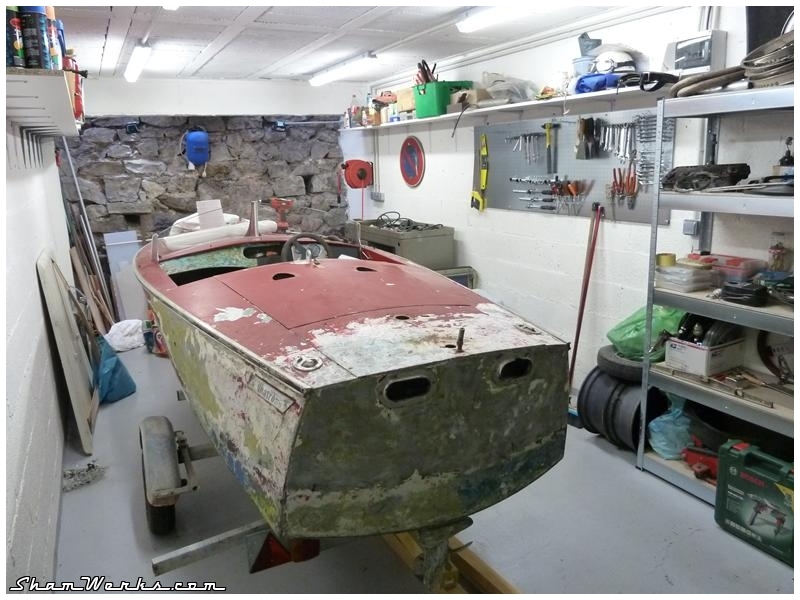
 I'm tinkering around this garage for more than 15 years now...
The bare concrete floor is greasy due to the oil and braking fluid spilled all those years ; since the concrete absorbs the fluids, it un-cleanable. The floor and block walls produce fine dust, the shelves on the walls are about to collapse, lighting is way insufficient, electrical installation is disaster waiting to happen...
Anyway, if I want to be able to work here in good conditions, it's high time I give it a complete overhaul.
As would Murtaugh say in Lethal weapon : "I'm too old for this shit".


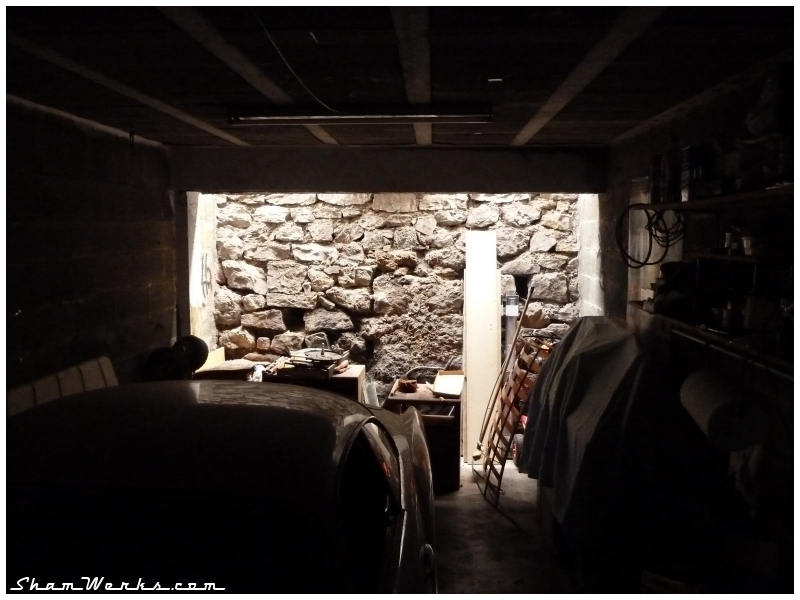
- Surface of the garage is a bit above average : 17m2 (183 sq. ft.)
- Same level as the street, no ramp : good thing for the dropped KG and the Albatross' trailer.
- Natural light source at the back of the garage : as the garage is located right below the parking, large windows at the back bring some sunlight down there, as well as some additional room to store stuff.
- Electricity is available.
- 5 minutes walking from my place.
- Basement level (underground), below a residential building : that's a limitation for noise, and spray paint/kärcher use are just a no-no ...
- The bitumen of the building's parking is right above my garage's roof : in mid-summer, it turns into a natural oven!
- Neighbors : a bunch of old people live in this building, and have organised a sort of militia in the basement, taking turns... As soon as I make some noise or dust, they're on my back. I hope someday I'll have a place without any neighbors...

- No water inlet/outlet.
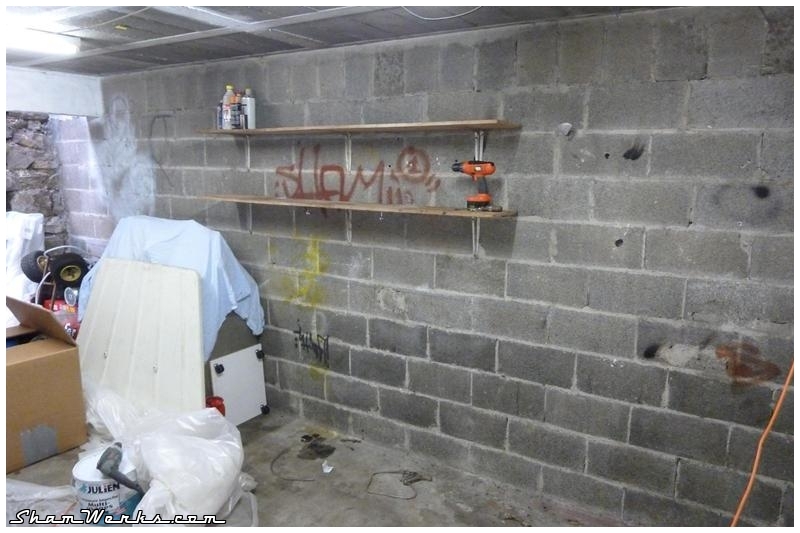
- Walls made of 5cm (2 inches) blocks ; it's difficult to fix anything really sturdy (I'm thinking shelves).
OK, that's far from the perfect place, but hey... It's not like I have the choice.
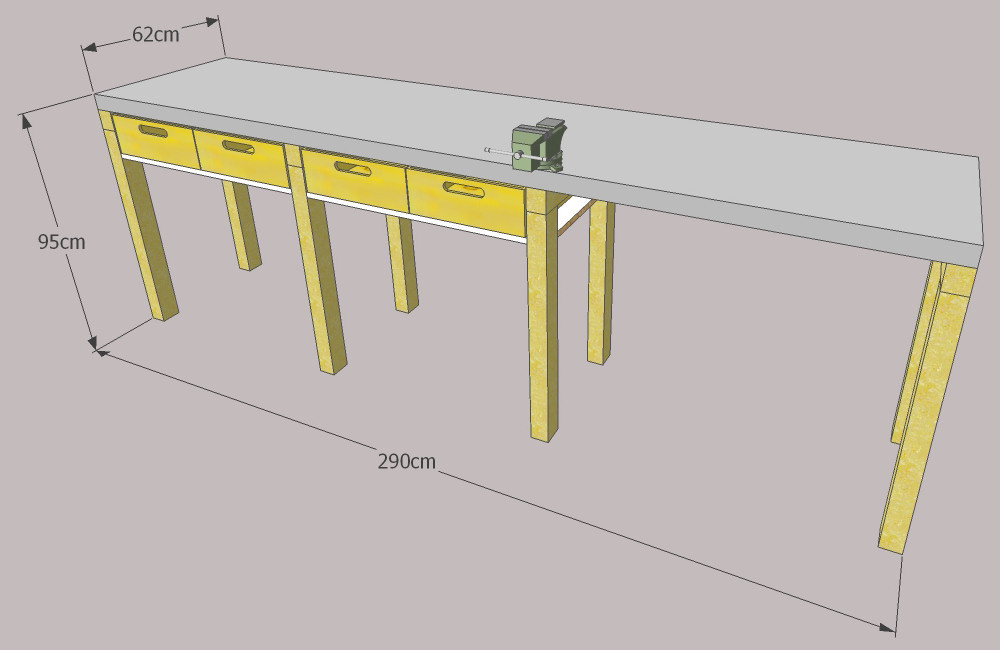
The project : Solutions / optimisation of room :
As usual, Sketchup is my best friend here to organize/layout everything.


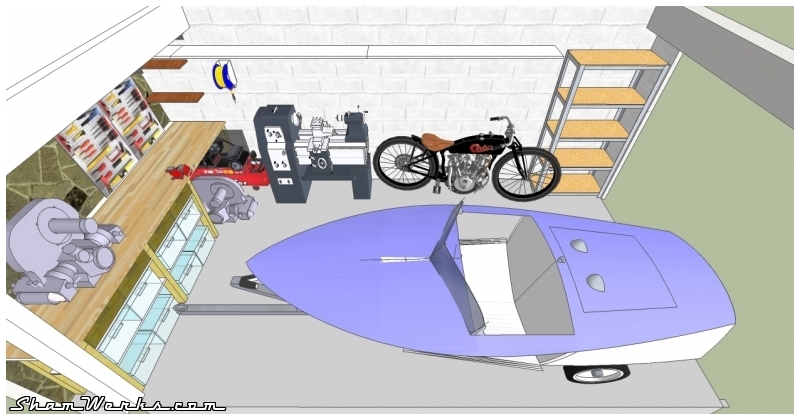
- White paint on walls and roof : more light and less dust.
- Lightgray paint on the floor : easy to clean, no more concrete dust. But painting on that oily surface will be tough...
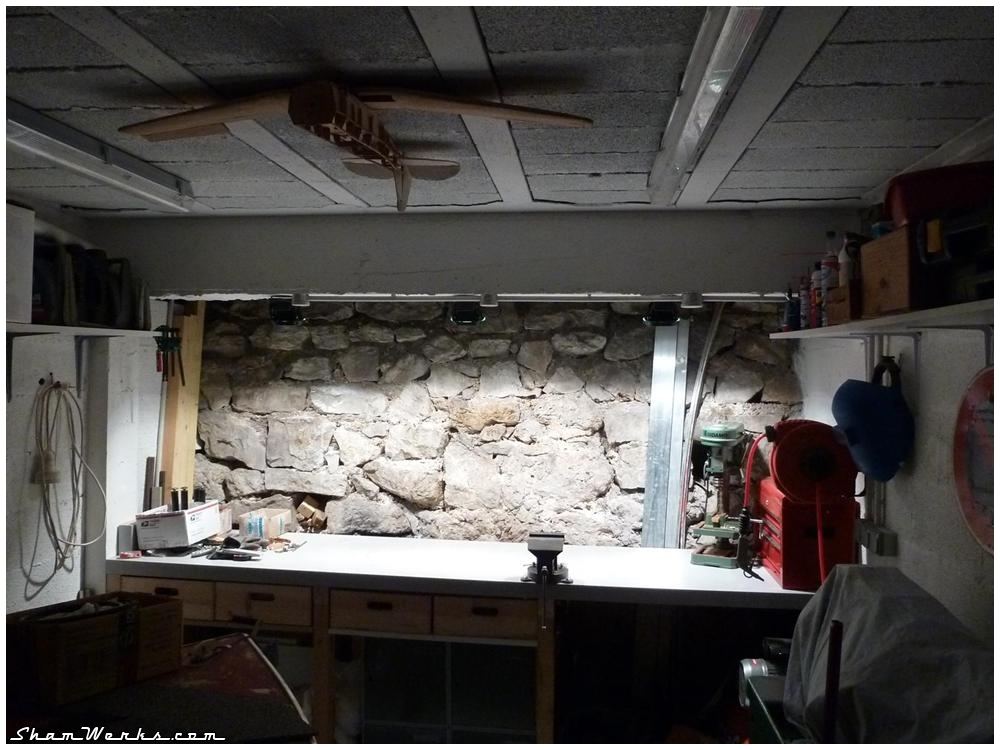
- One long shelf on each side, almost as long as the garage itself, with many angle brackets. The shelves being more than 185cm high, I can easily walk below.
- A 5 shelves rack near the entrance. I'll buy it from Castorama (your "Home Depot") : see here. 90x40cm, height 180cm, heavy duty (supposed to handle 80kg per shelf - I doubt it though).
- Home made workbench, wooden structure. Since the floor is far from being flat, I'll handle the variations. Four drawers below the countertop (actually, wooden crates 40x60x15cm from Castorama as well see here).
- The air compressor will be hidden below the workbench. Not an ideal situation for tis ventilation, but I'll be able to take it out if it has to run permanently. Winding drum for the compressed air hose right above the compressor.
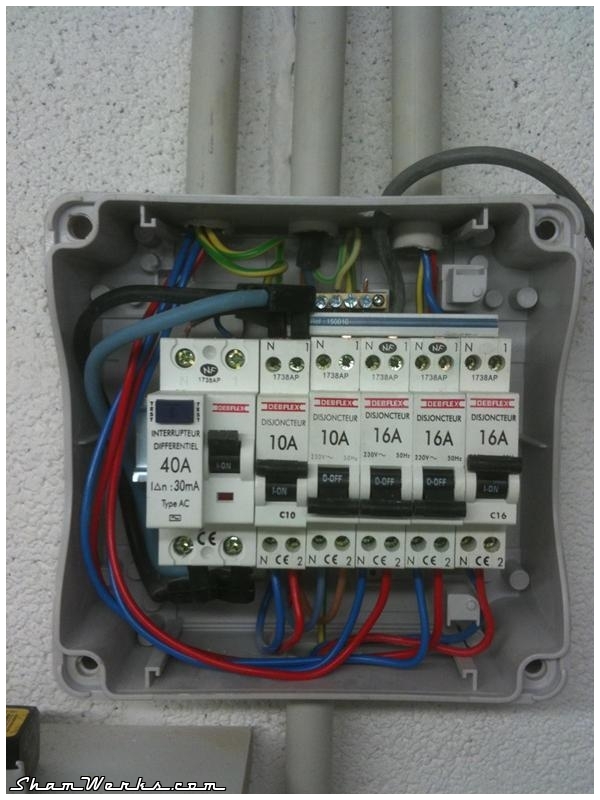
- Brand new electric circuit matching safety standards, with proper circuits breakers, 2 electric outlets near the workbench, another one close to the door.
- Four 1.20m fluorescent lights on the roof, plus three 150w halogen lights above the workbench.
That's it, that's the project right now... Gotta get my hands dirty now!
Posted on 26/07/2011 at 00:05
Workshop : Garage project, the renovation

Act 1 : walls...
OK, first thing, if you've never tried before, painting concrete blocks is Hell on Earth. Specially after 50 years of dust encrusted in...I've painted the walls using a paint which actually is a primer... But it's way white enough for a garage. Plus, it was on a special offer.
So, white acrylic paint Jullien "Multifond 2" it will be. I sprayed the first coat using an HVLP gun, diluting by 50% (that's border-line for the cohesion of the paint, be it works). The spray-gun is quite handy for the first coat, it gets the paint in every hole/asperity of the blocks, it blows away the dust (still remains lots of it even I thoroughly brushed the wall before - wear a dust mask!) and removes the small loose grit from the surface (these gravels would f*ck up your paint roller in 2 sec. if your try it directly...).
The second coat is applied with a paint roller end blocks the concrete from sucking in more paint. Finally, a third coat to make it shiny white, with the roller loaded to the max with paint (almost like a plaster coating!).
Eventually, 2 and a half 10L paint container will be necessary to cover the surface of 45m² (484 sq ft : walls + ceiling), while each paint pot was supposed to cover 96m² (1033 sq ft)! Didn't I tell you concrete blocks suck paint? (...and suck at painting!)
It's long, very long to paint that bloody thing if you want a bright, pristine white result...

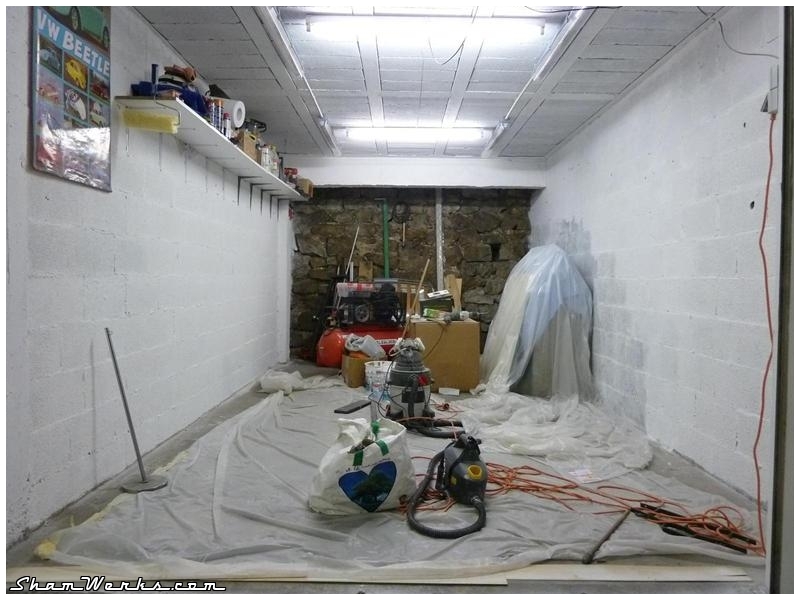

Act 2 : floor...
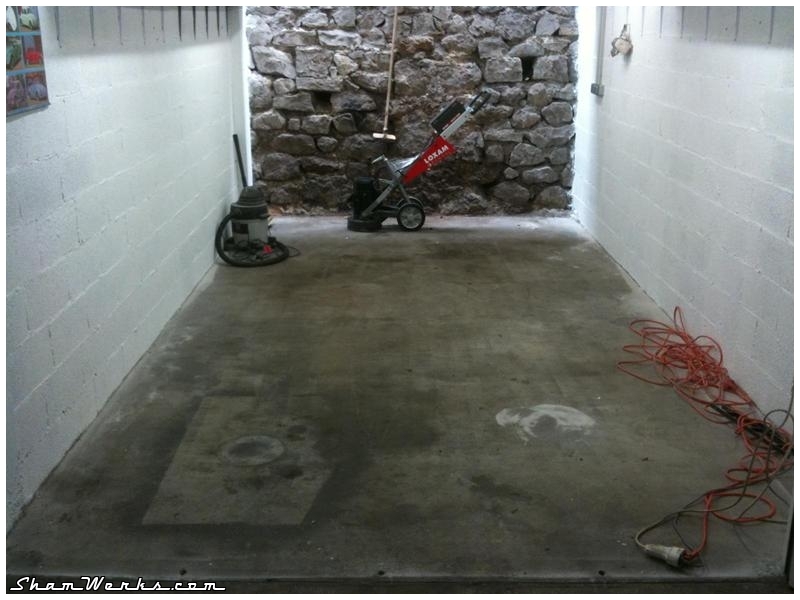
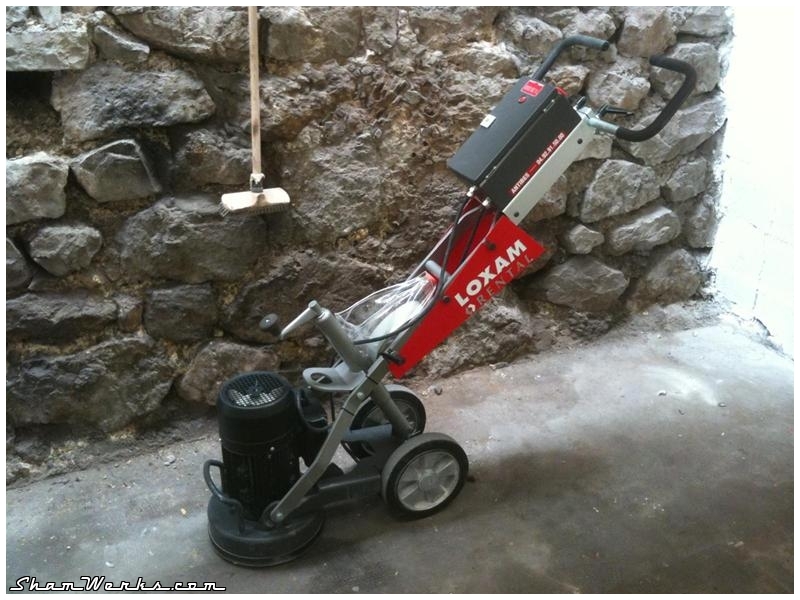
My floor was covered with greasy/oily dirt (see previous article), and I decided to clean it using a concrete grinder. The idea behind this is to remove the top 1mm from the concrete surface to get rid of any oil stuck in... I've rented the machine at "Loxam" (picture below).To be perfectly honest, it was probably not the best solution. You can not imagine the amount of dust that beast will generate : after less than a minute of use, I couldn't see past my elbows! I couldn't even see my hands! Plus, that very fine dust goes everywhere, including the whole building basement and my neighbours garages... Hence heavy complains from them, it was Armageddon!
And, I discovered that the floor of my garage wasn't perfectly flat, and the grinder can not get into these shallow areas... At the end of the day, I managed to clean 90% of the whole surface. Fair enough, but I'm still unsure it was worth the hassle.
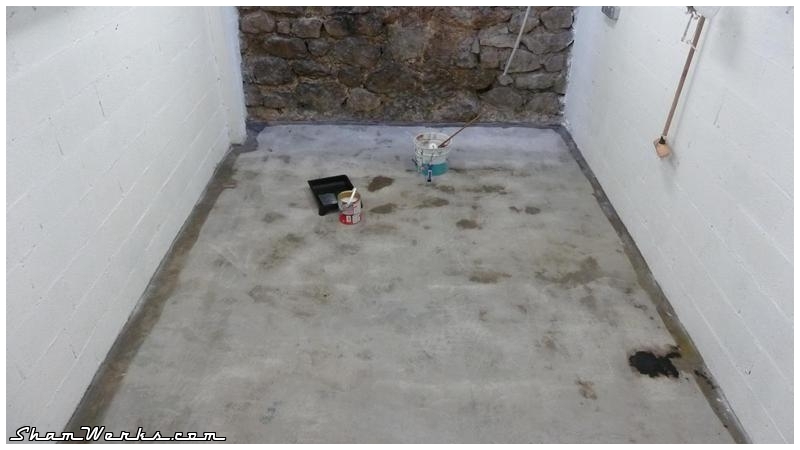
After that, treatment was :
- Acid cleaning ("Shampooing sol ciment/béton V33"), using a floor-cloth.
- Rinsing with floor-cloth too (twice).
- One coat of special primer : "primaire d'adhérence spécial ciment/béton V33".
- Finally, two coats of V33 floor paint : "peinture sol V33 trafic extrême gris clair U133/A".


Act 3 : electricity...
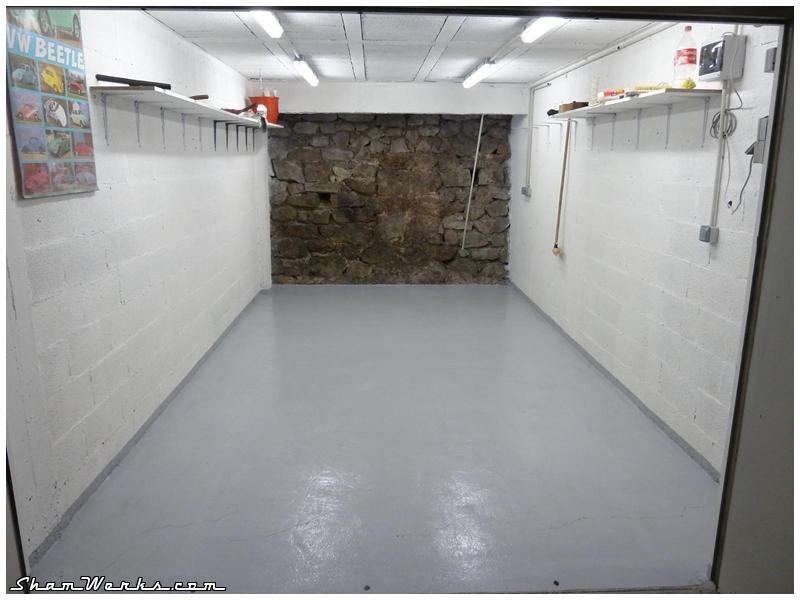
I am not an electrician, but I believe I managed not too bad...4 fluorescent lights on the ceiling, 3 halogens above the workbench, the whole circuit wired with rigid 2.5mm² wire in PVC conduits (with helluvalotta bends and "T"'s!), 3 outlets, 2 switches, and a real electric cabinet with circuit breakers to make it safe.
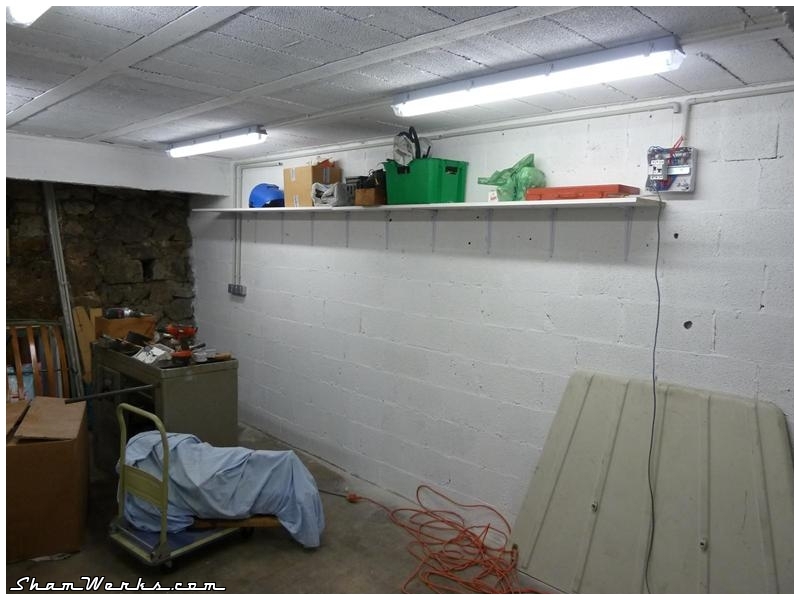

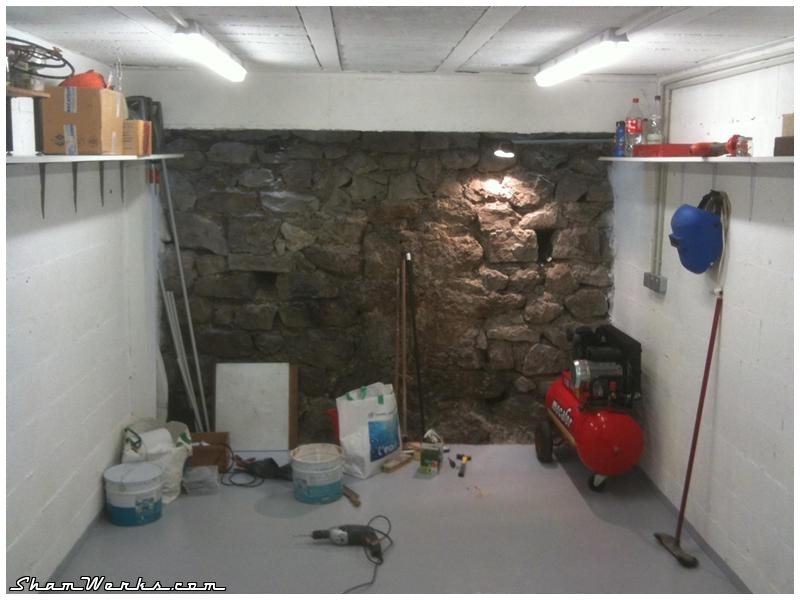
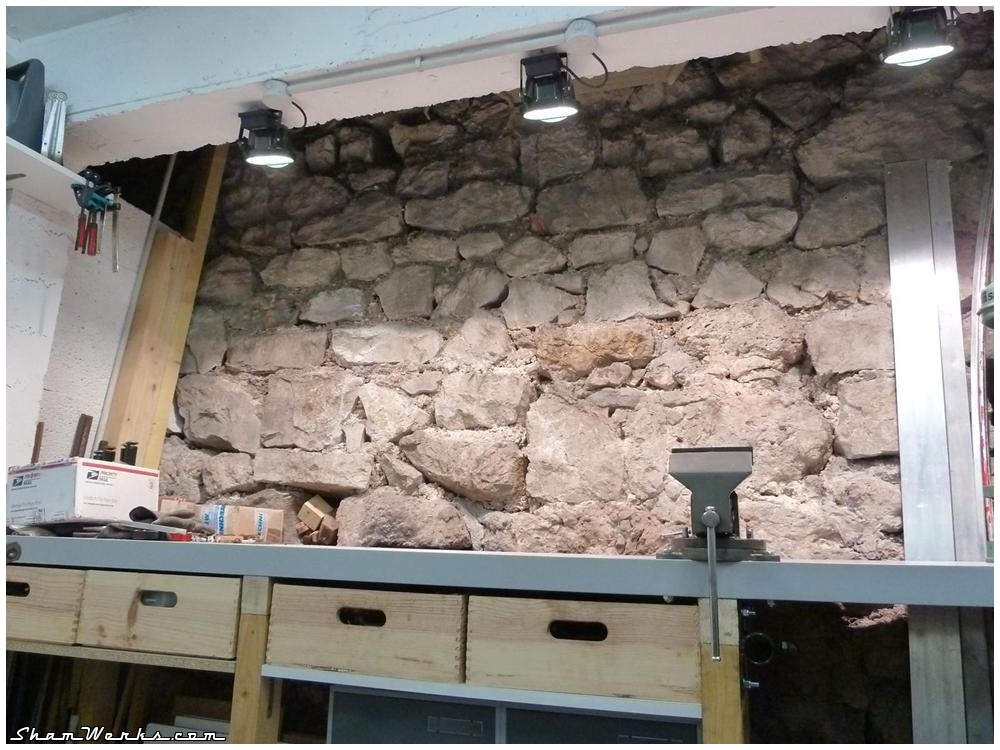
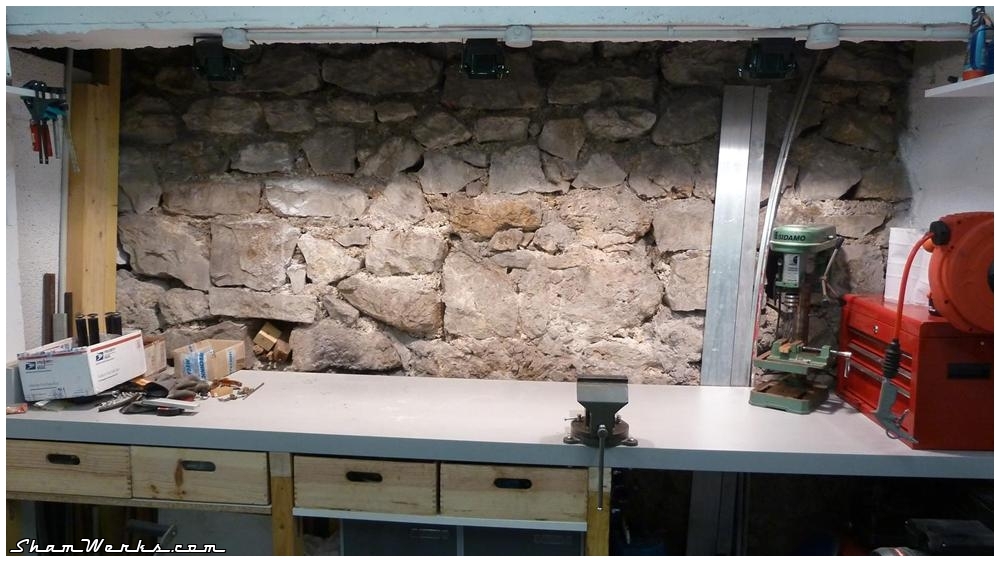
Voilà the current status : that's day and night compared to what it was before! Bright, clean, with plenty of storage space. Still looks a bit messy on the pictures, I didn't have the opportunity to organize everything!
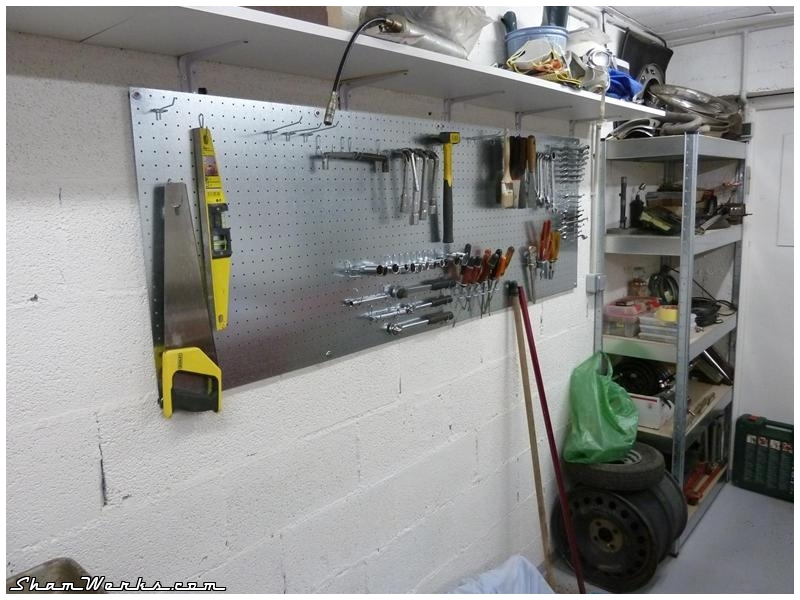
Compared to the original Sketchup plan (see previous article), I've moved the tools panel to the side wall : it's more practical, access is easier this way than if it was above the workbench as originally planned.

Posted on 18/10/2011 at 14:13
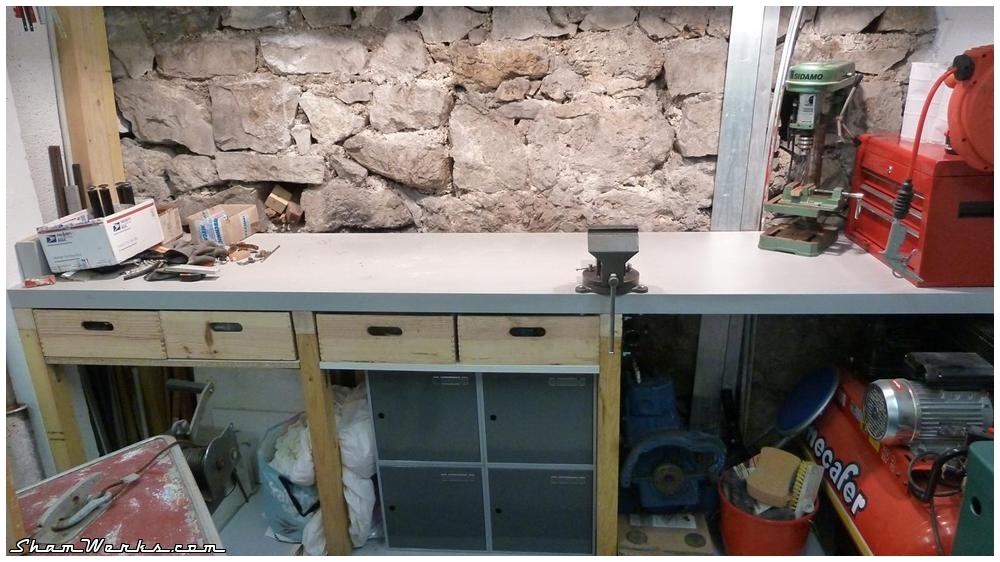
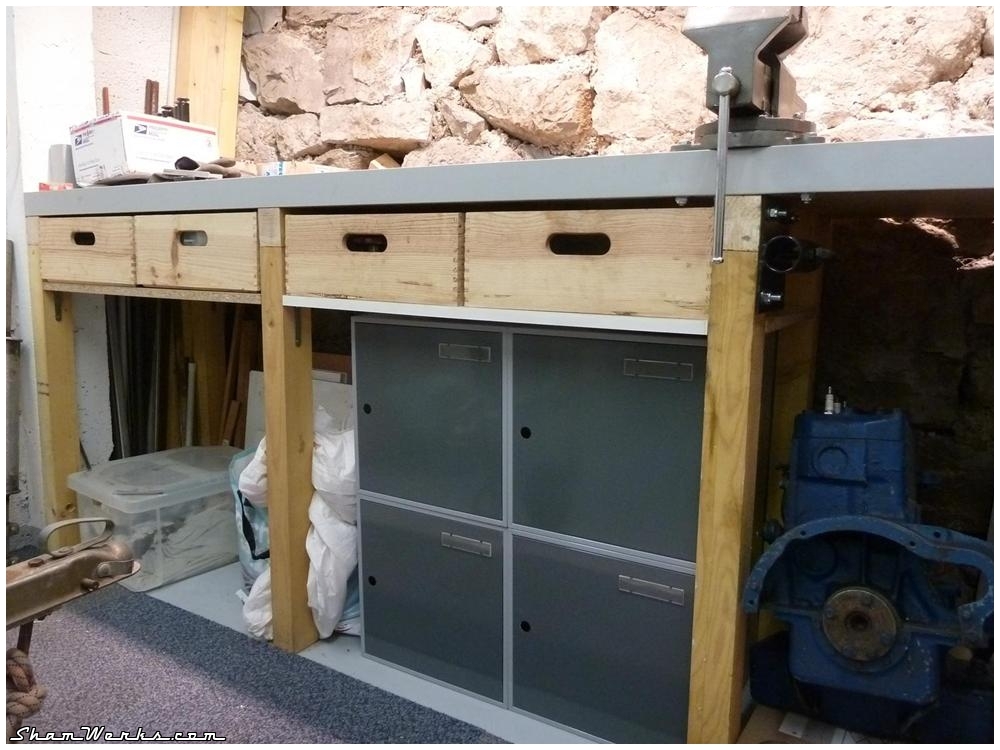
Workshop : Workbench

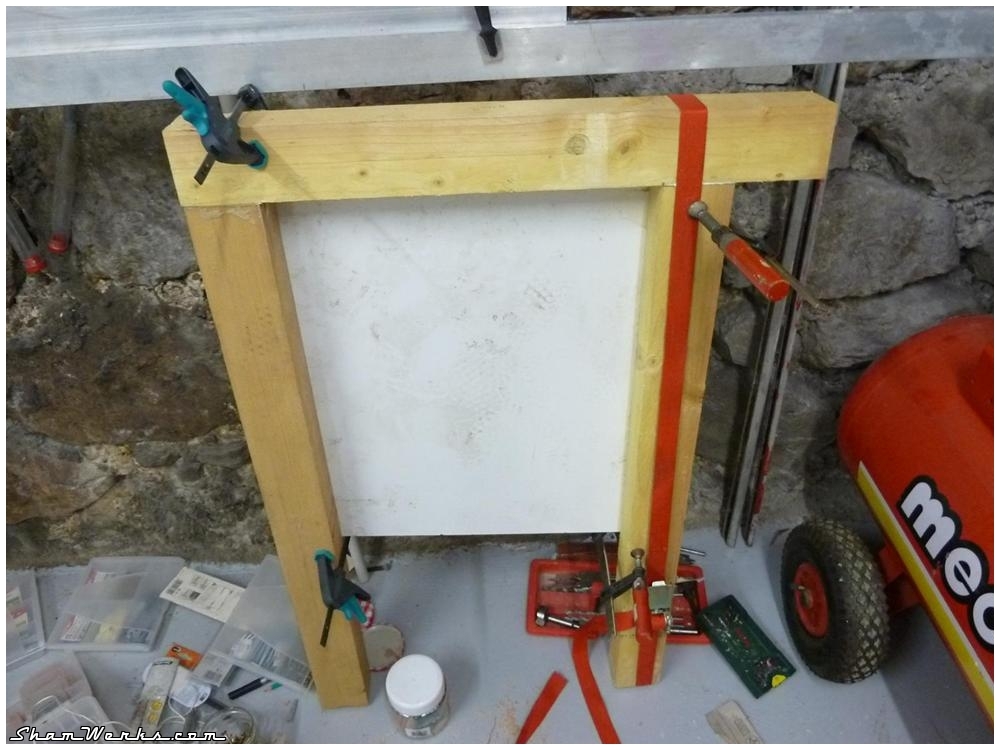
Last major step in the process of renovating my garage : create a proper workbench.
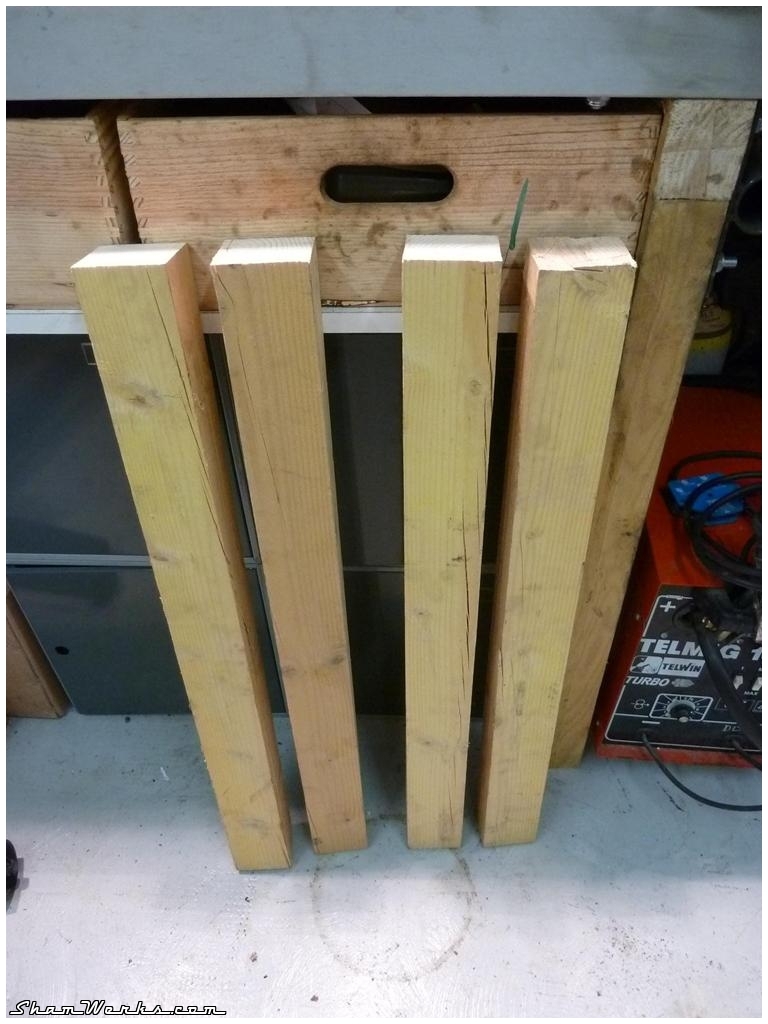
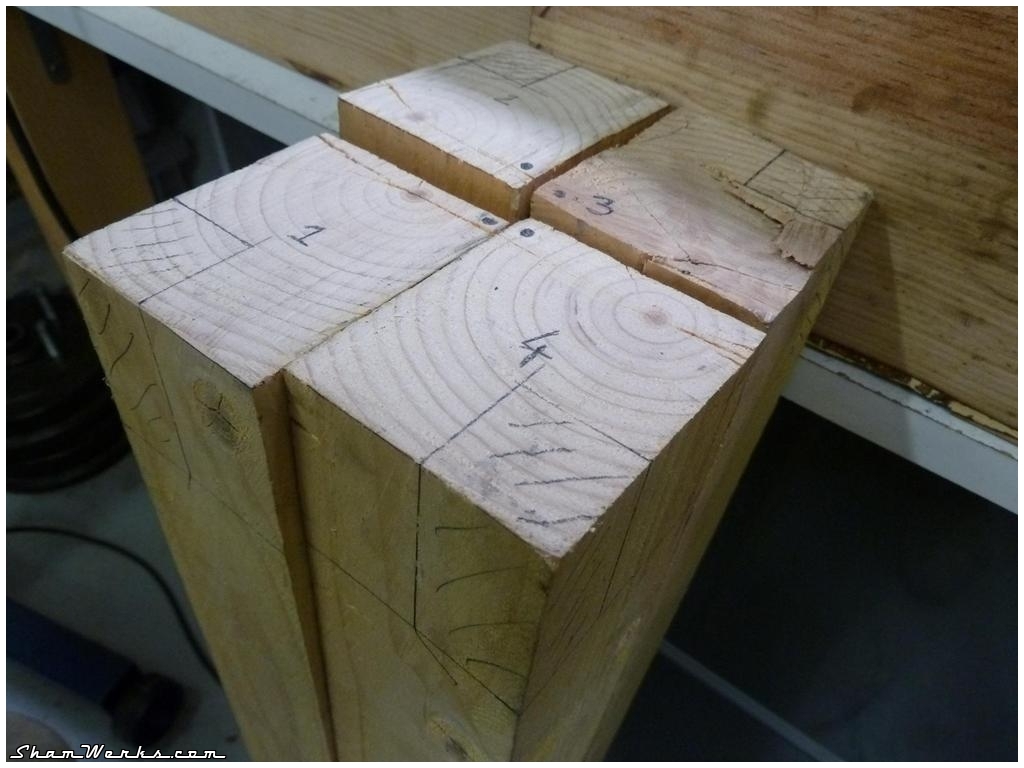
The specifications were simple : sturdy enough so I can hammer on it, or put a couple of complete engines on it; higher than standard benches since I'm tall and the usual benches just kill my back; precisely adjusted to the space available in the garage (I ain't got much space, so I can't afford to lose any); and obviously... As cheap as possible.
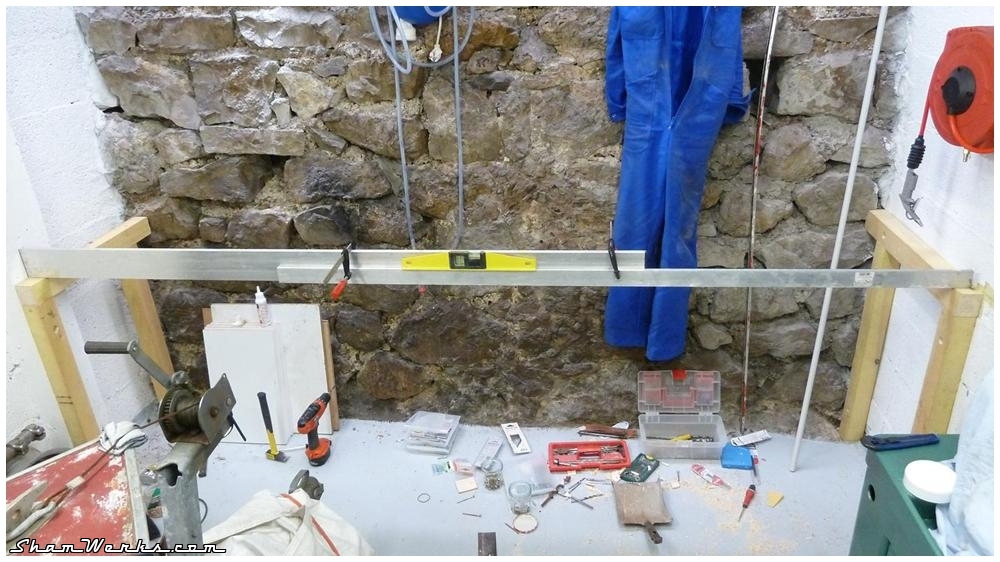
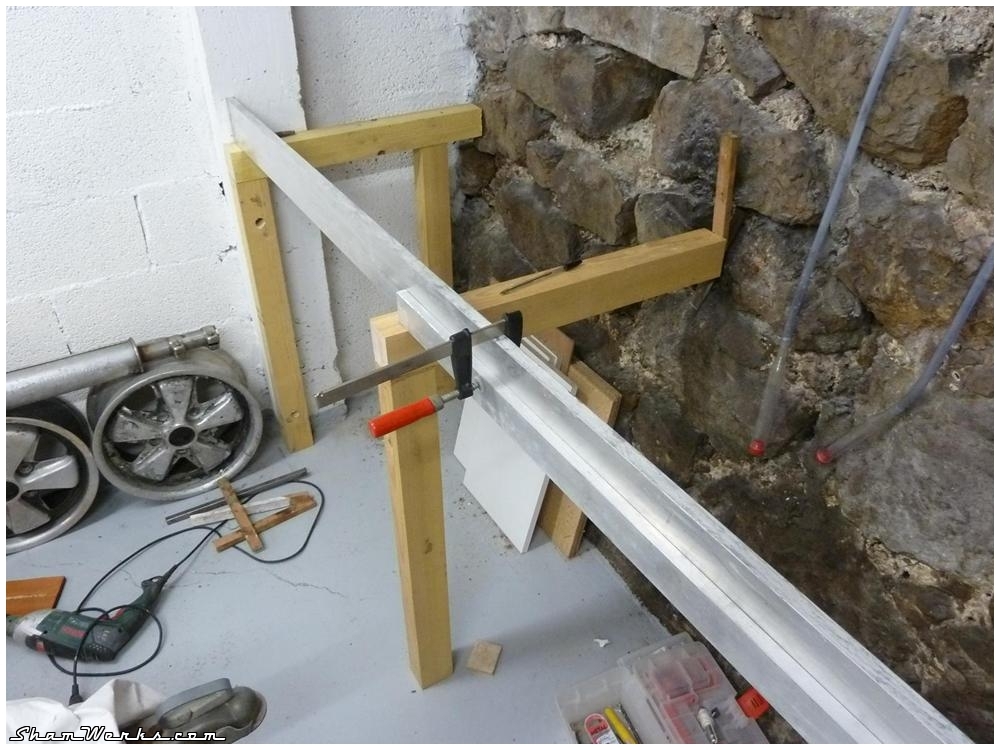
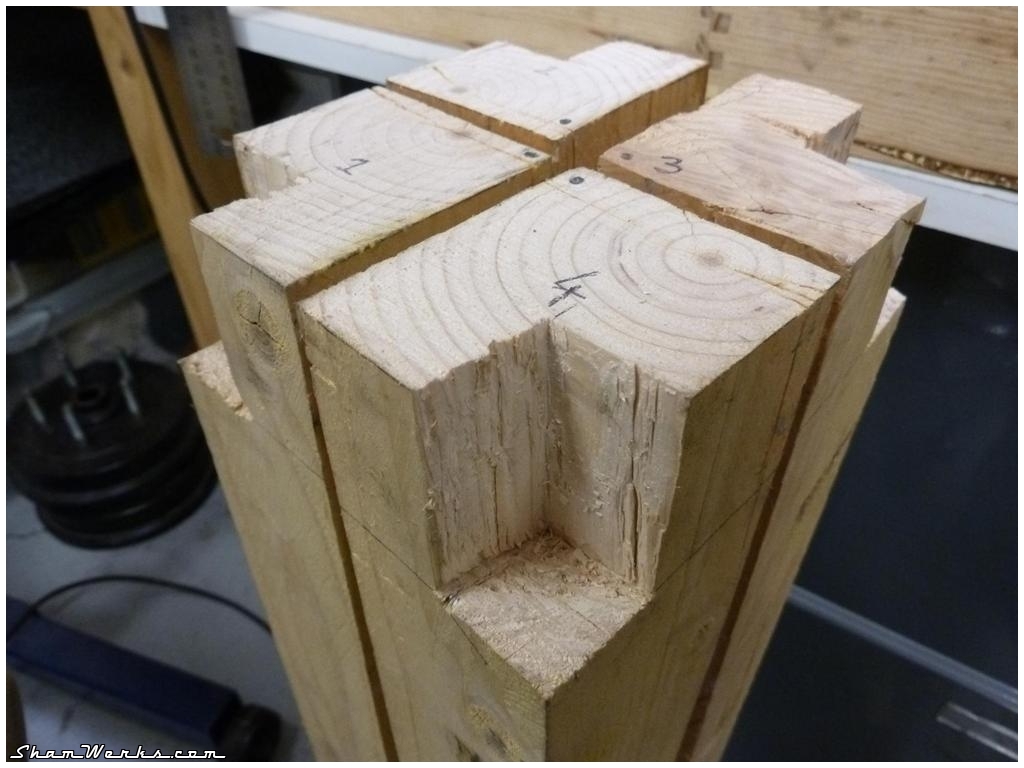
So, this has to be DIY, tailor-made... Moreover, the floor isn't perfectly flat, so every single foot rest of my workbench has a different length...
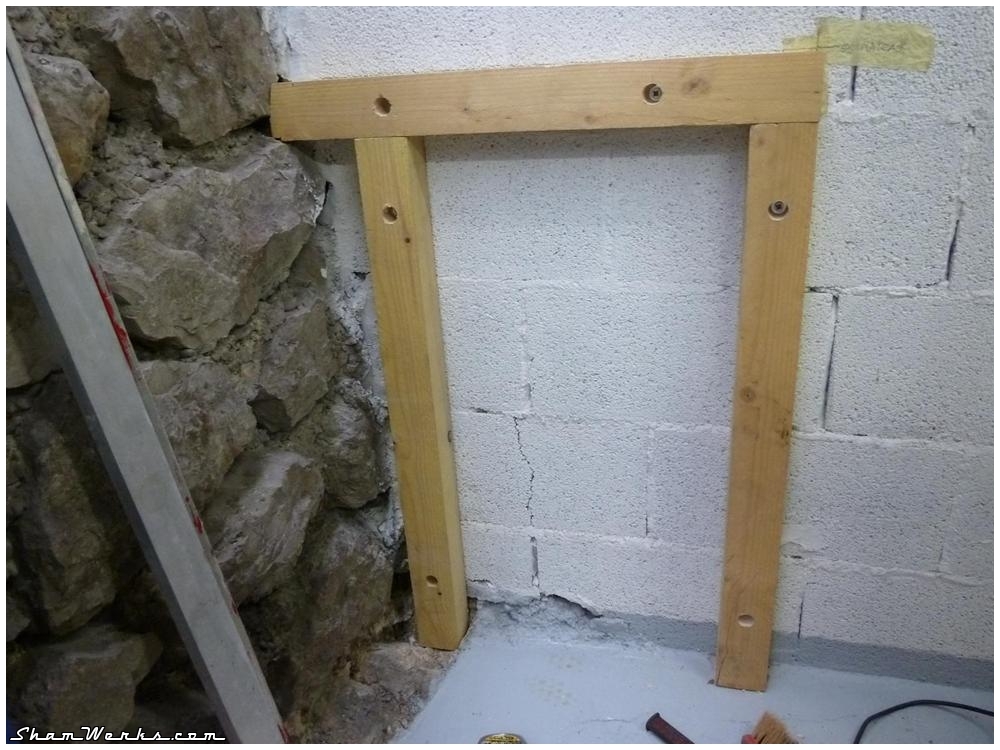

Once both of these stands are fixed into the walls, I could, using a long aluminium rule (actually, it was two 2 meter rules clamped together) in order to measure the exact length of each stand. Well, have a look at the pictures, you'll understand what I mean.
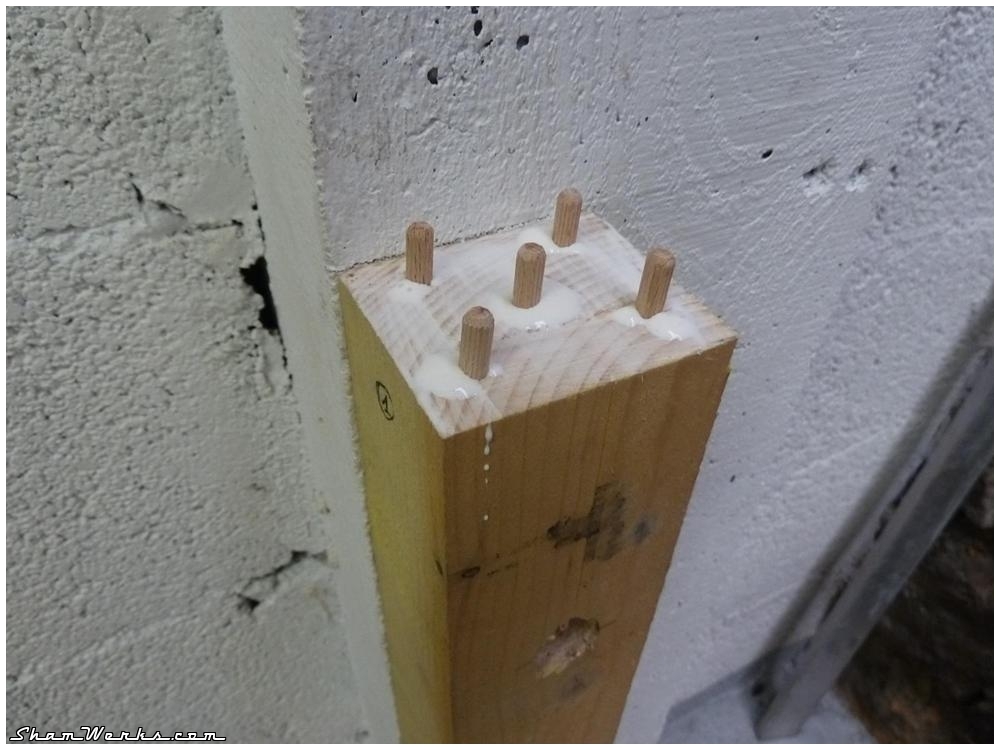
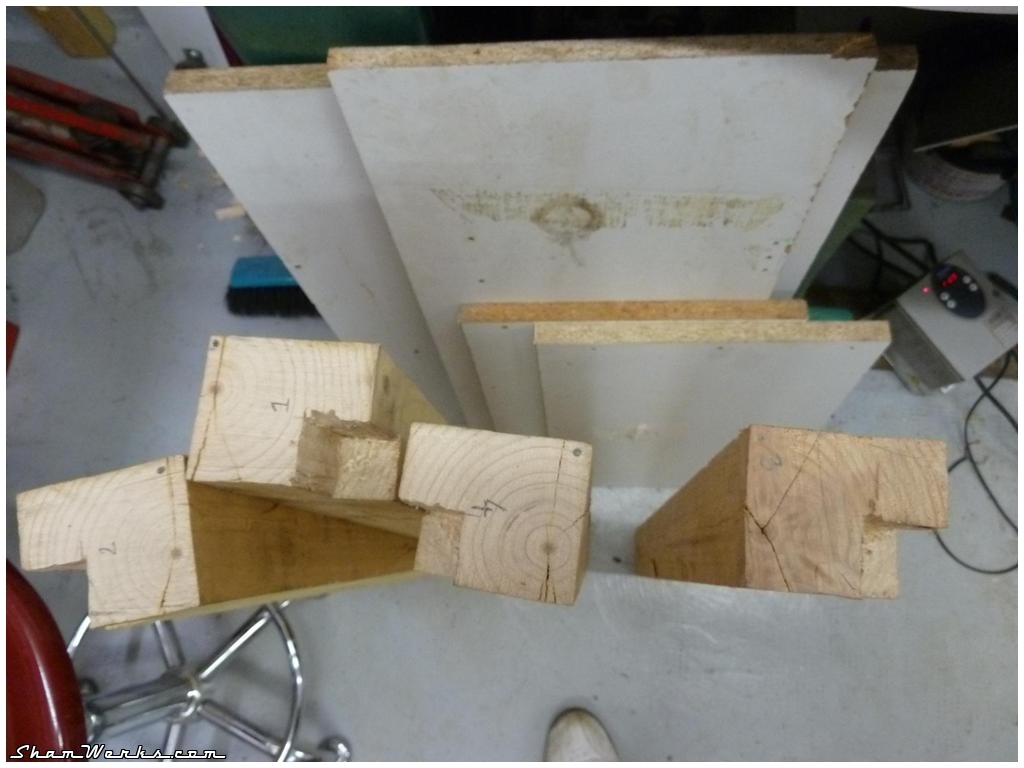
Stands are assembled using dowels and wood glue. I glue everything up clamping the whole assembly against a spare chipboard : pressing the assembly is done using a ratchet strap, while clamps make sure everything remains square and in the same plan.
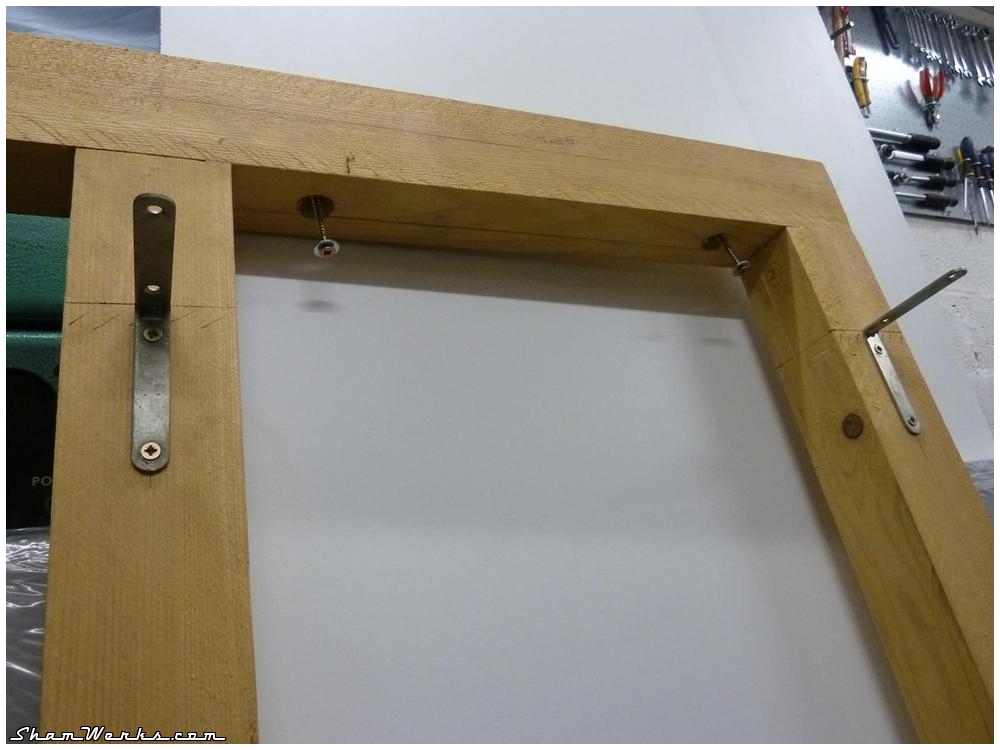
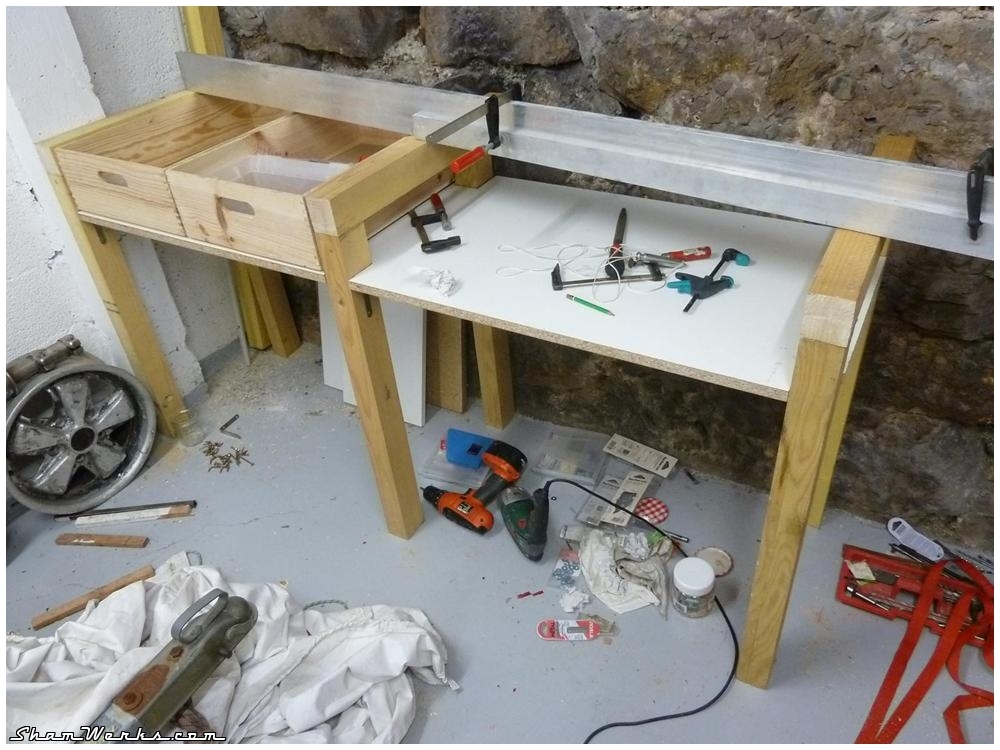
On top of it all, a 58mm thick (maximum I could find) melamine chipboard kitchen countertop, and here you go!
I'd prefer a proper counter top made of an assembly of lerge lumber pieces, planed all together... But I don't have the room, nor the time, to go into such a project. That'll wait till I have a real workshop!
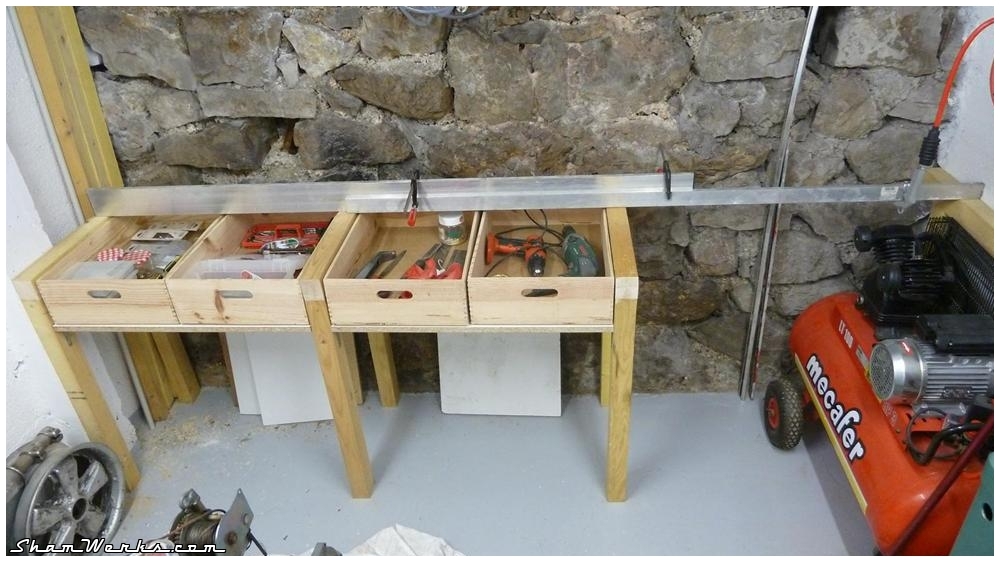

The 4 bottom metal cases I found in the trash bin (seriously, there were 50 of them, brand new!), and luckily they just fit below the drawers. Below the vice, you can see the VW engine support, fixed on the side of the wooden stand.
I know, my garage looks more like a lab now, it's quite far from what it looked like in the beginning (Click here the "workbench" before :
 ), but I like to work in a clean, well ordered environment. Yeah, probably some OCD as well, hmm.
 And now finally I'll be able to work on some real projects...
Posted on 29/11/2011 at 00:56
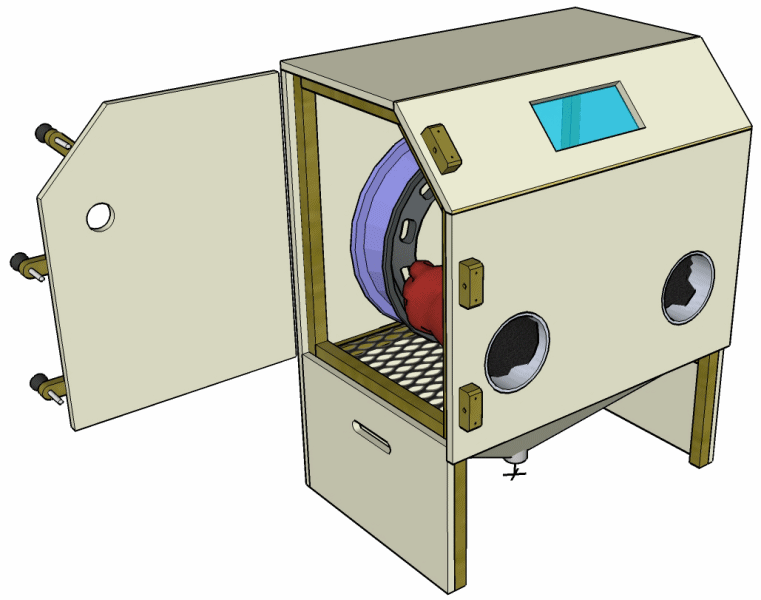
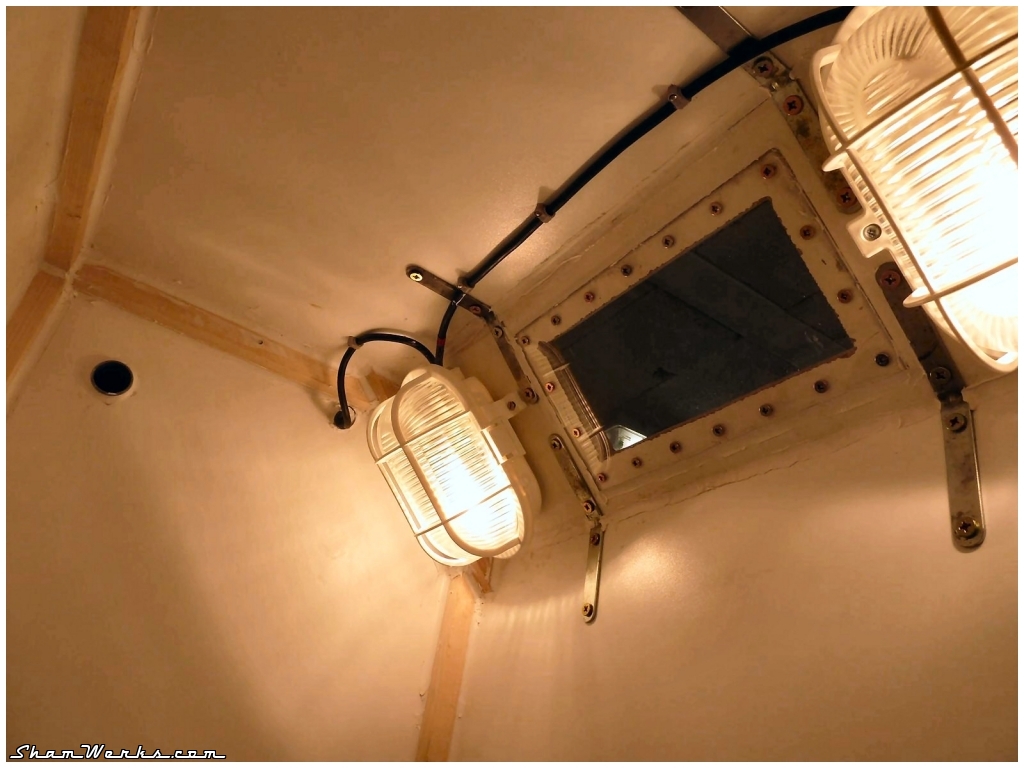
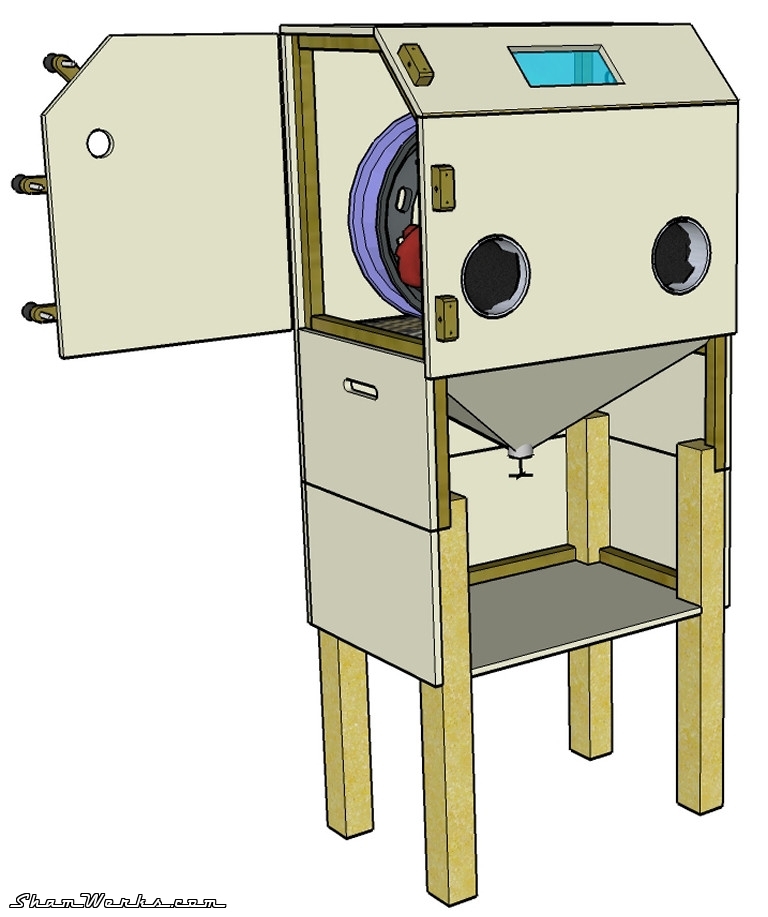
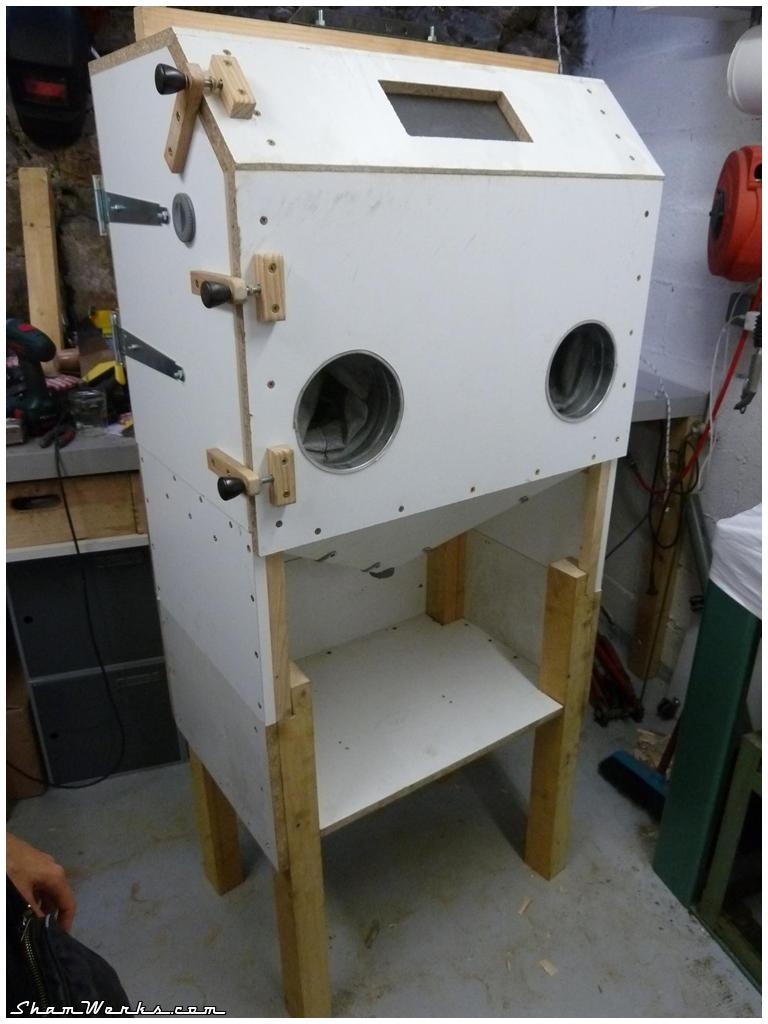
Workshop : DIY Sandblasting cabinet
 A sandblasting cabinet... Now that's a tool I've been looking for for quite a long time!
 One can find different models for sale, but I find them pretty expensive, plus they never have the right dimensions (too large or too small)... So I decided to build my own, with ideal dimensions.
Plans
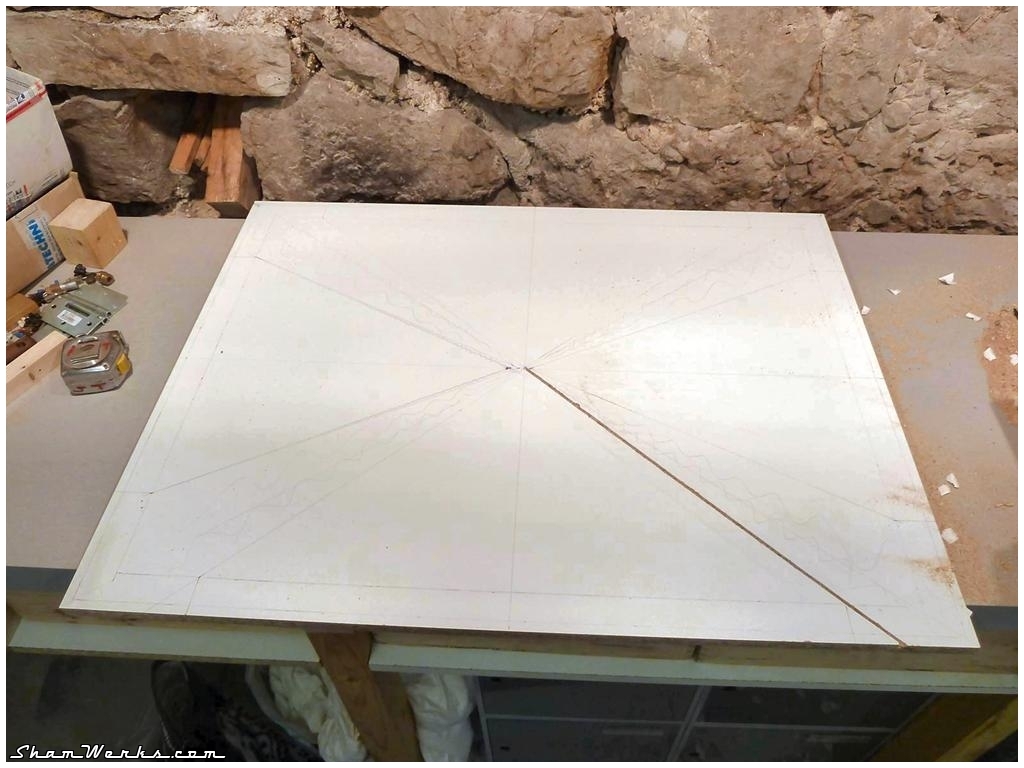
As usual, I started by drawing accurate plans with SketchUp (if you're a frequent visitor on ShamWerks, this shouldn't be a surprise!)...
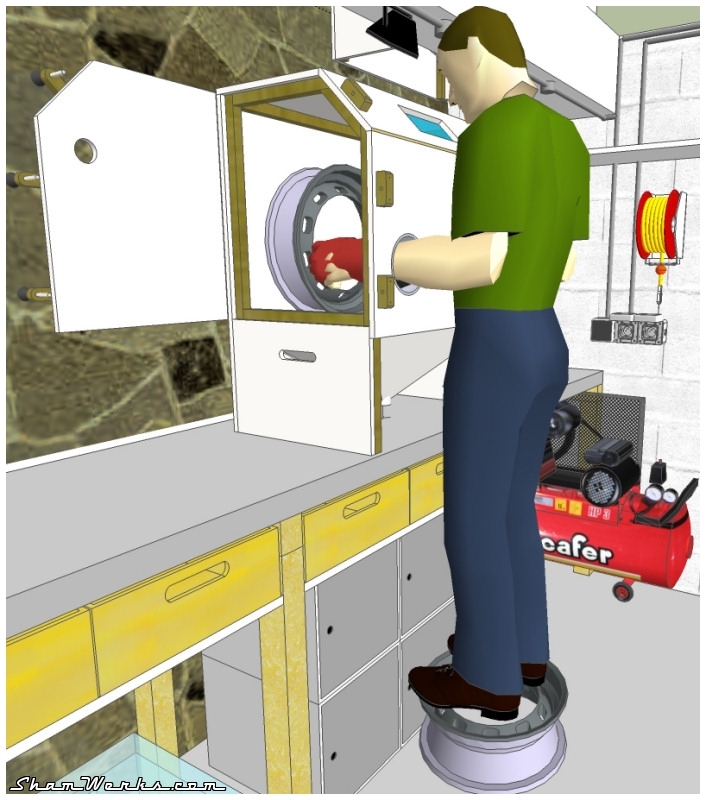
For the cabinet to work properly, the bottom funnel-shaped sand recycling tank needs to have enough angle for the media to slide down to the bottom. That made my design way taller, and since the cabinet is supposed to stand on my workbench (quite high itself at 95cm from the floor), it's too high for me to use it comfortably. Therefore, I want the funnel to work properly and the cabinet on my workbench, I'll need myself to stand on some sort of support (a rim for example) in order to have a correct working position.
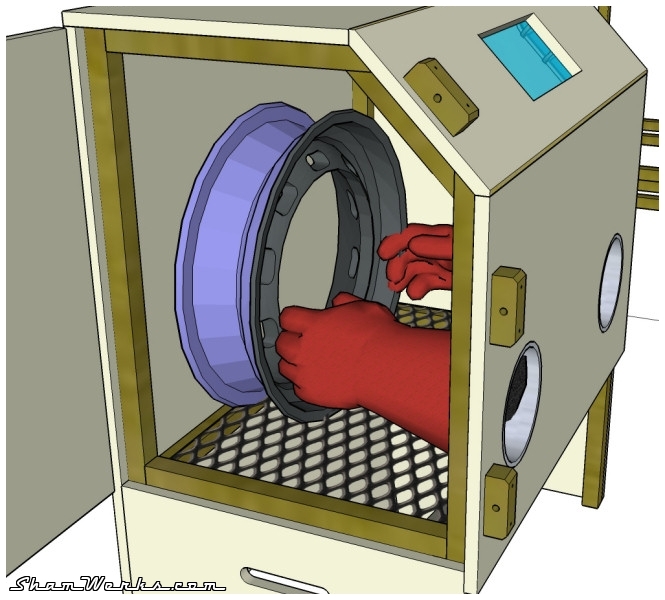
In terms of size, I've adapted the dimensions of my cabinet so that a 15" rim can fit in it. I have an idea for a flexible extension if I need to blast bigger parts, but it'll have to wait..
My SketchUp plan is available for download here.
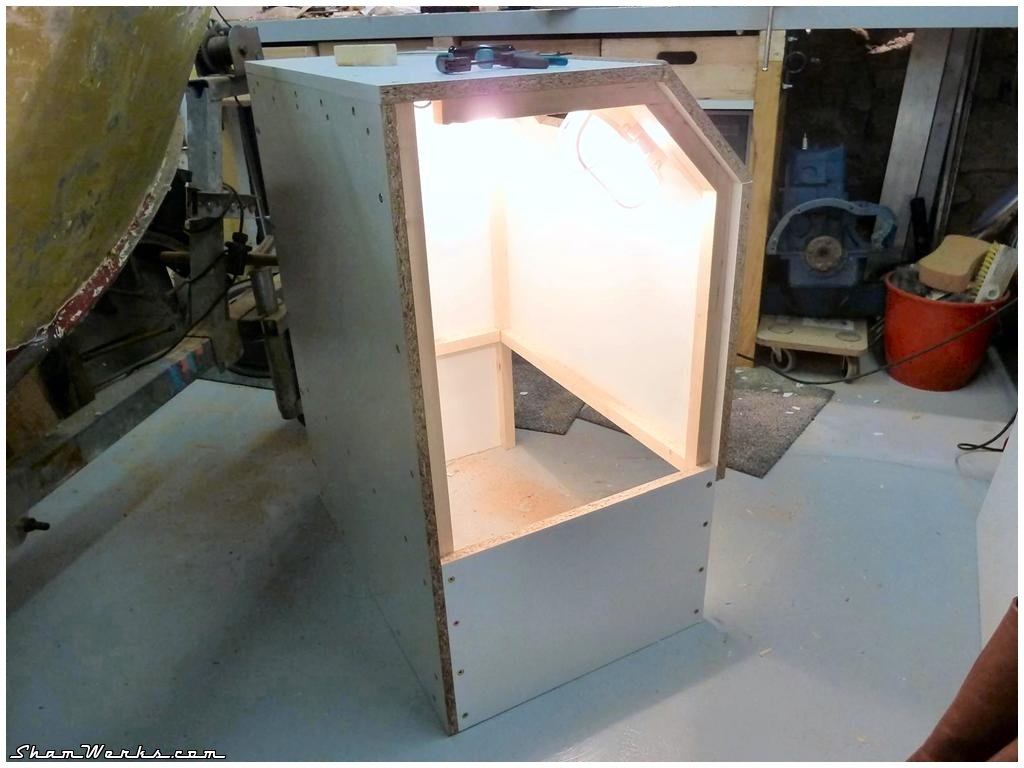
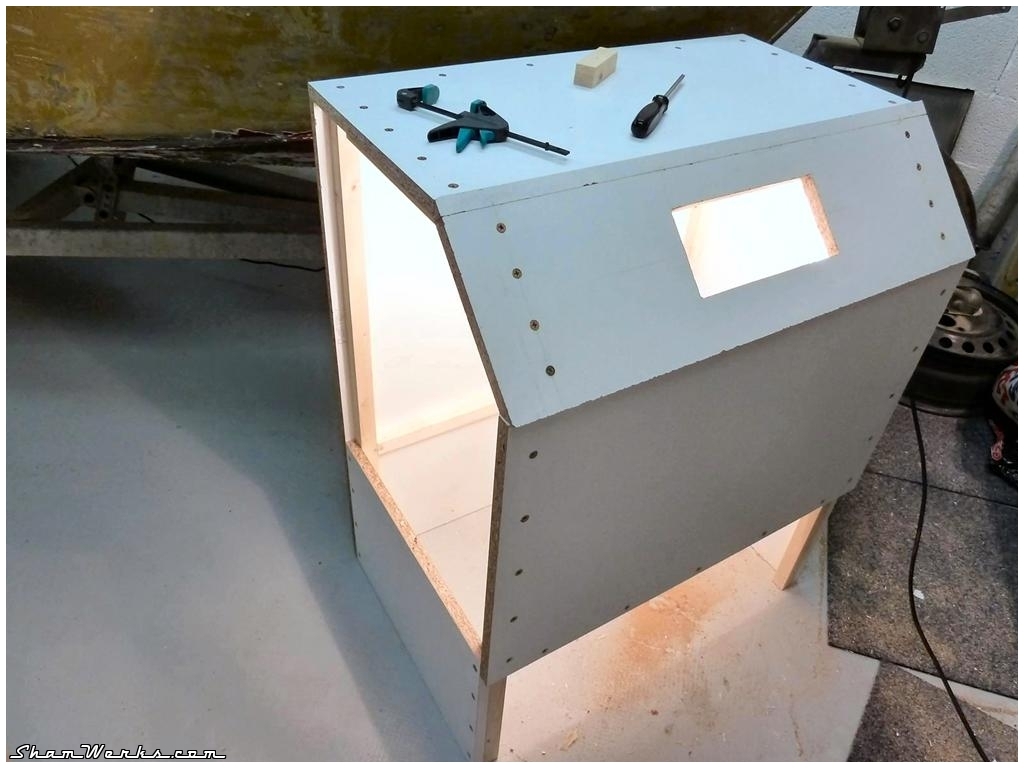
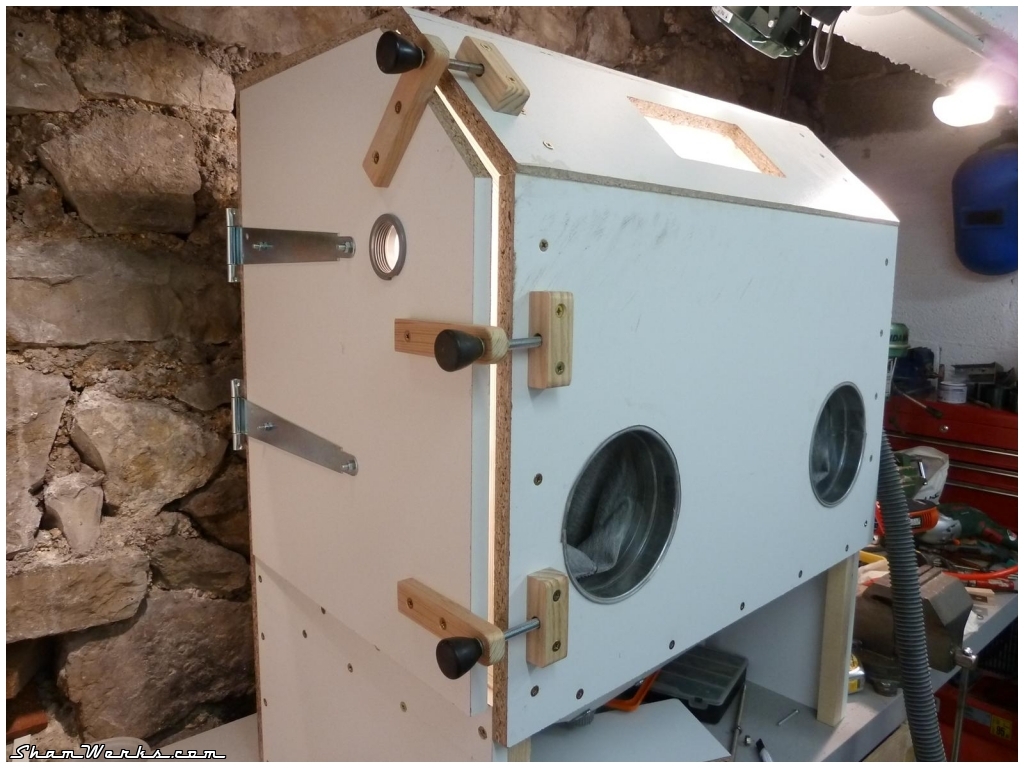
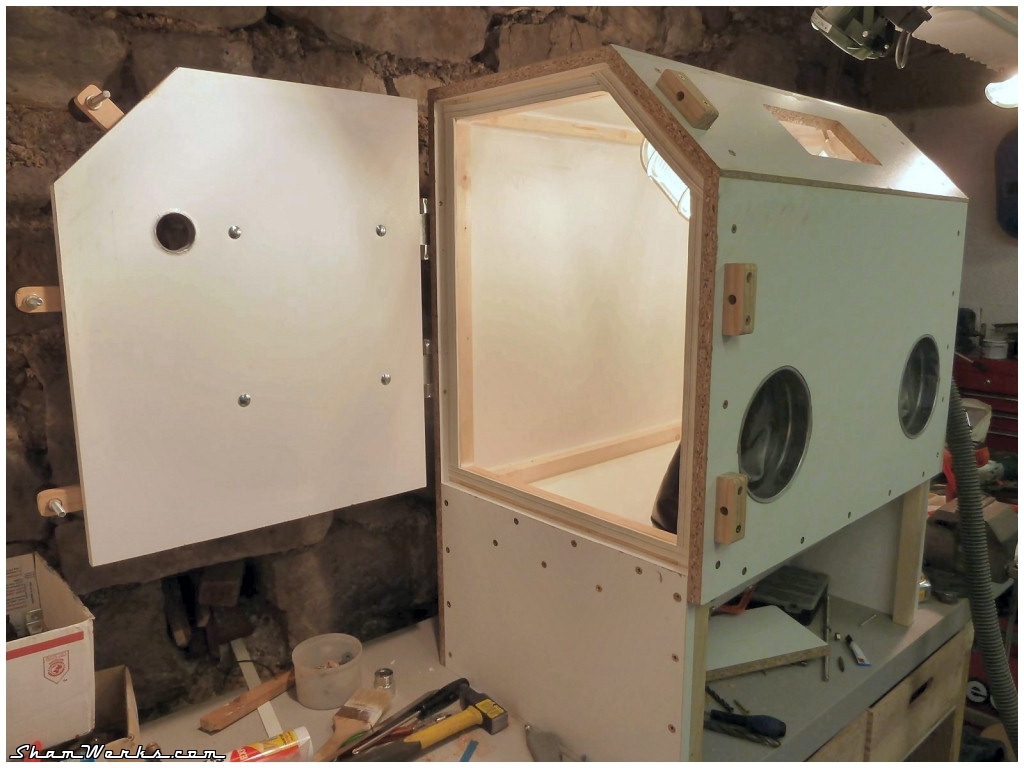
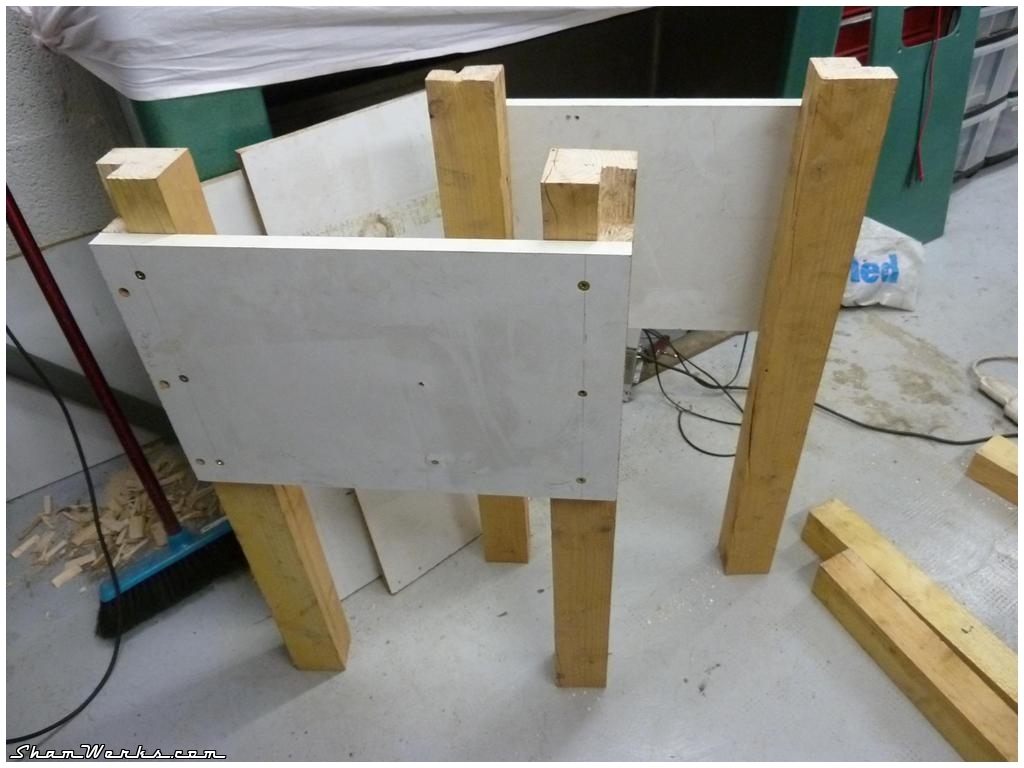
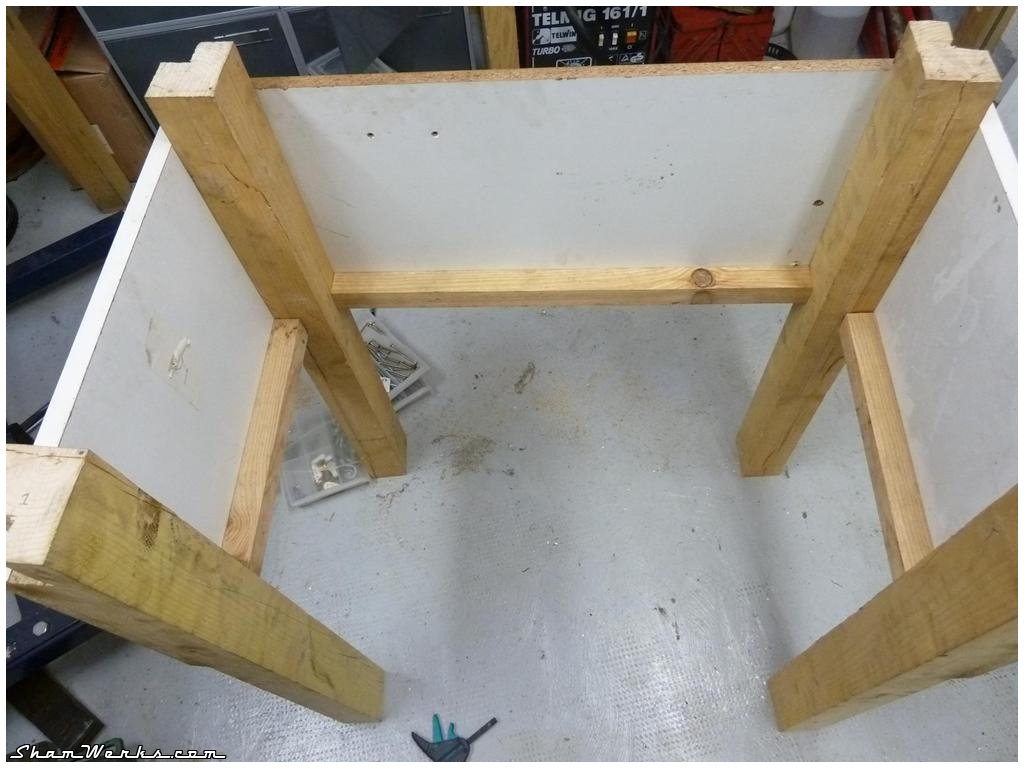
Building
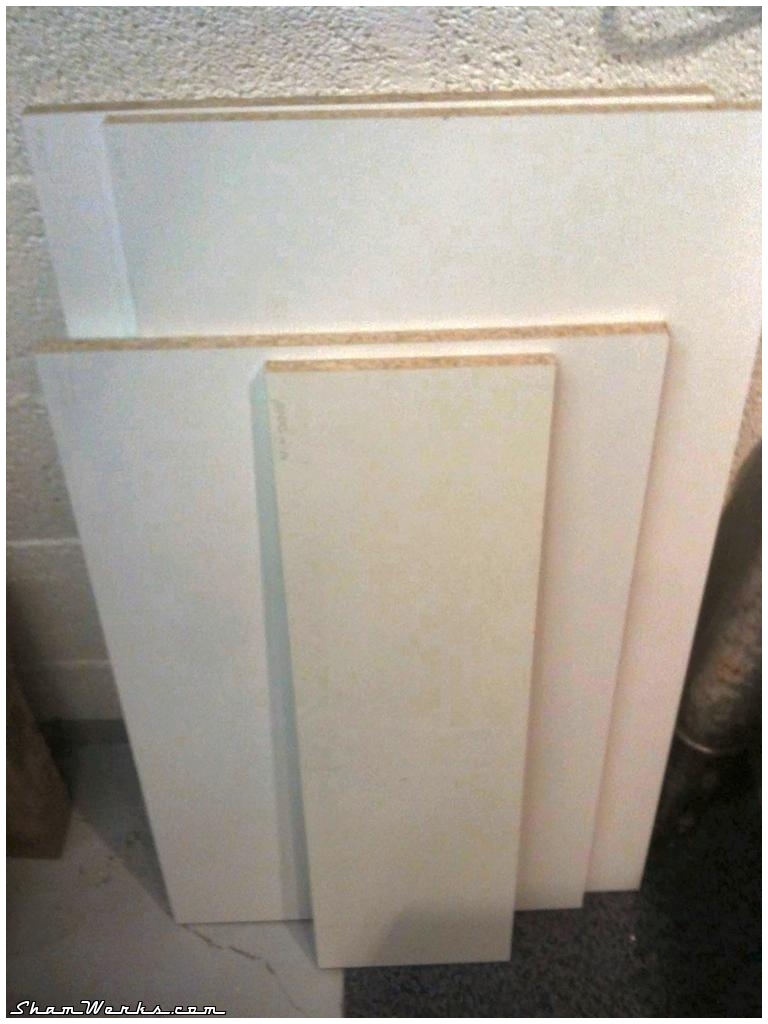
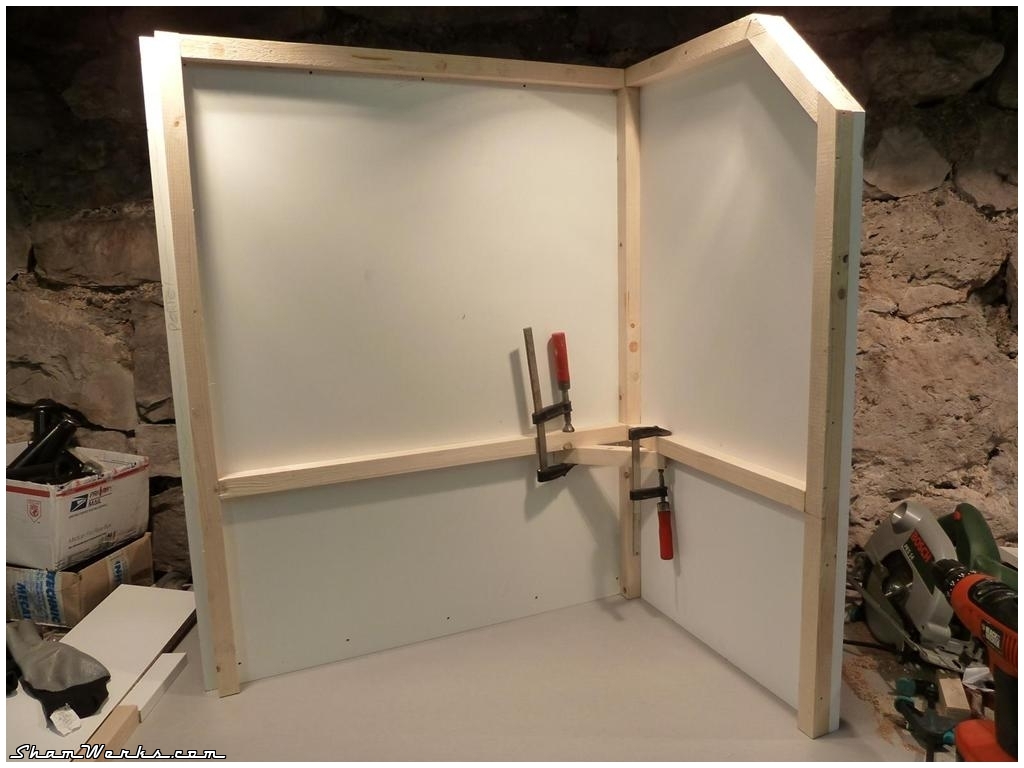
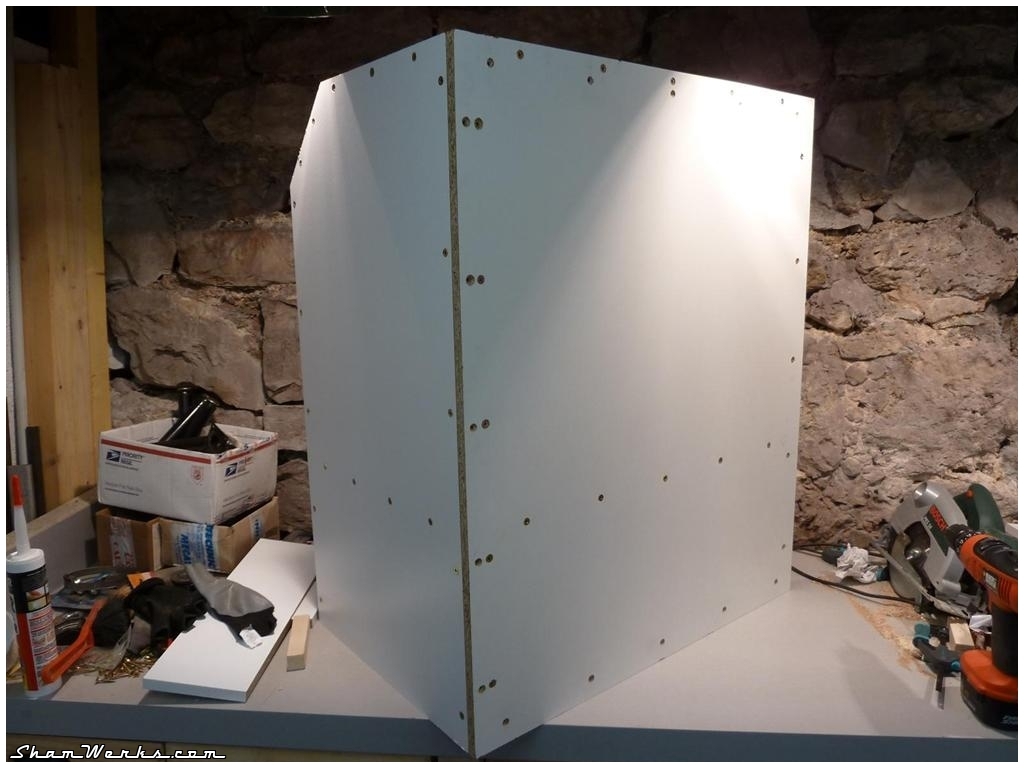
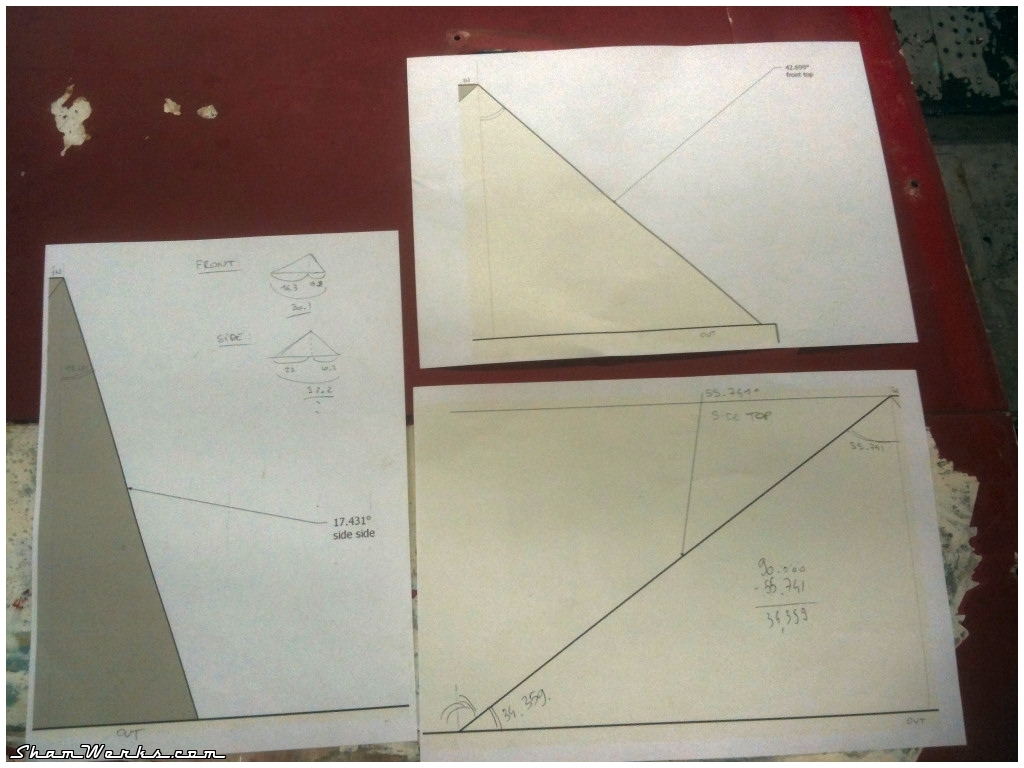
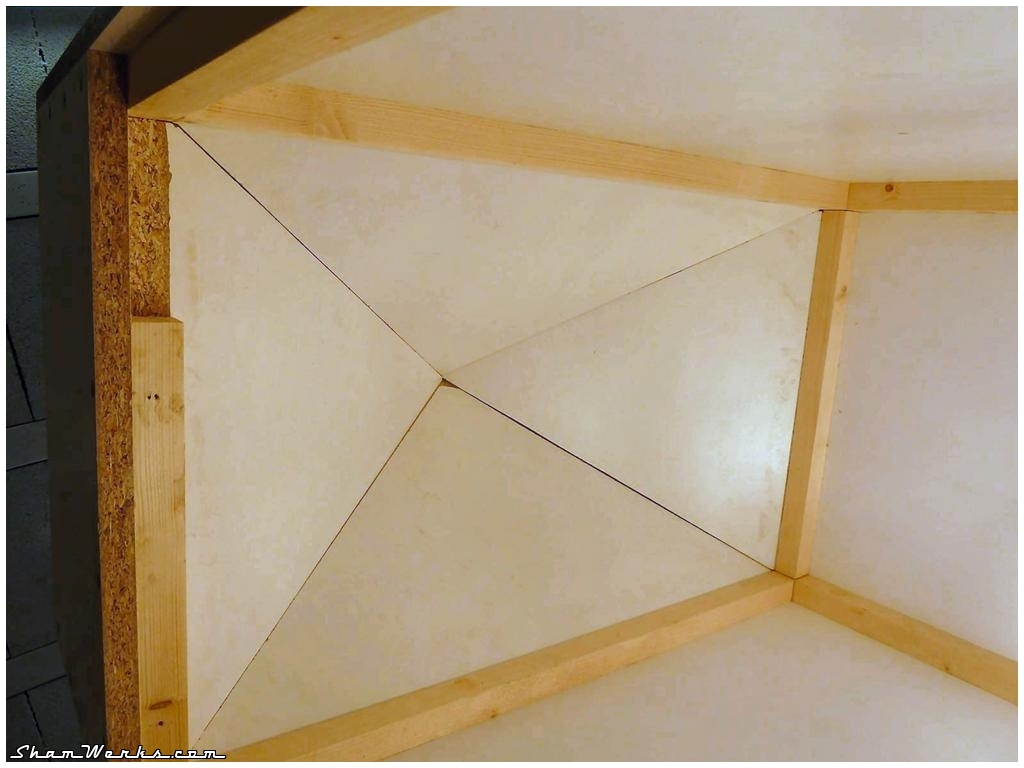
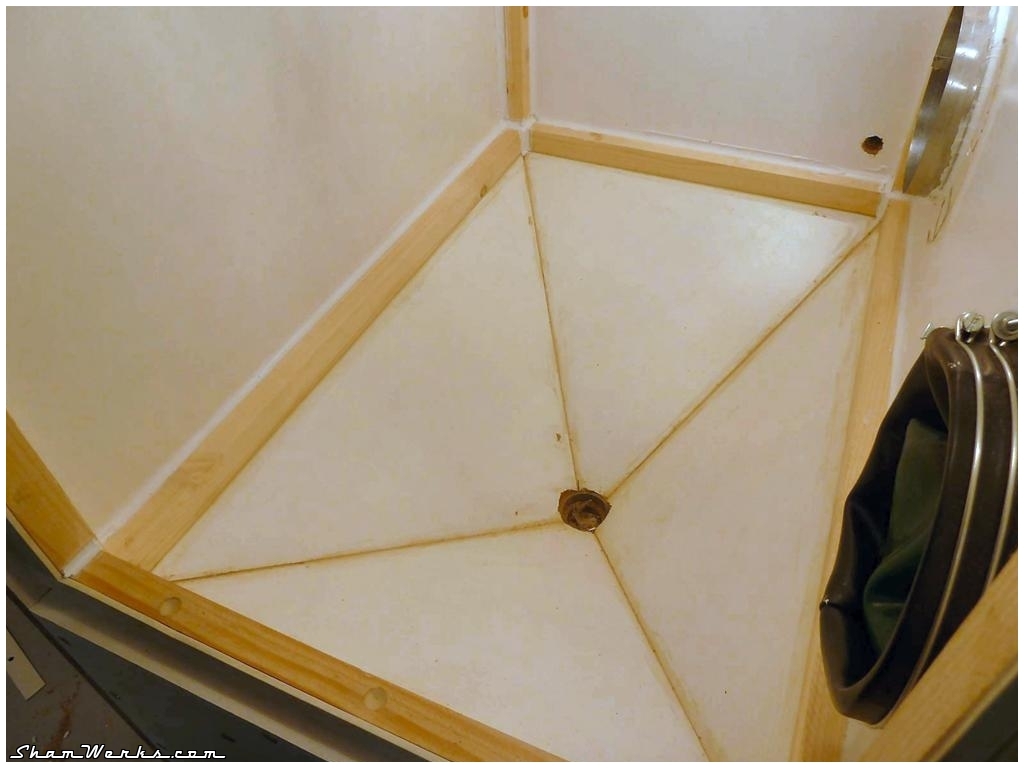
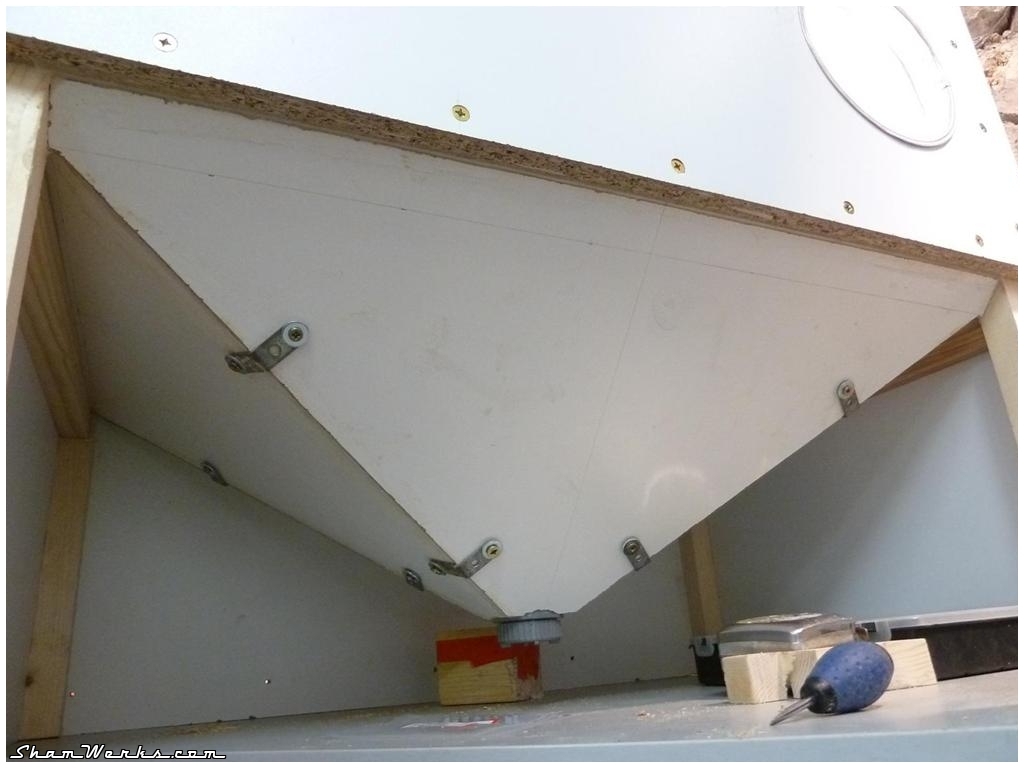
The cabinet is built out of white melamine 15mm thick chipboard. That's purely an economic choice, as I hate working with this material : but al the boards for €37, that's a bargain... Additionally, the white surface will add a welcomed brightness inside. All boards are glued and screwed on a 27x27mm pine wood frame.The only difficulty in this process is th bottom funnel shaped part, in which the media is recycled : in order for the assembly to be accurate, I need to make very precise angle cuts with my circular saw... In order to make it easier, I've printed the angle directly from Sketchup (removing the perspective effect to have a parallel projection) on A4 paper (see picture) : then I could directly put my circular saw on the paper and finely adjust the angle by visually aligning the blade with the print. I've honestly been impressed by the accuracy of the method, as my assembly wasn't totally perfect but very close to! My saw can cut up to a 45° angle ; unfortunately it wasn't enough for one of the angles, so I temporarily glued a strip of wood below the saw's base to reach the 55.7°. The method isn't really secure but it worked like a charm.

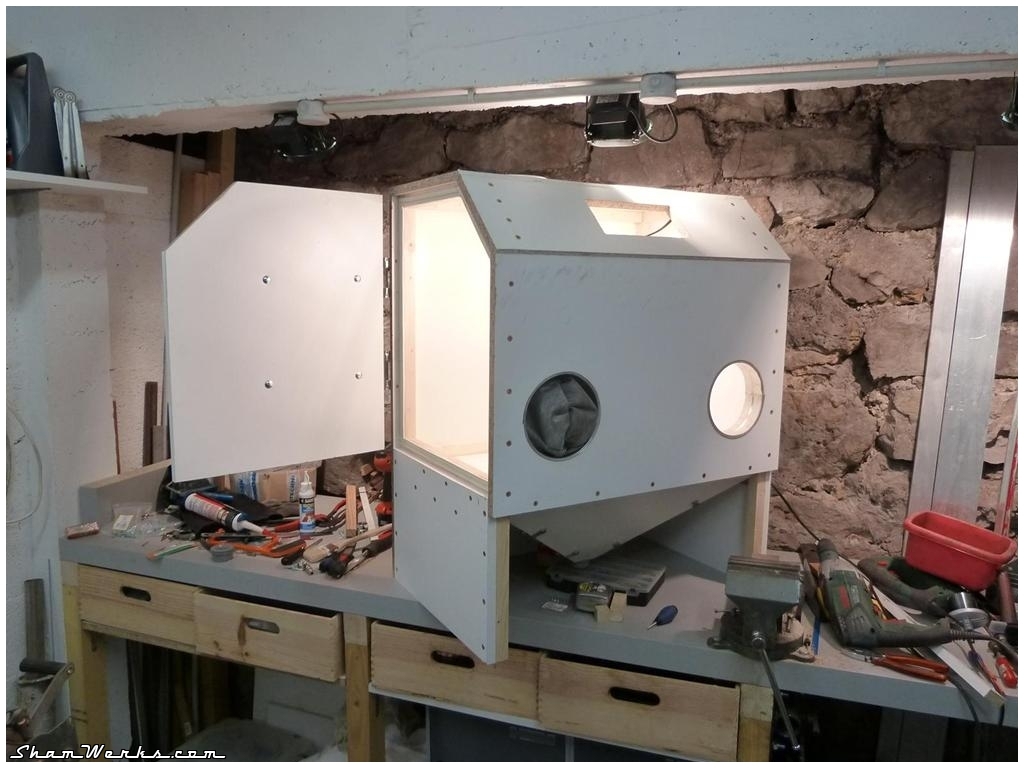

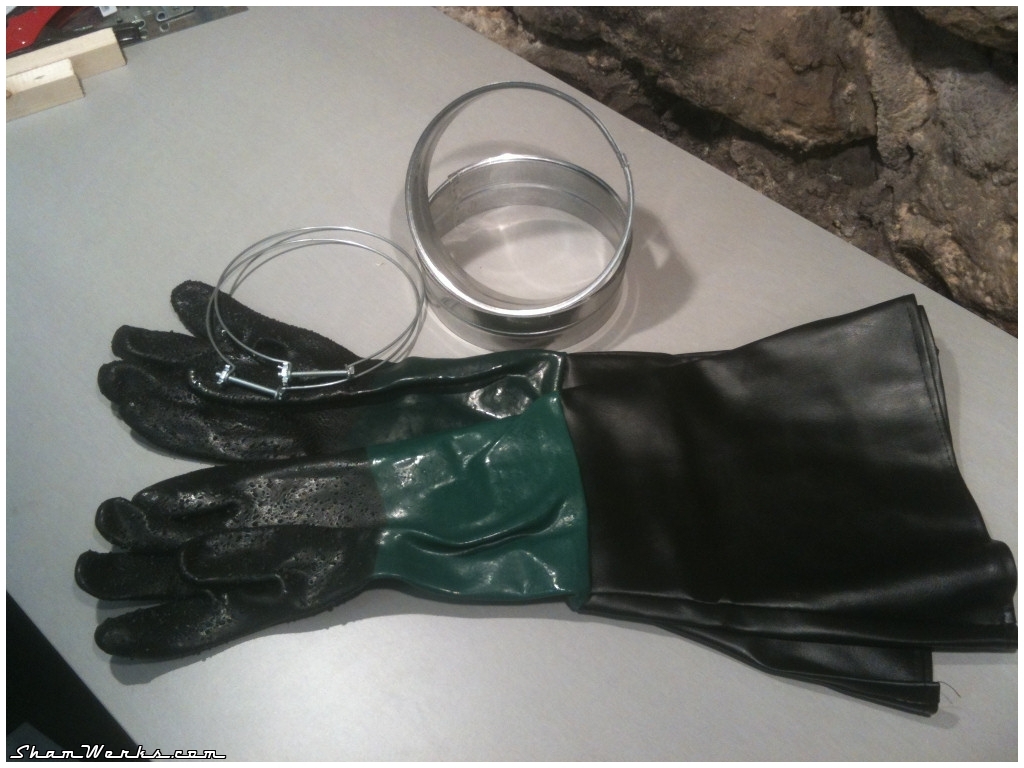
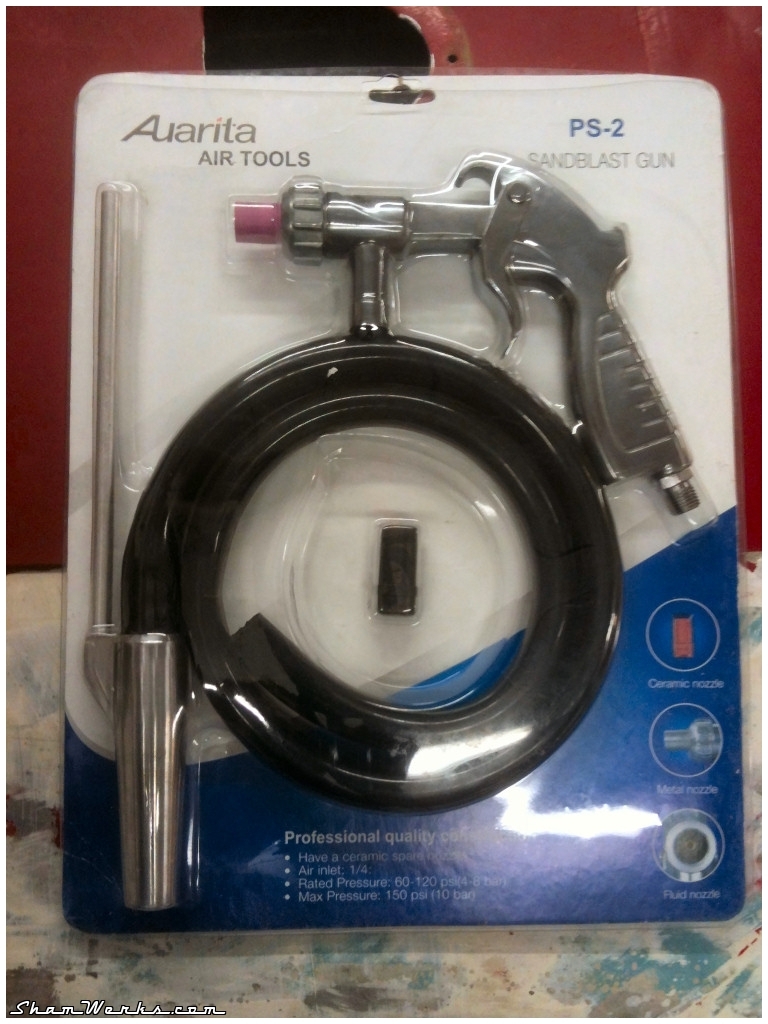
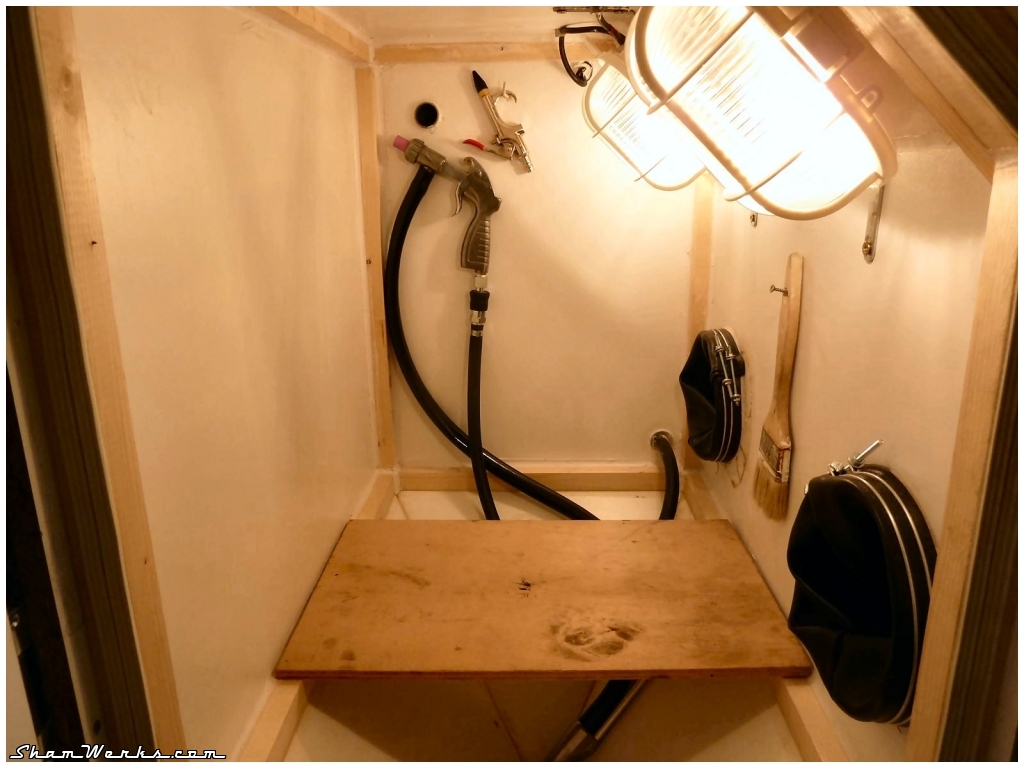
The blasting gun comes from eBay, a €18.90 model using standard ceramic nozzles. Gloves as well come from eBay ; I could have build'em from scratch using an air chamber and glued rubber gloves, but it was cheap enough to avoid this additional hassle (€19.95).
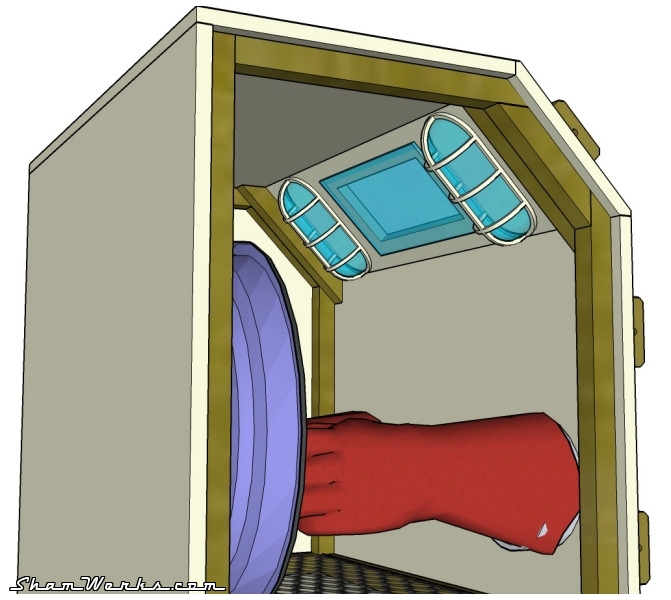
The acrylic glass piece is cut from a reclaimed piece I had in the garage ; it is mandatory to stick a sacrificial transparent protective sheet in the inside, unless it turns opaque pretty quickly due to the blasting media sanding the glass.
At the end of the funnel is a screw-in PVC plug, epoxy glued. It allows me to drain the media and change it.
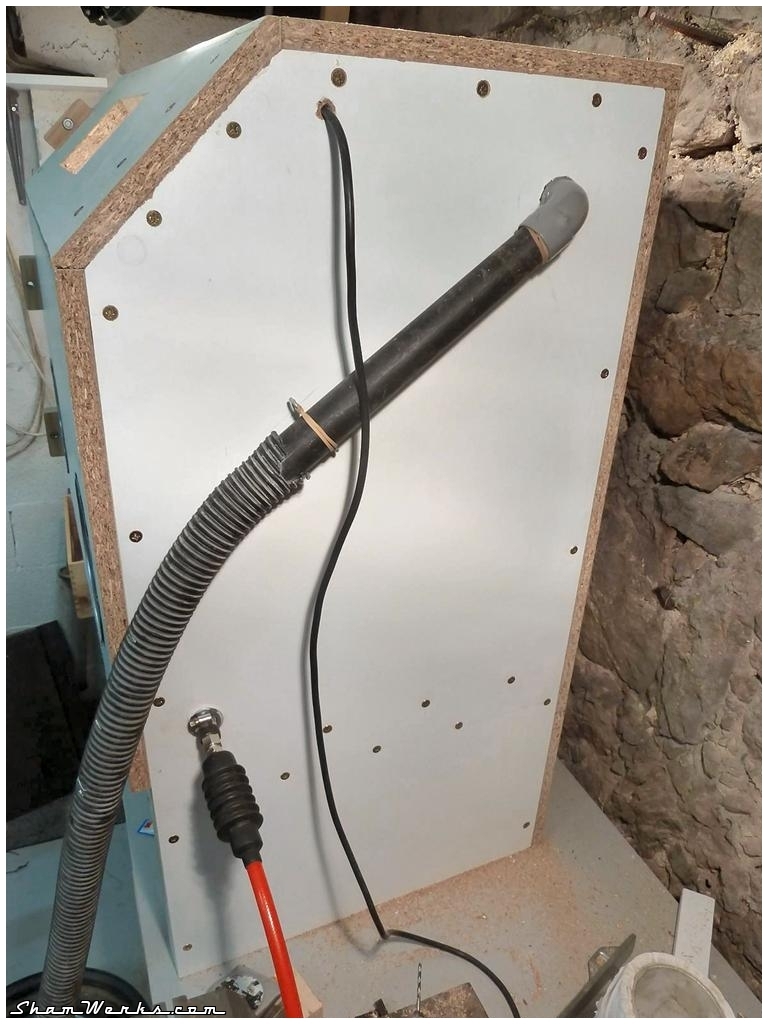
On the right side of the cabinet, a PVC 32mm bend allows the connection to the vacuum. A couple of hooks and a rubber band help securing the vacuum hose in place ; an additional rubber band is wrapped around the extremity of the hose, acting as a gasket to make it air tight. On the opposite (left) side of the cabinet, another screw-in plug acts as air intake. It creates a diagonal, bottom-up air flow keeping the airborne particles level low during operation.
Air tightness
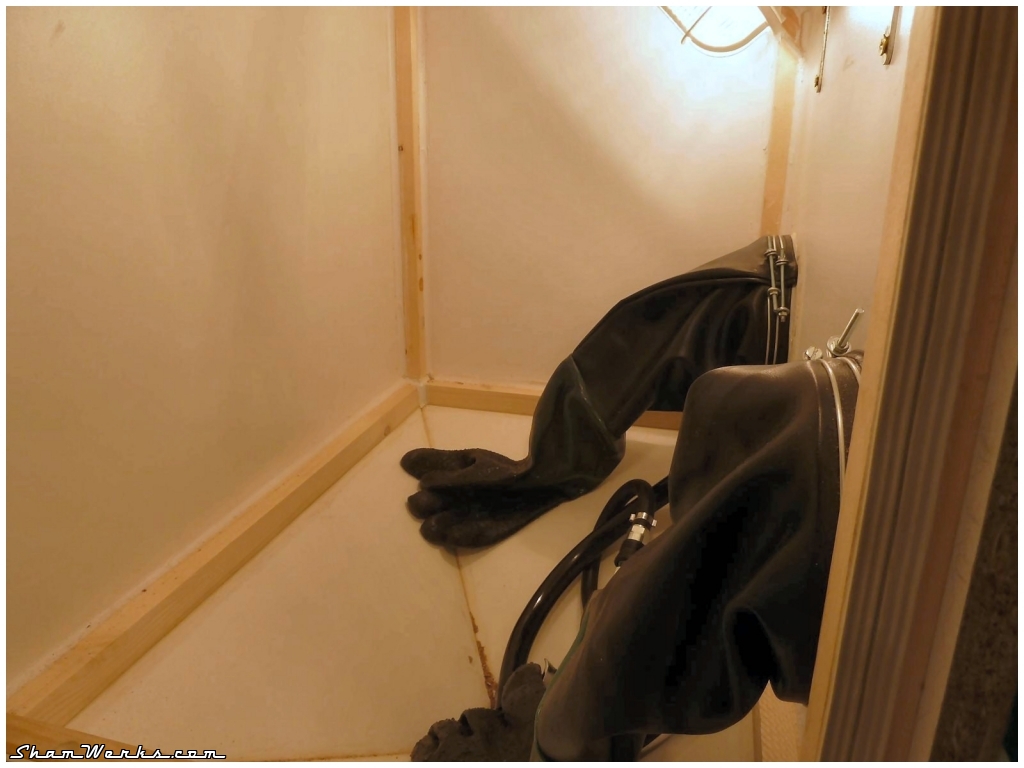
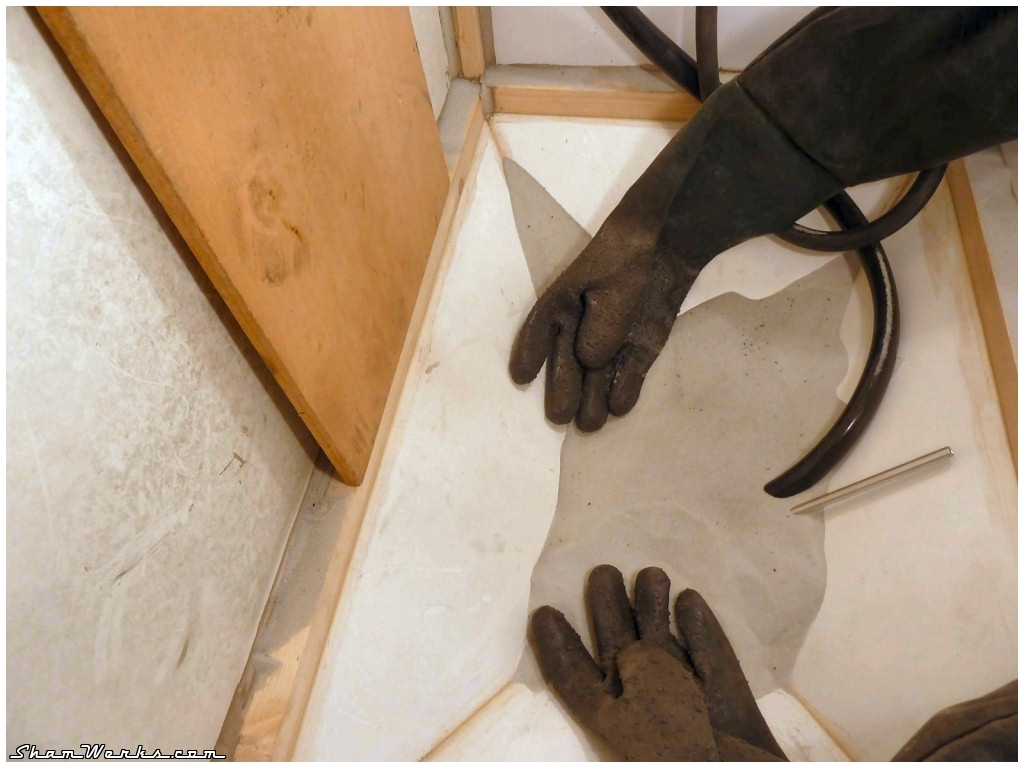
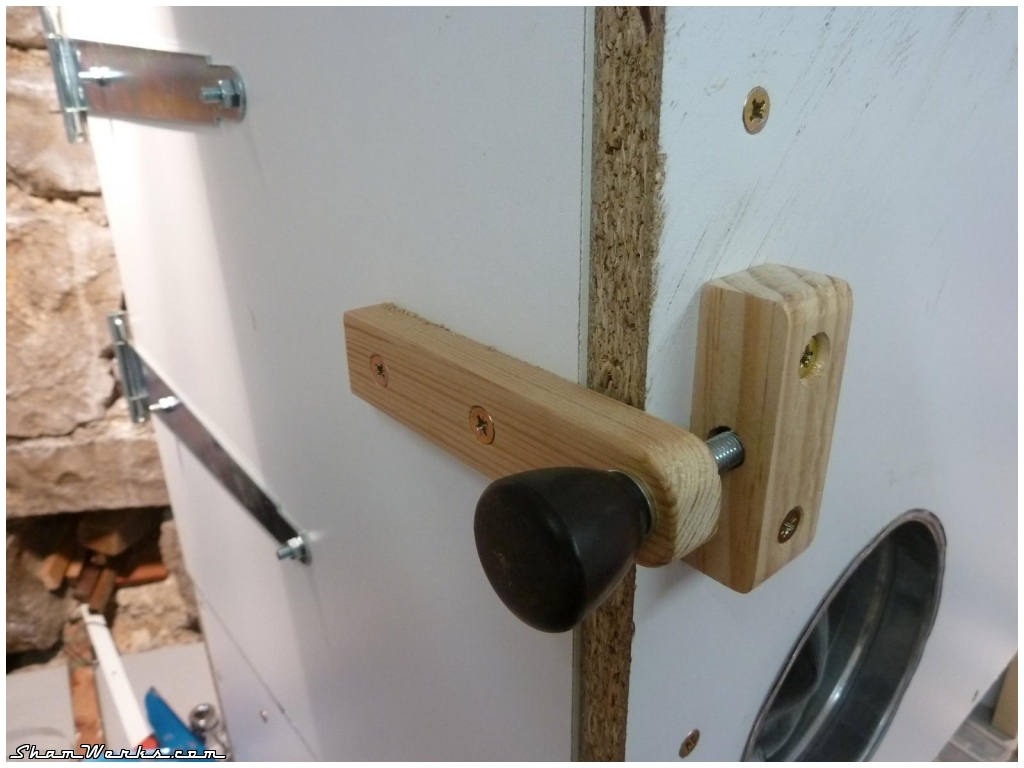
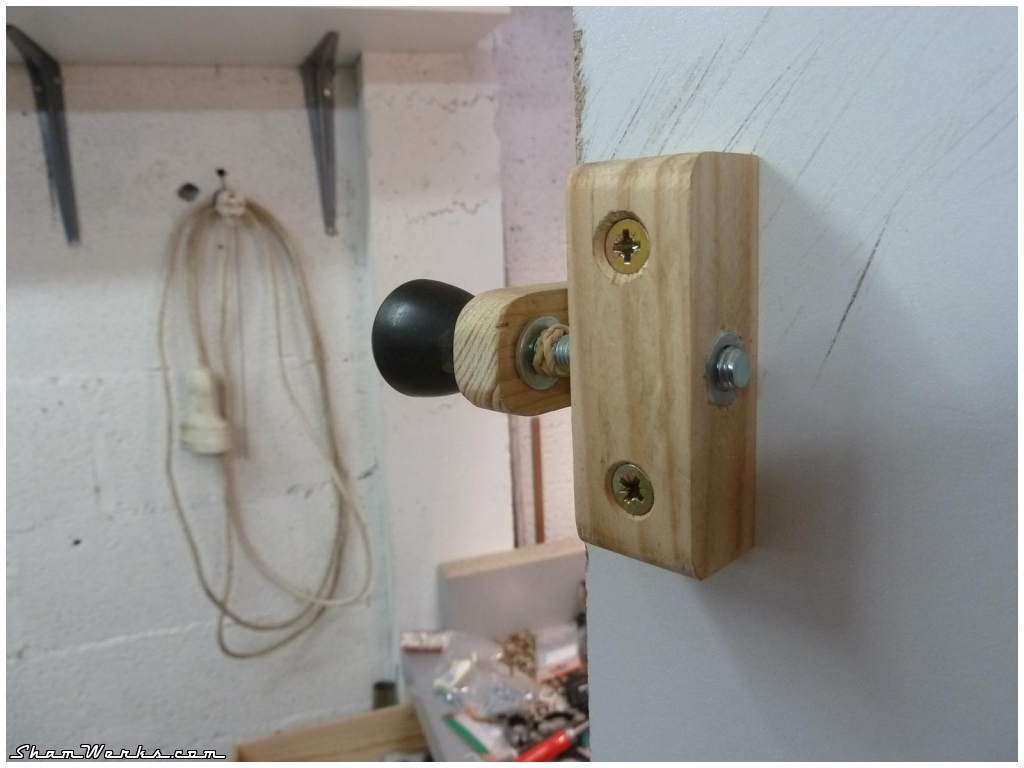
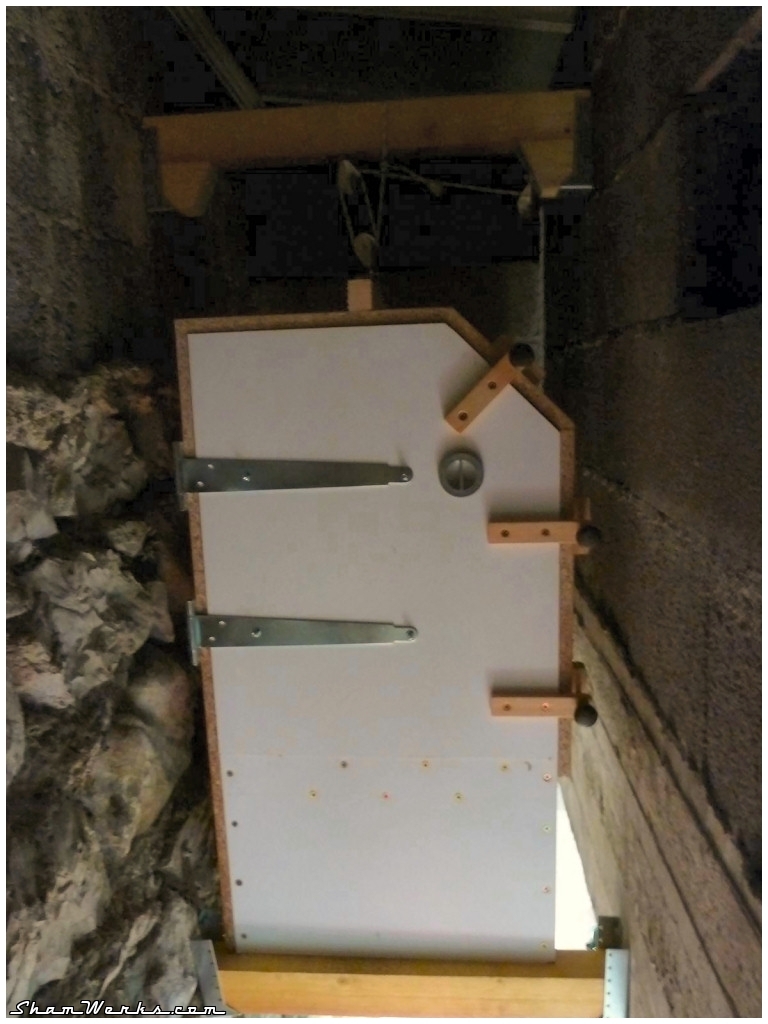
Ok, that's a nice box, but it needs to be perfectly air tight as well to work properly. for that matter, all assemblies/joints have been caulked (silicon caulk for bathrooms). Using a metal saw blade tip is perfect to smooth out the caulk with a nice round finish.The door articulates on 2 shutter hinges (€1.95 each). Airtightness is ensured by a double rubber foam gasket glued around the frame. Hinges are placed taking into account that additional gasket thickness.
Door is closed using 3 screws (with Bakelite knobs I "reclaimed" 20 years ago from the windows of my high-school. I knew that would come up handy someday). It's probably overkill though, 2 could have been enough. Screwing snug tight compresses the rubber foam gasket, that's perfect. I originally wanted to put lever-type metal thingies, but they were too fragile, and do not offer any adjustment levels, so I decided to make my own system...

Storing
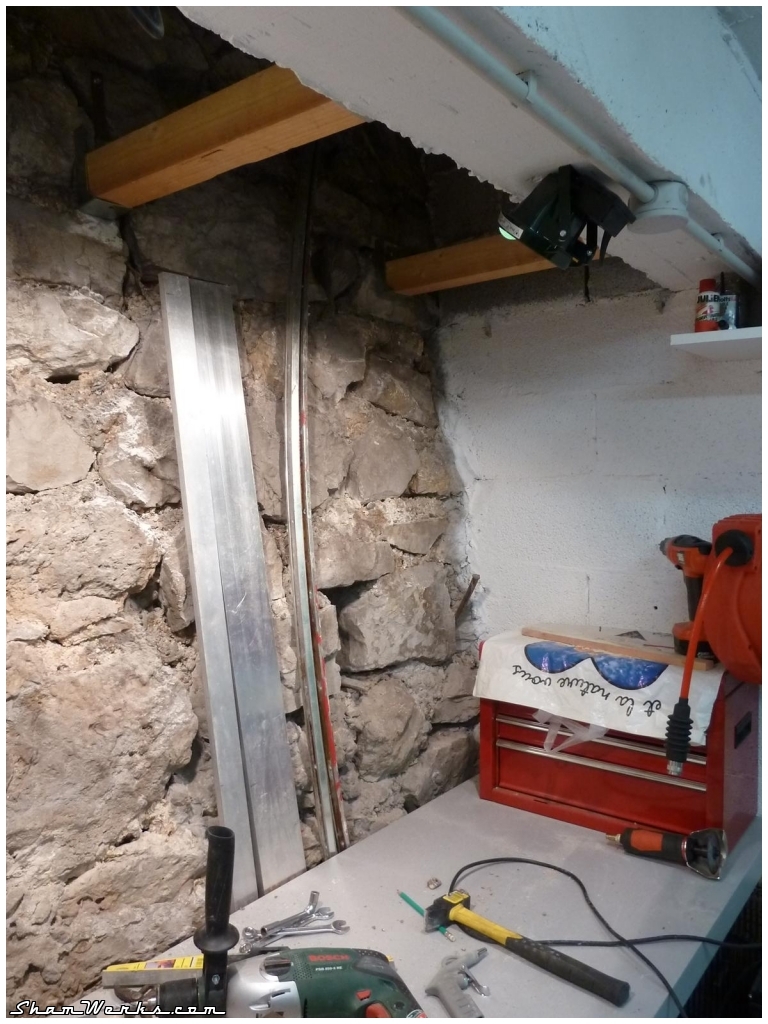
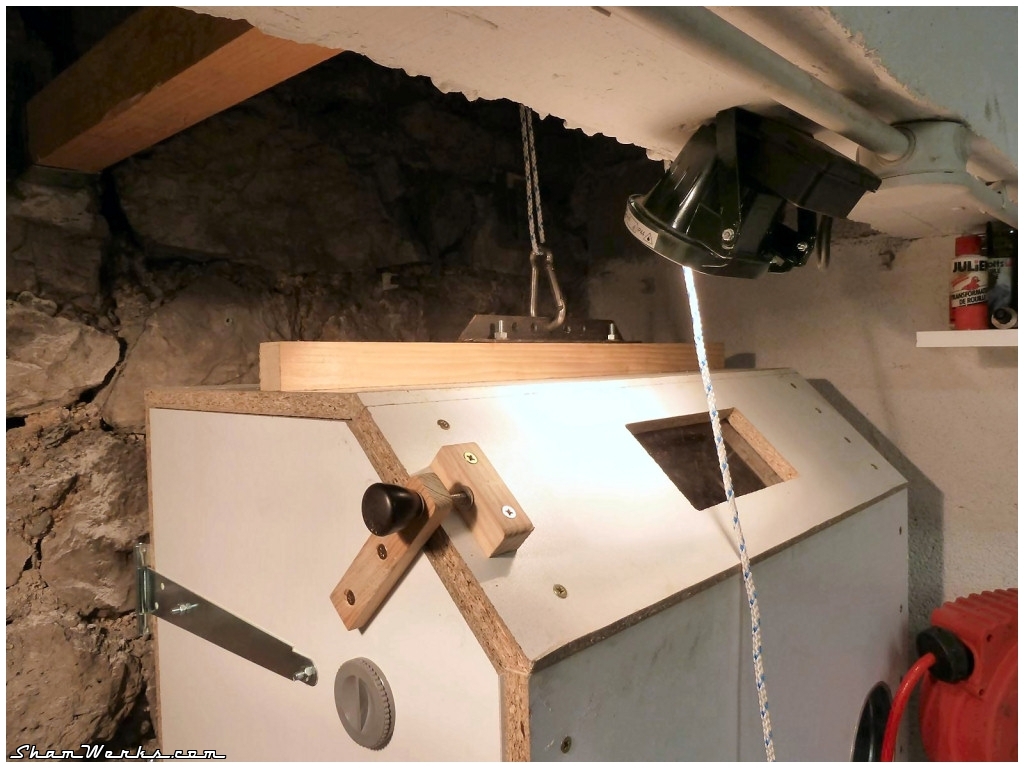
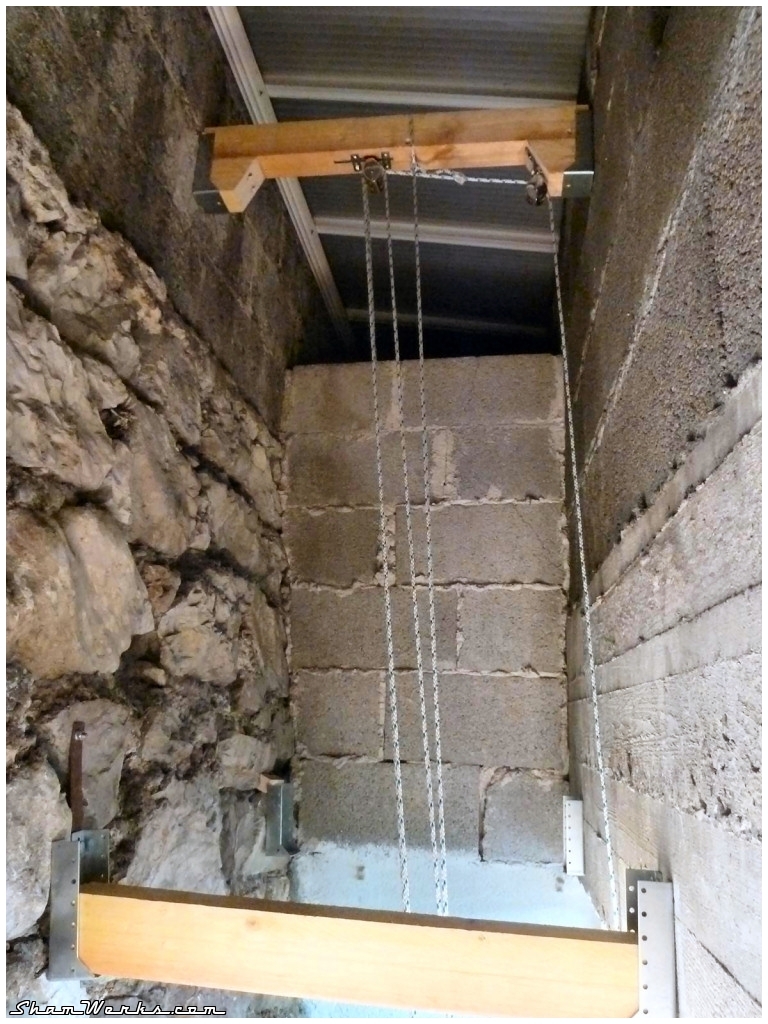
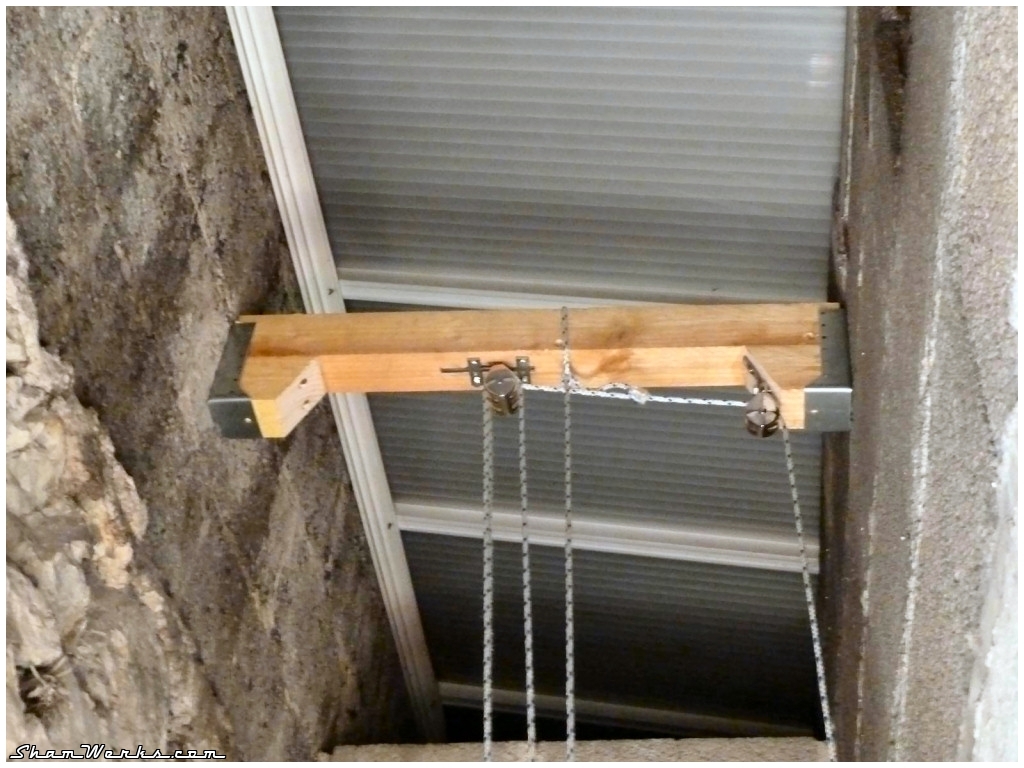
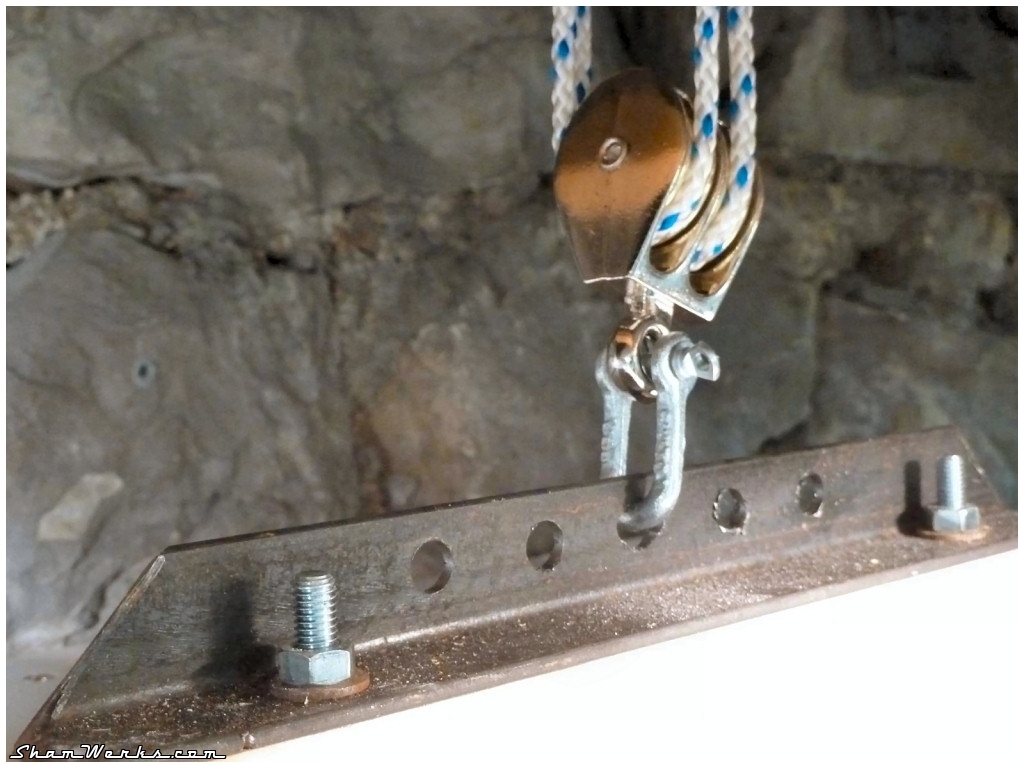
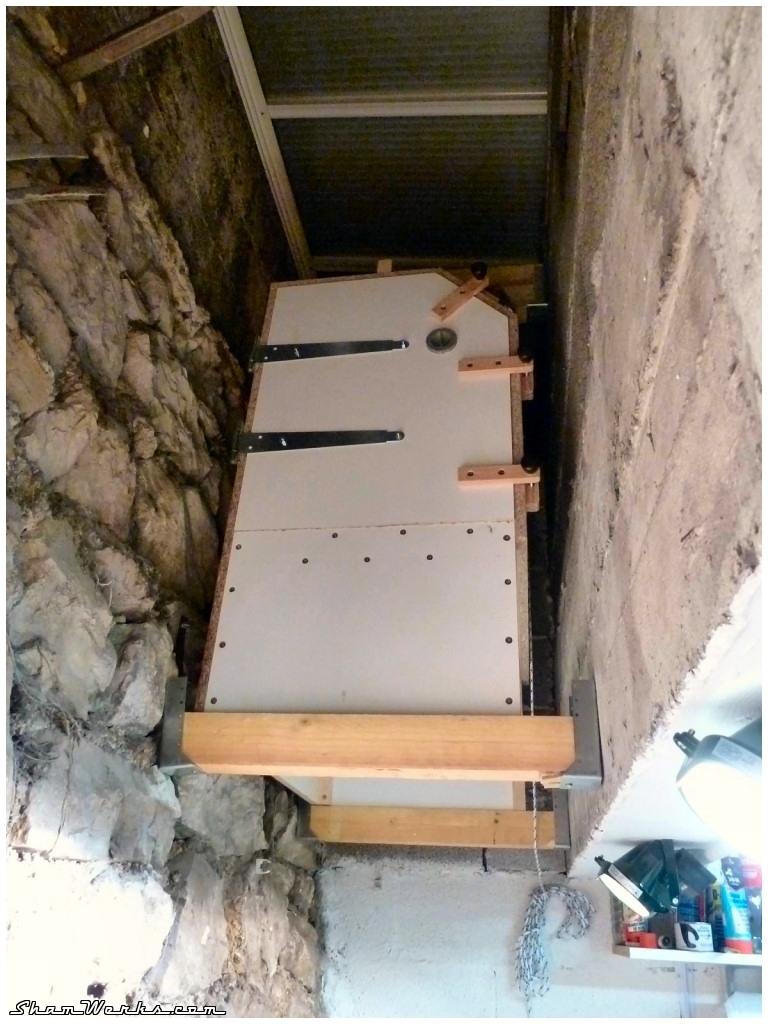
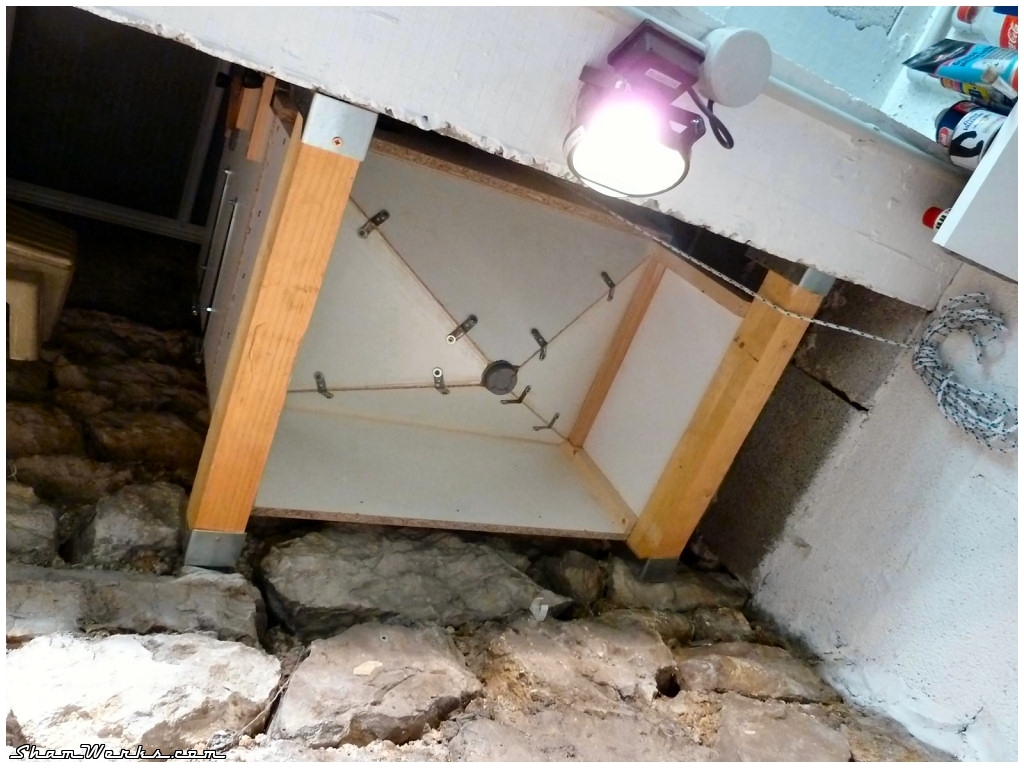
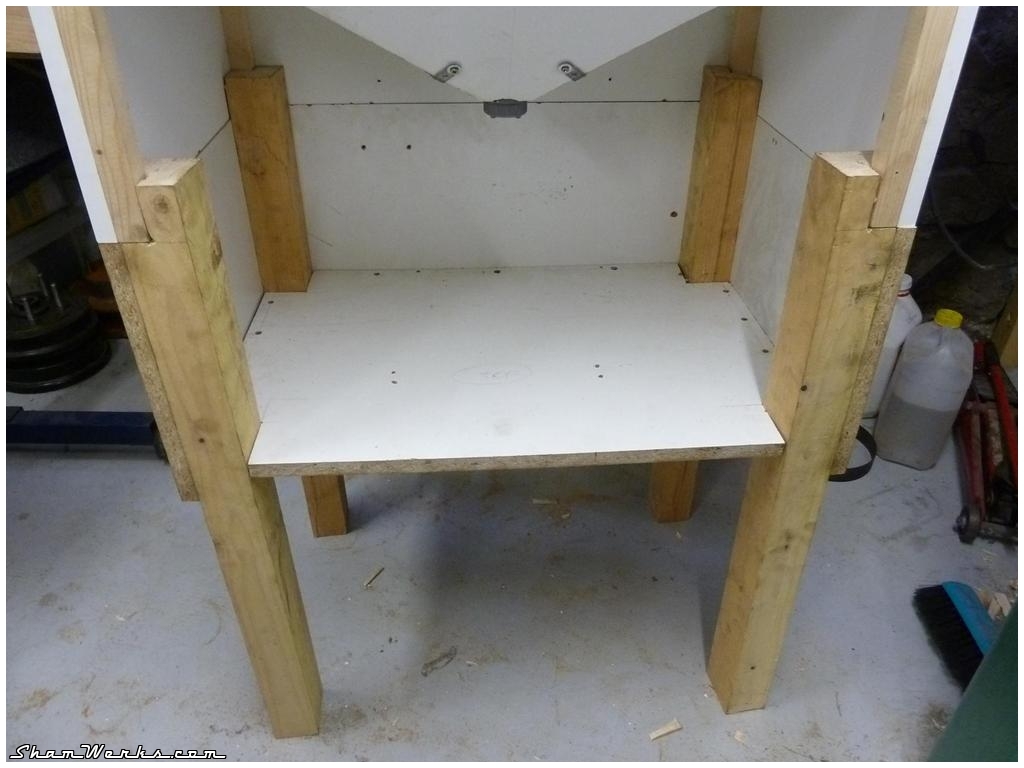
So, now I have a nice cabinet but it's quite bulky and my garage is small...Fortunately, I had planned that from the beginning, and reckoned the dimensions of the cabinet accordingly : it's made to fit right above my workbench! With the help of a couple of pulleys, as the beast weighs a good 20kg.
First tests
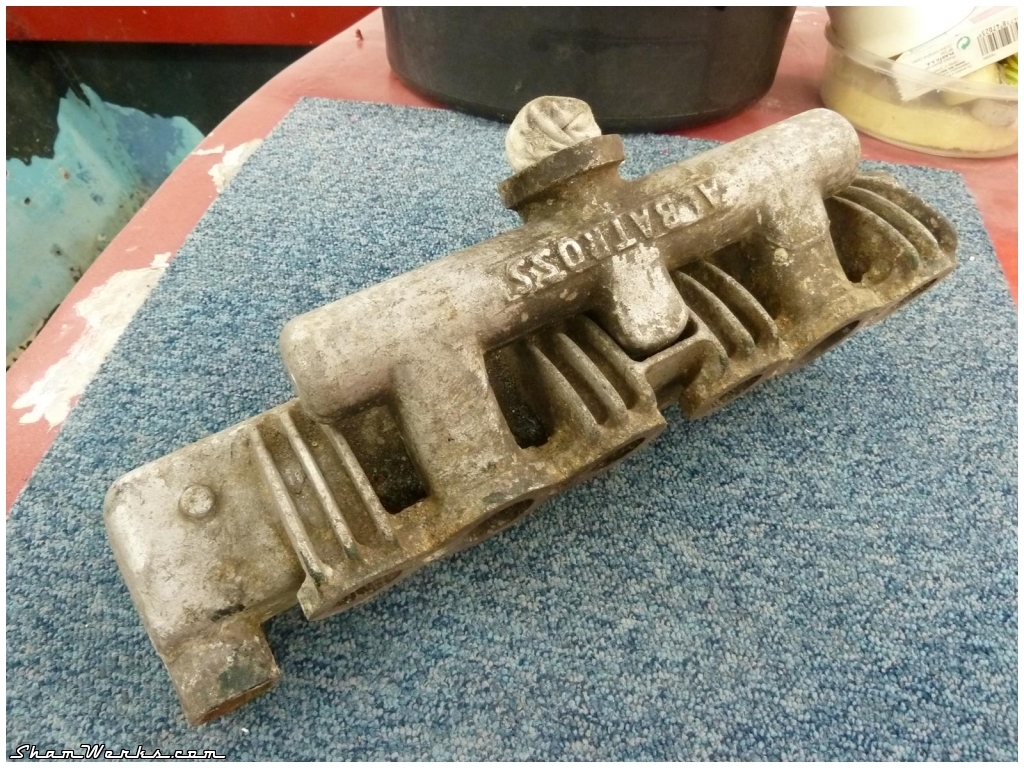
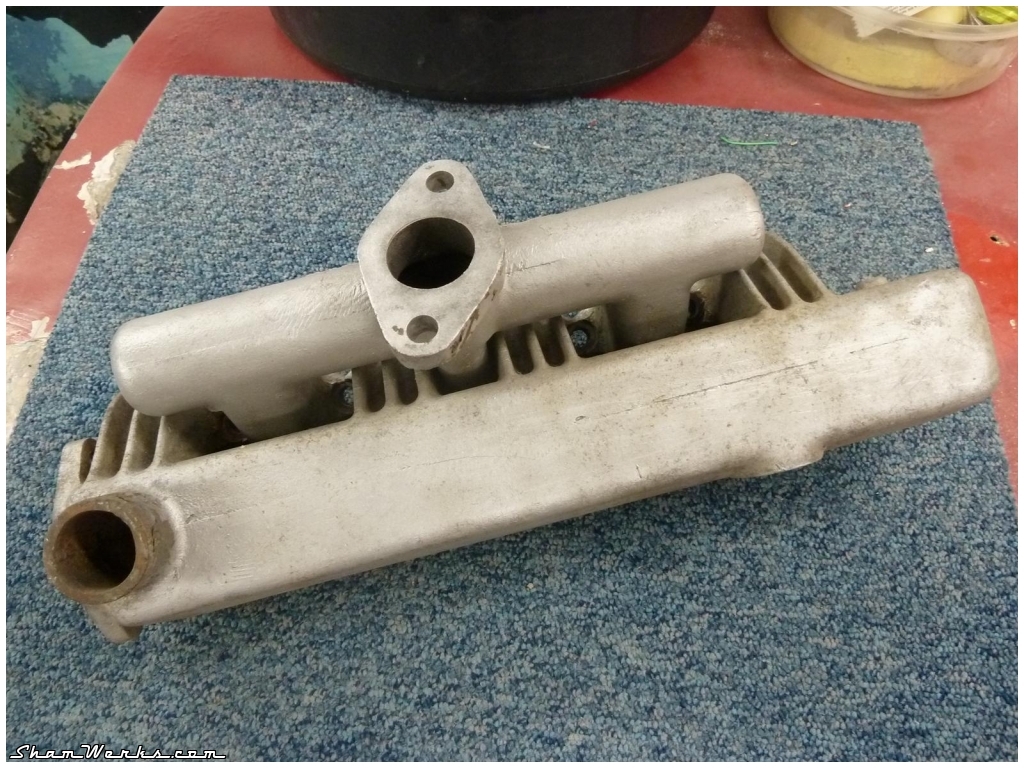
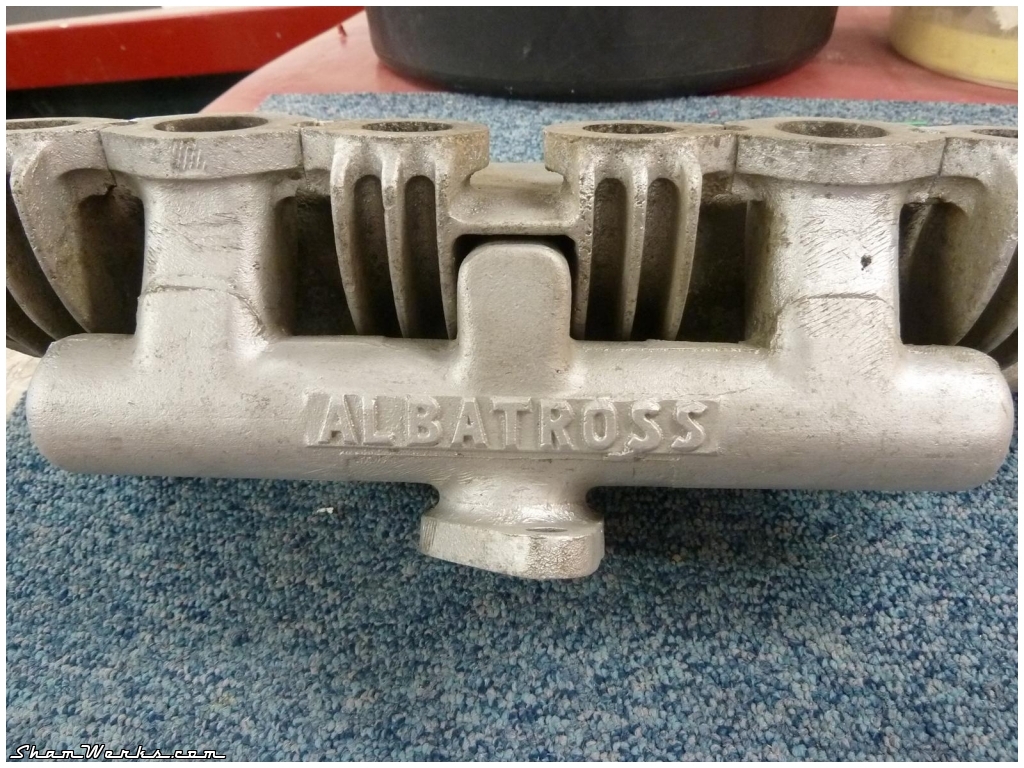
Since I could get my hand on any reclaimed metallic grill inside the cabinet, I just used a piece of plywood instead. Works fine too!I've ddone my first tests using glass beads (200-300 microns, bought online on Matthys) at 4.5 bars (65 psi), on an aluminium part (the Albatross' intake/exhaust manifold). It was just a 10 mn quick test, without degreasing the part first, which was a mistake since a rubbery/greasy compound on the part prevented me from getting a perfect result. But for a first test, I'm delighted with the result, the aluminium ends up with a smooth satin mat finish, looks just as new!


Conclusions
The cabinet is perfectly airtight, only a few glass beads manage to make it into the glove (as I had to "fold" a part of them to adjust them on the metal rings holding them). Good news! I just need to remember blowing/brushing away the grit at the bottom of the door before opening it after a blasting session, since it accumulates there ; I'll try adding an inclined/angled piece of wood to fix this later.Actually, it's almost too airtight : the depression created by the vacuum cleaner make the gloves inflate inside the cabinet, even with the air intake on the door opened. If I close it, the glove become totally inflated and rigid! I'll probably have to add another air intake to limit that effect.
However, just as expected, my 3HP/100L compressor turns out to be a bit small for blasting : it runs a lot, I'll need to take pauses to let it breathe... Or find a bigger one.
The air blow gun inside the cabinet : bad idea, the quick coupler gets jammed with the grit. So either I install a 3 way coupler to have the blow gun permanently fixed to its own hose, or I just pull the hose of the blast gun out of the grit to use it just as an air blower. Well, I'll go with that easier solution!
Here are a few links that inspired me while building my cabinet, for your consideration if you want to do so :
- Ma500.fr (et and his first, smaller version) (in French)
- Restauration Anciennes (in French)
- The Simca 1100 forum (in French)
- Ford Trucks
- Custom Fighters
Coming next
As next I'll try getting heavy rust off of metallic parts using aluminium oxyde grit instead of glass beads. I'll post the results here in that very same article. I consider as well building a cyclone dust separator (like in the "Dyson" vacuums cleaners) just like this one (in French), this one, or that one here.To be continued...
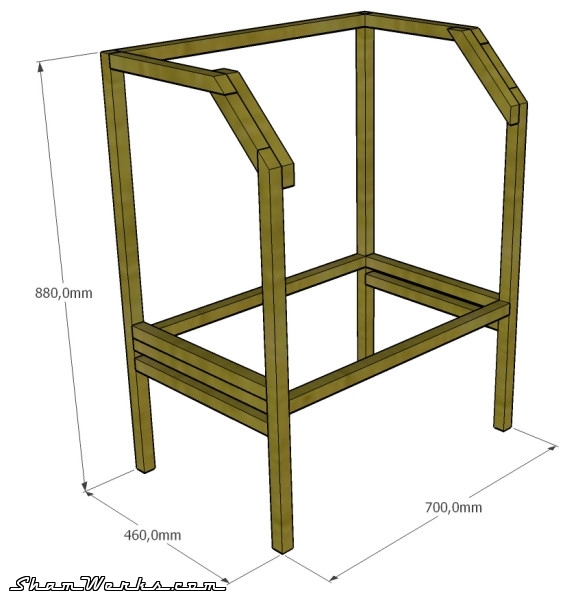
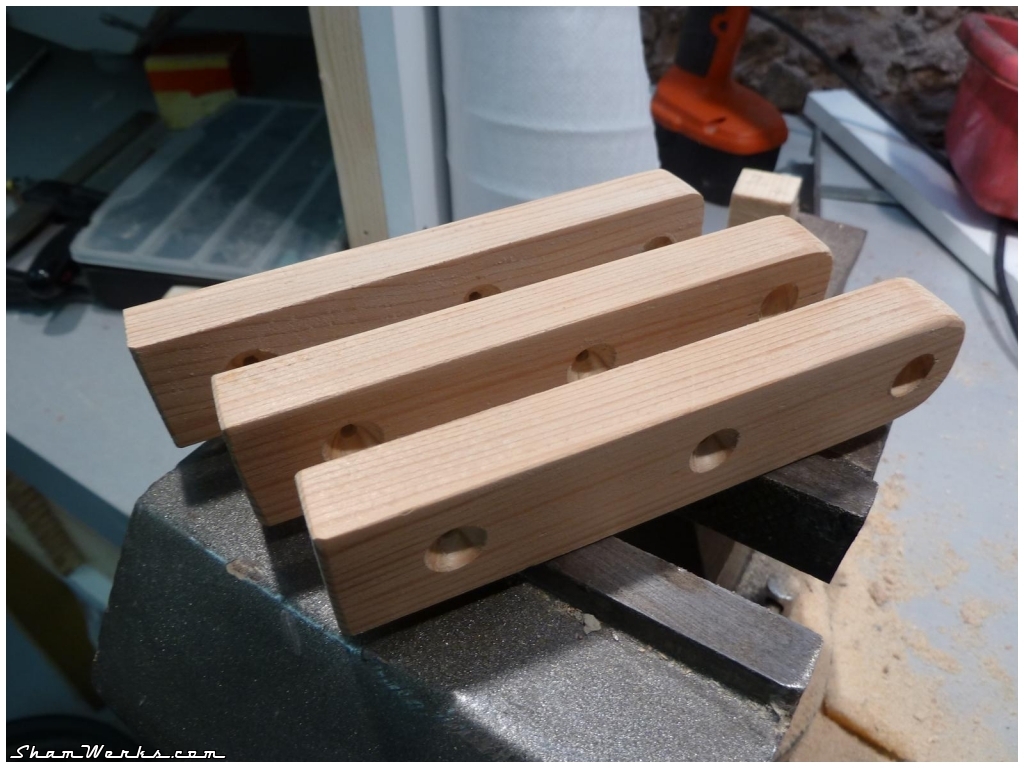
Edit 30-08-2012 : a stand for the cabinet :

So after some reflexion, and some more Sketchup, I decided to build a stand for the cabinet. Only out of scrap wood that I have laying around the garage. It'll have to be heavy duty since the cabinet is pretty heavy.
The legs will be made out of 62x75mm lumber (the left overs of the workbench project), the rest will the out of 19mm thick melamine chipboard (some od shelves I scrapped). The legs will be chiseled out at the top for the cabinet to slide into them. (check the plan).

And... Tadaaaaaaa!
I got it right first time... Pretty proud of meself gotta admit.
So now, the cabinet is at the perfect height, no need to stand precariously on something!
The shelf right below allows me to put a bucket to pour the sand/beads into.
Next step, a cyclonic dust separator??
Edit 10-09-2012 : Corundum blasting test :

The complete process took me around 10 minutes (at 5 bars of pressure), I you can see the result by yourself, it works perfectly! I'made a short video for you to see how fast it goes.
The only drawback is my compressor : 100L/3HP is a bit low (I knew that before hand), so it tends to run non-stop, with a risk of over-heating. If I ever have to do long blasting sessions, I'll have to make regular pauses for it to cool down a bit.
I also discovered that the corundum media slides way less easily than the beads towardss the bottom of the cabinet ; on the video, you can see I have to push back the sand to the bottom from it to be catched by the intake tube. Well, it's not actually too much of a hassle, and it give a few seconds off to my compressor .
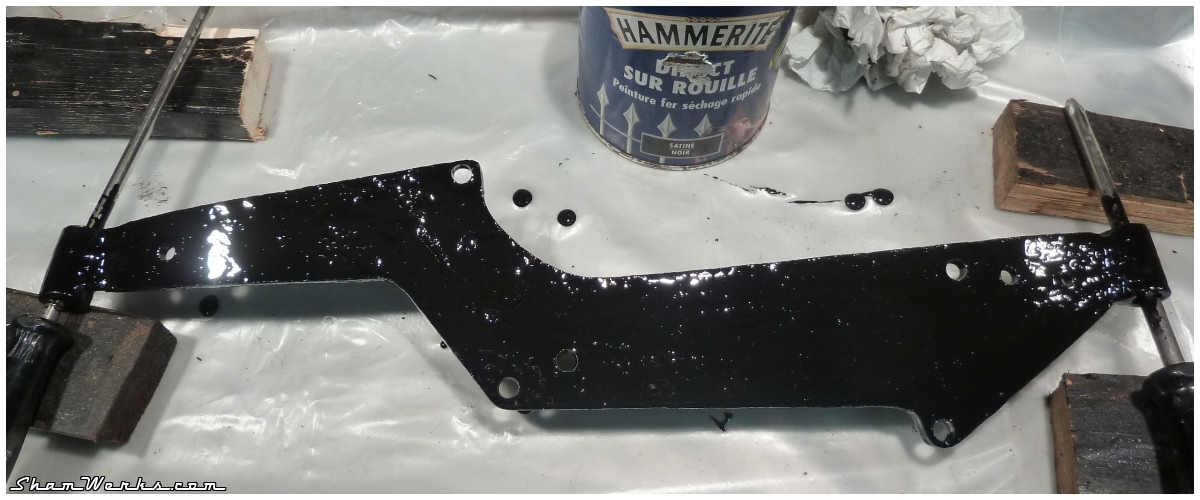
After sandblasting, the metal must be protected asap, unless rust will settle back in a matter of days (even hours depending on the conditions). Here, I use a couple of thick layers of black Hammerite (well, mostly because that's the only thing I had at the garage at that time!).
I'll still have to install a cyclonic separator on the exhaust, and a form of siphon on the intake (as some dust manages to get out that way), and it will be perfect!
Posted on 02/11/2012 at 13:22
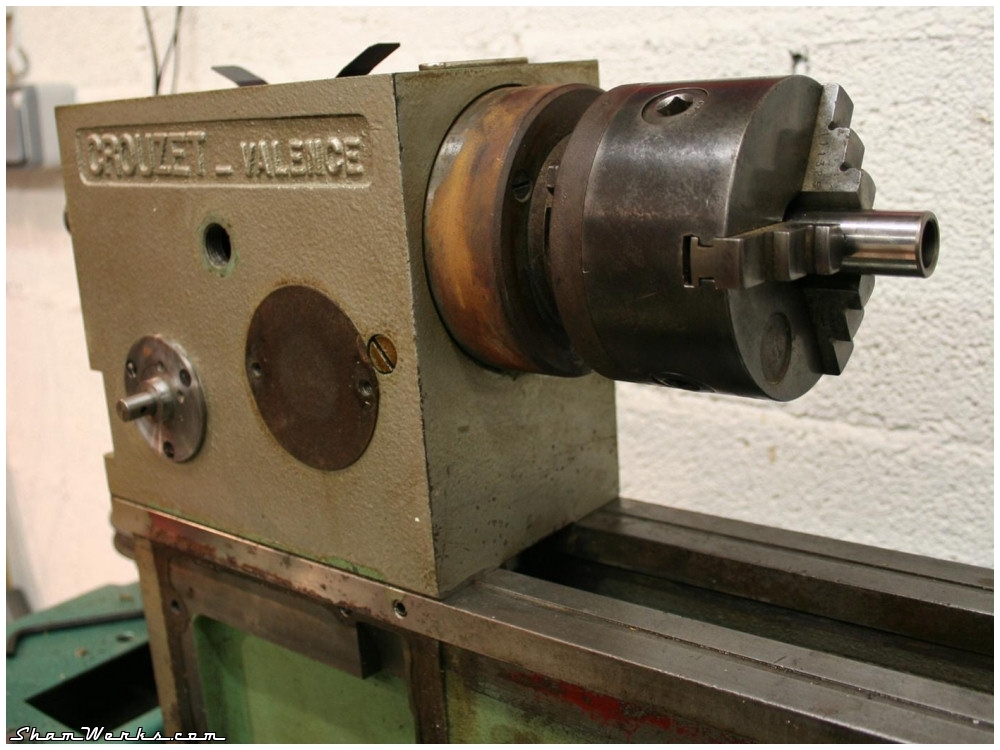
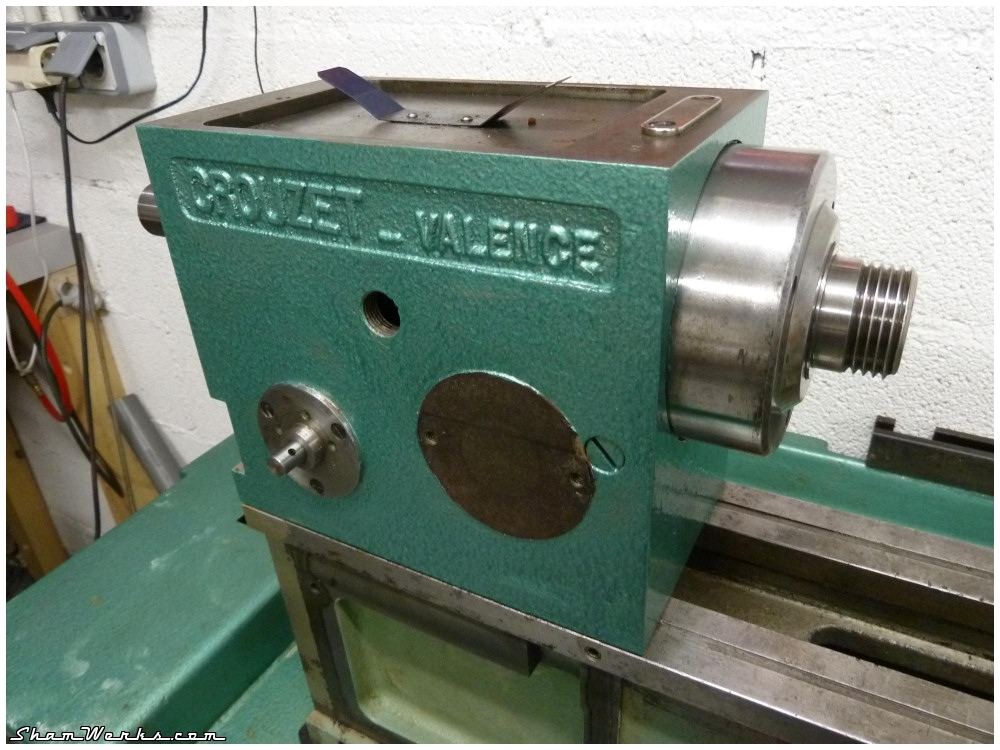
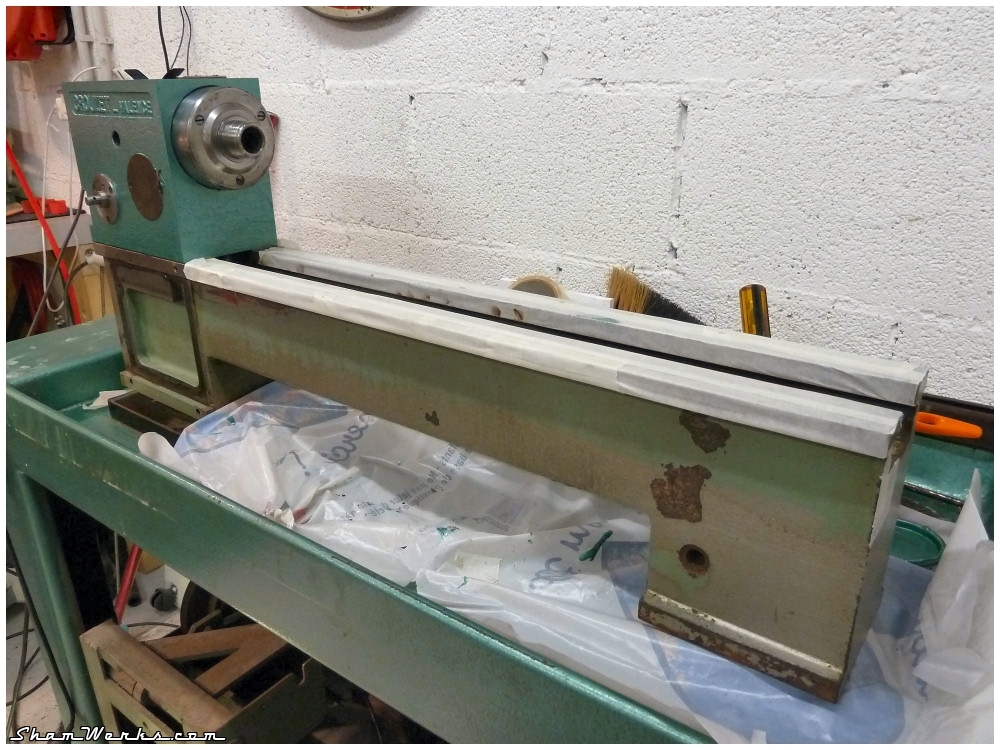
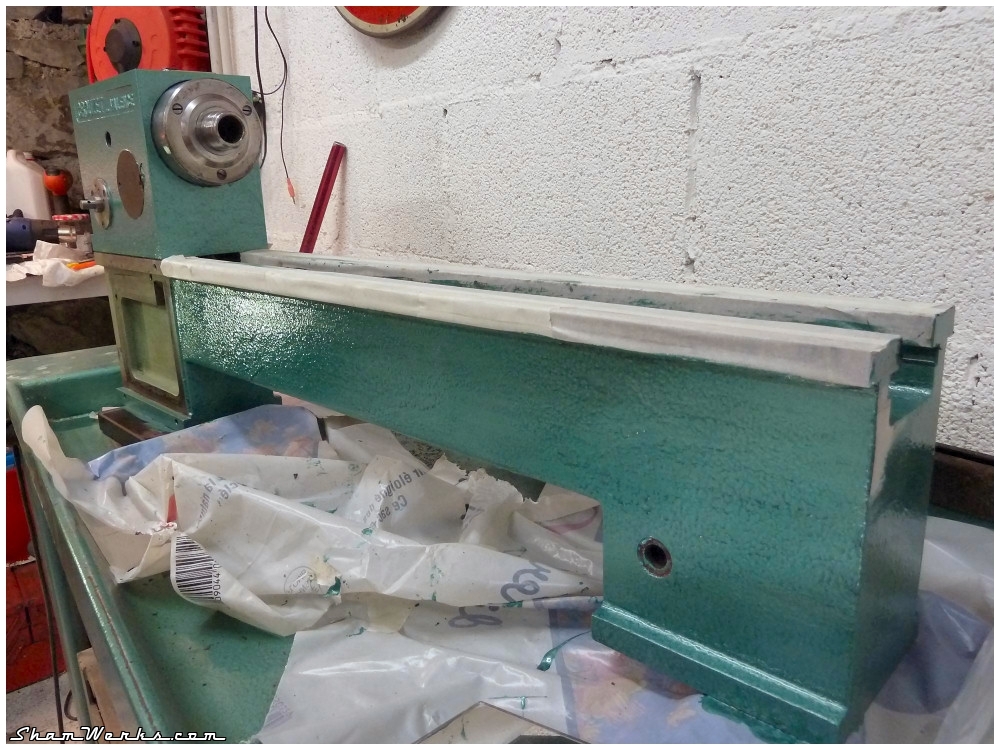
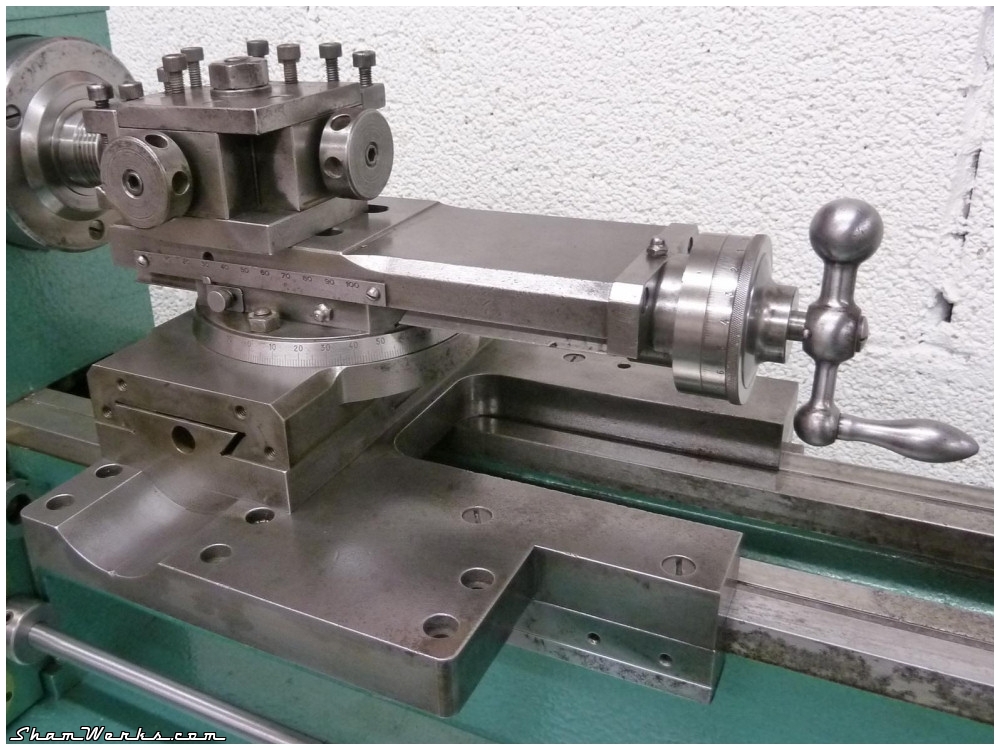
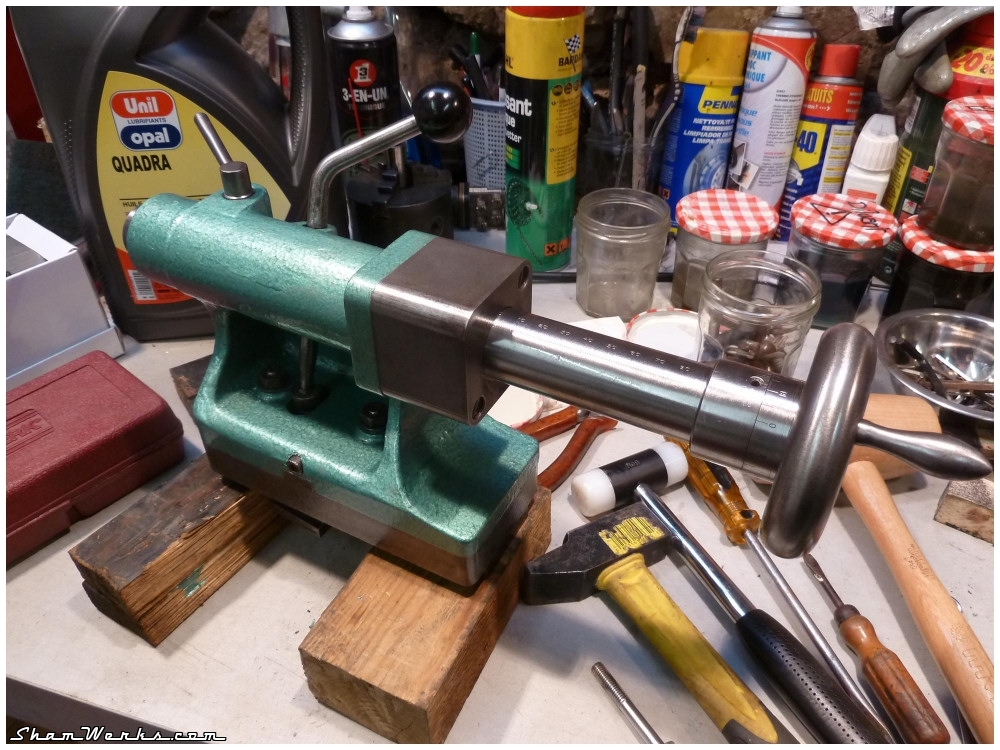
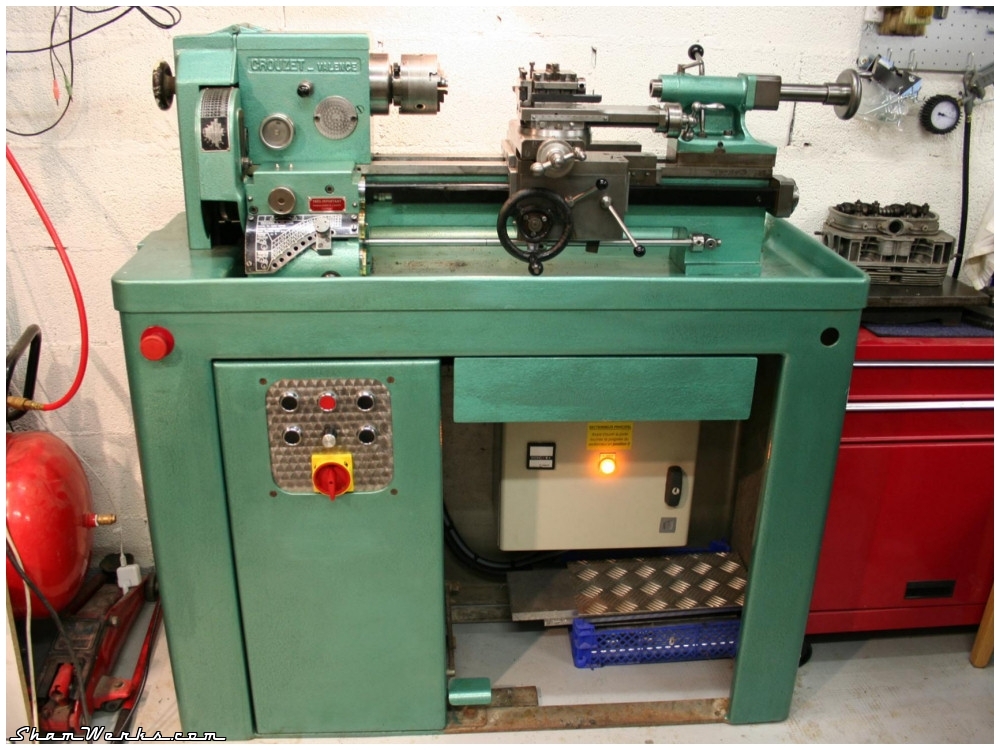
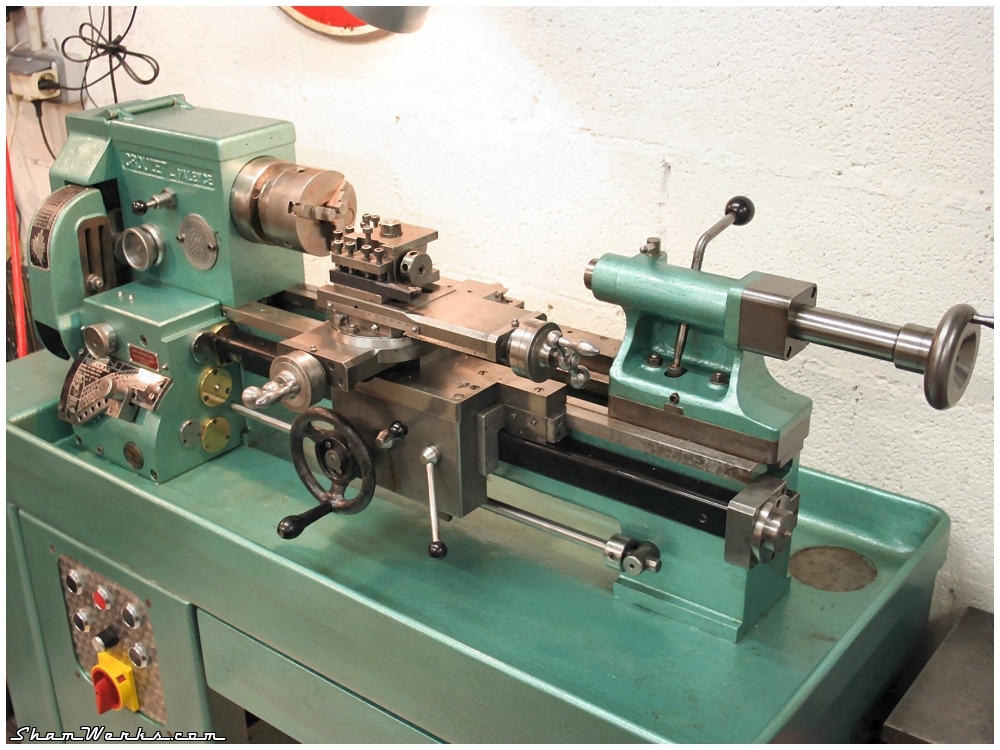
Restoring the Crouzet-Valence
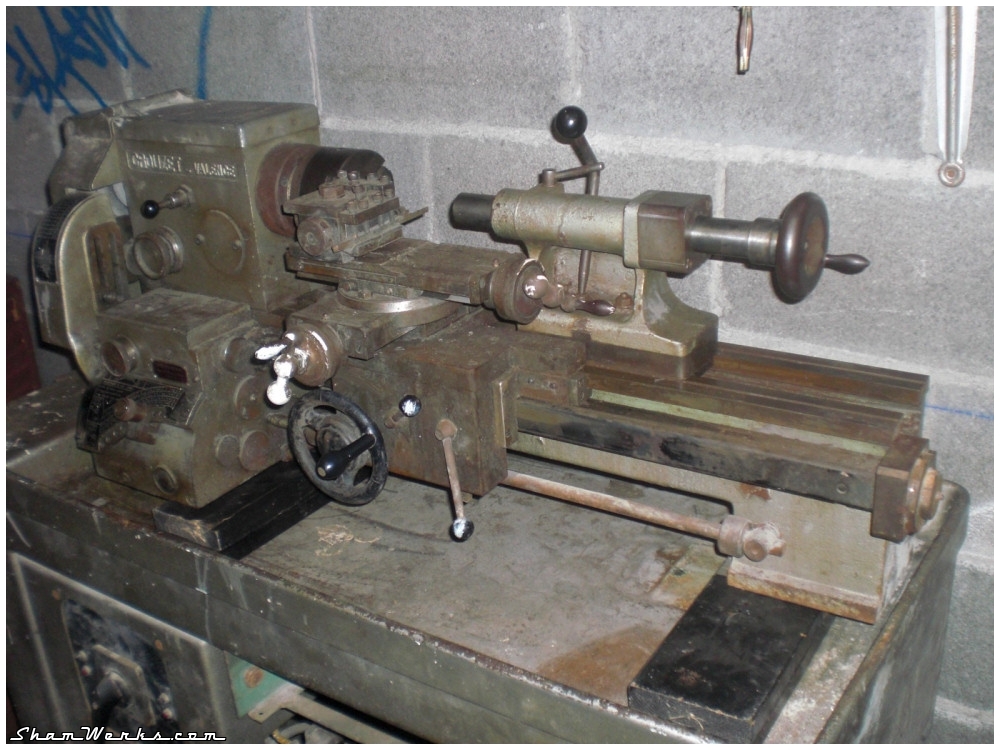
Do you remember the metal lathe I picked up last year? (see post here : Crouzet-Valence VM125)
Well, I've made the mistake of taking a part off to clean it... Then a second... And a third.... And well, finally, it wasn't a priority for me, but I've restored the whole thing!
I must admit, spending time of the online (french) forum usinages.com (there's a thread about my lathe there), and seeing all these beautifully restored machines, temptation was to high!
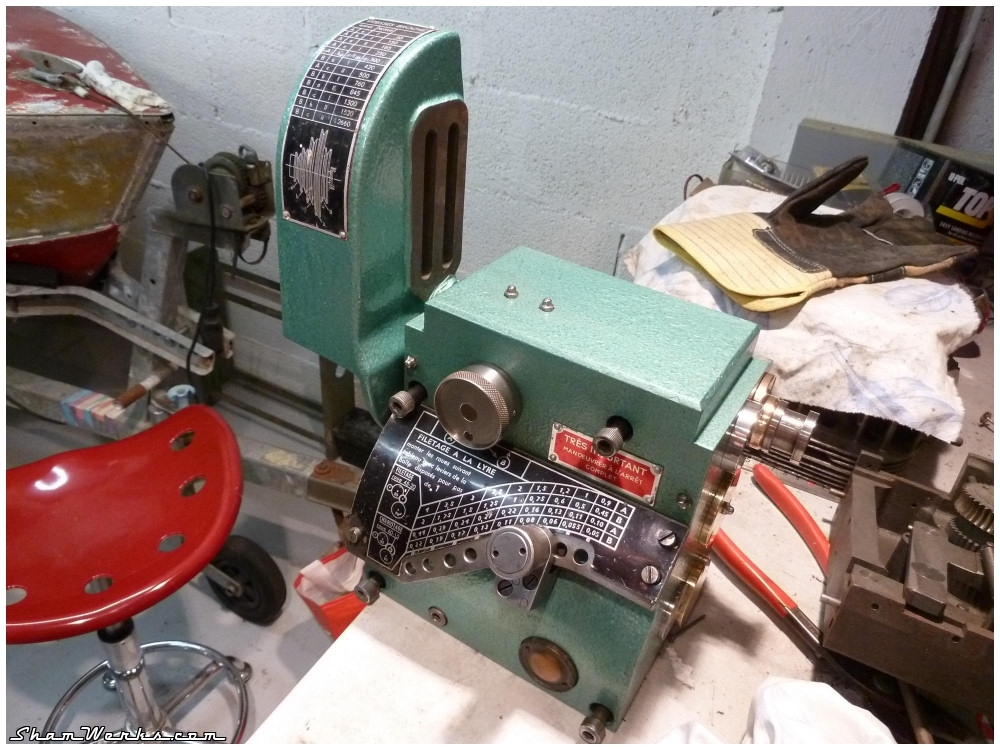
Paint
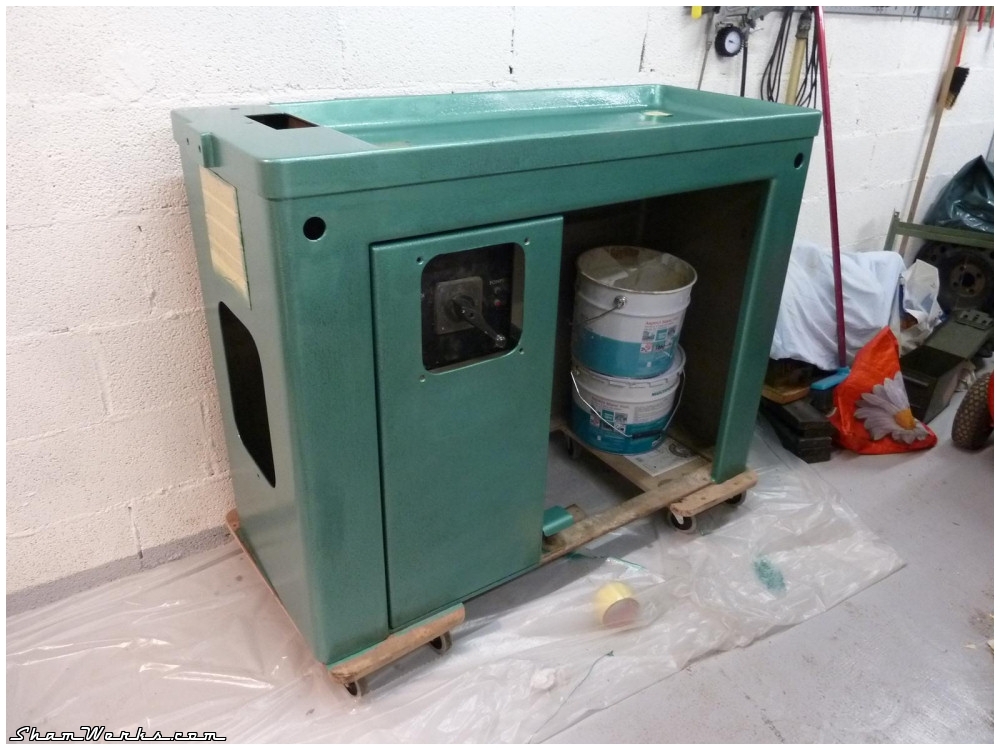
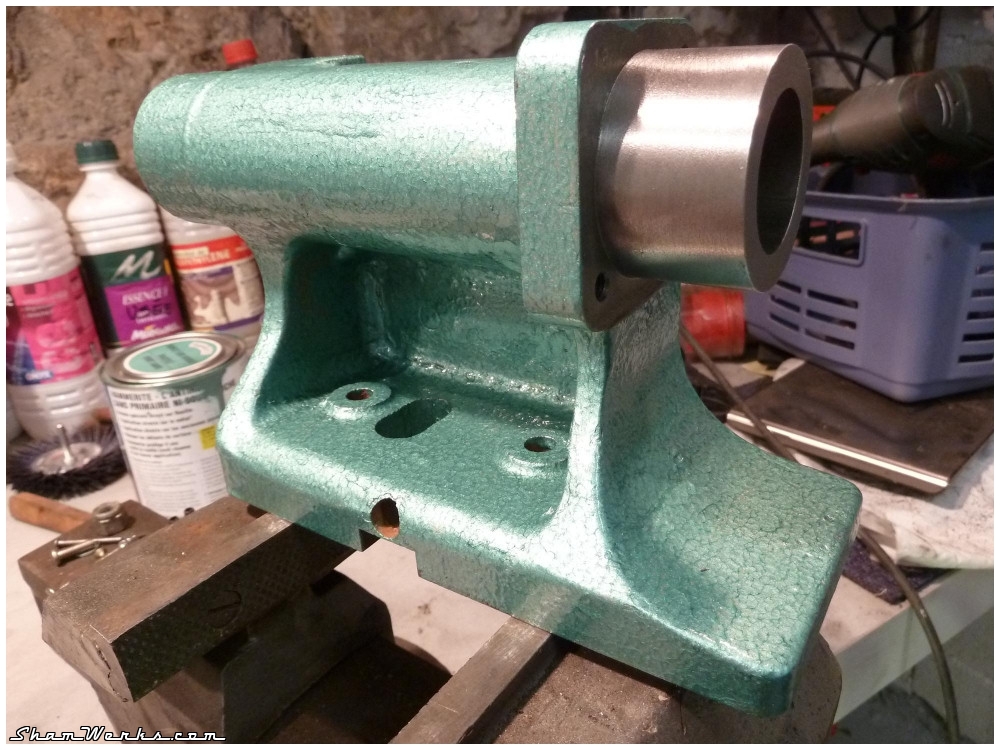
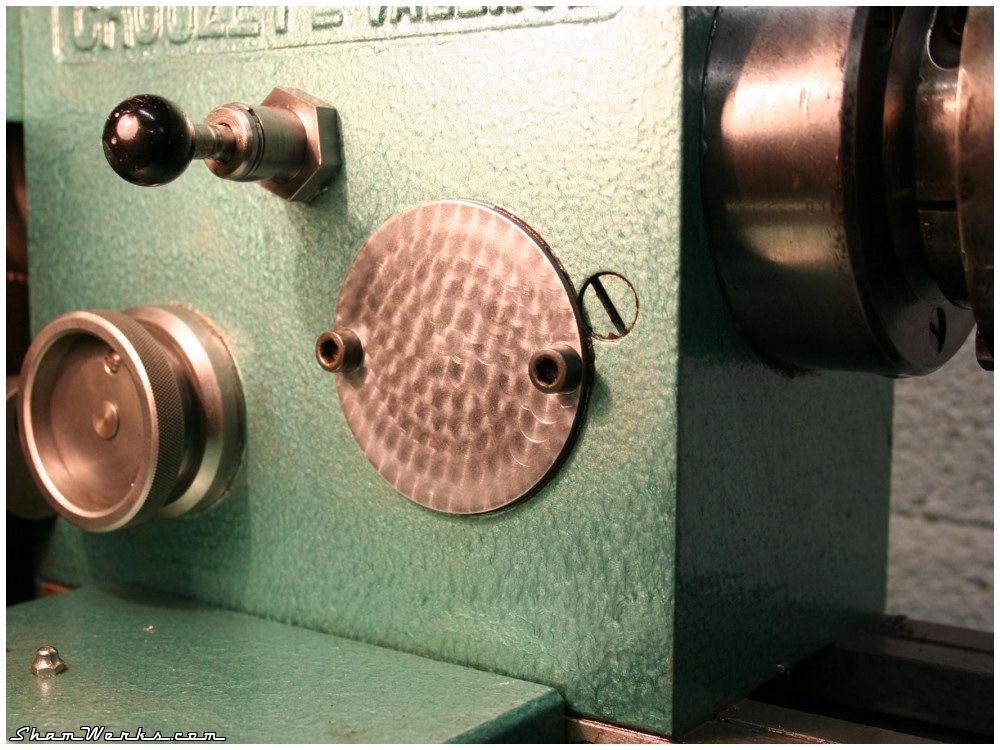
I've started by painting the stand. Degreasing using solvent F (naphtha) and Scotch-Brite scrubbing sponge to remove most of the thick coat of grease that was all over it (with some additional WD40 on sticky grease patches). Then complete washing/cleaning using "St. Marc" (french equivalent of your "Cillit Bang", I guess), rince, and a good rub with 90° alcohol to remove any remaining greasy film (the cloth has to remain white when doing this).Finally, a coat of green, hammered finish Hammerite paint (not that easy to brush, but final visual result is really nice).
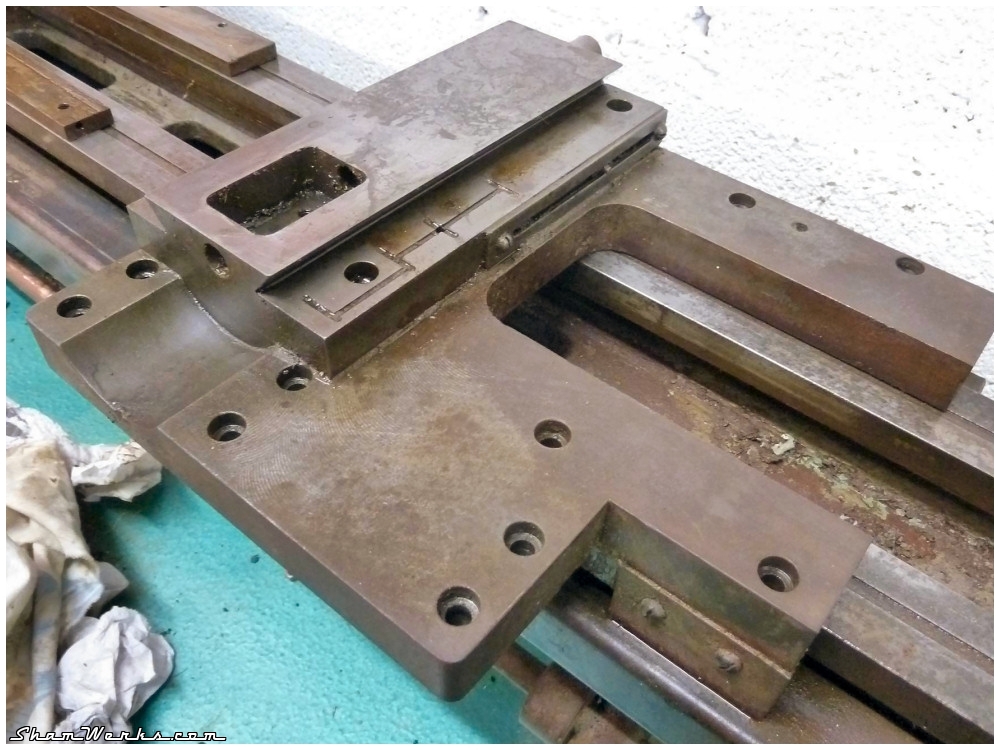
On some of the following pictures, you can see the bed standing up in quite an unstable position : that was the only way I could access the under and inside parts of it. Unfortunately it almost fell off on me, my cervical vertebras hurt for 3 days... Don't do this at home, kids.


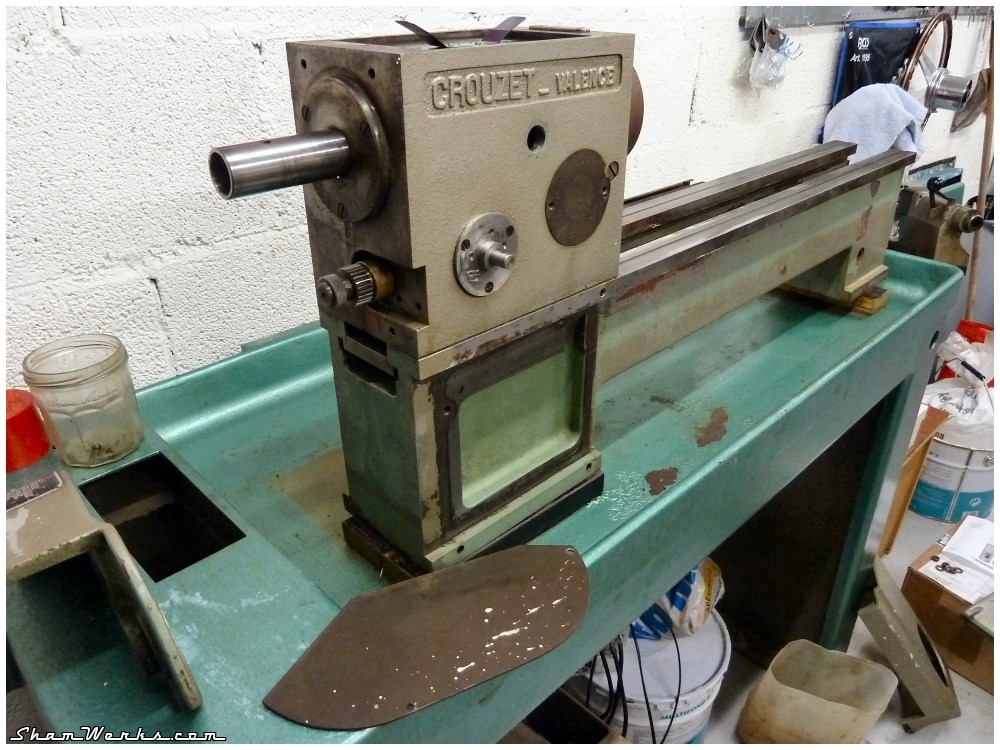


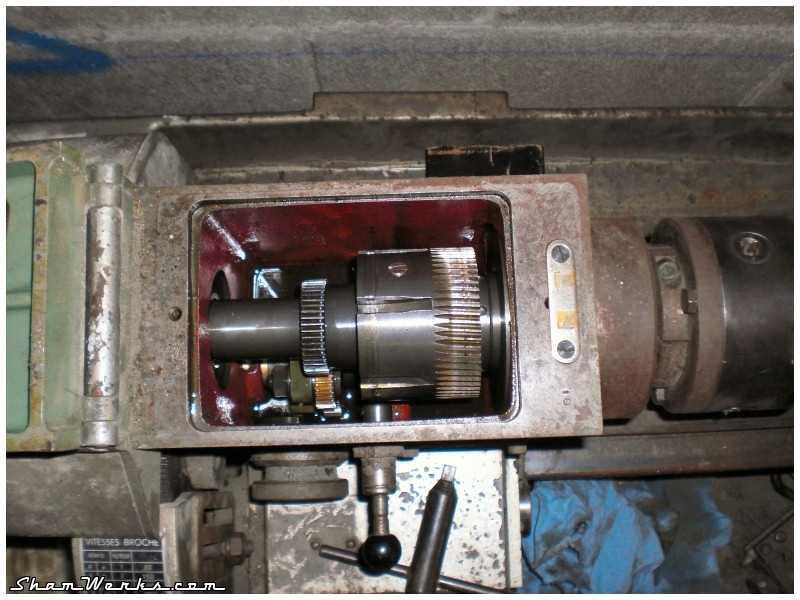
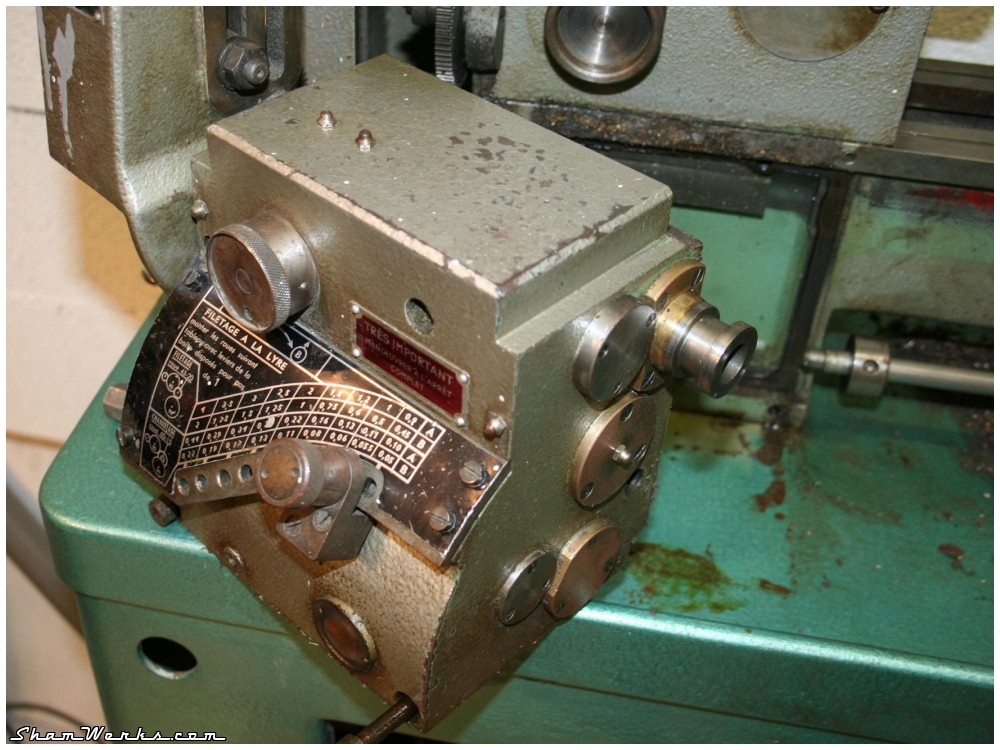
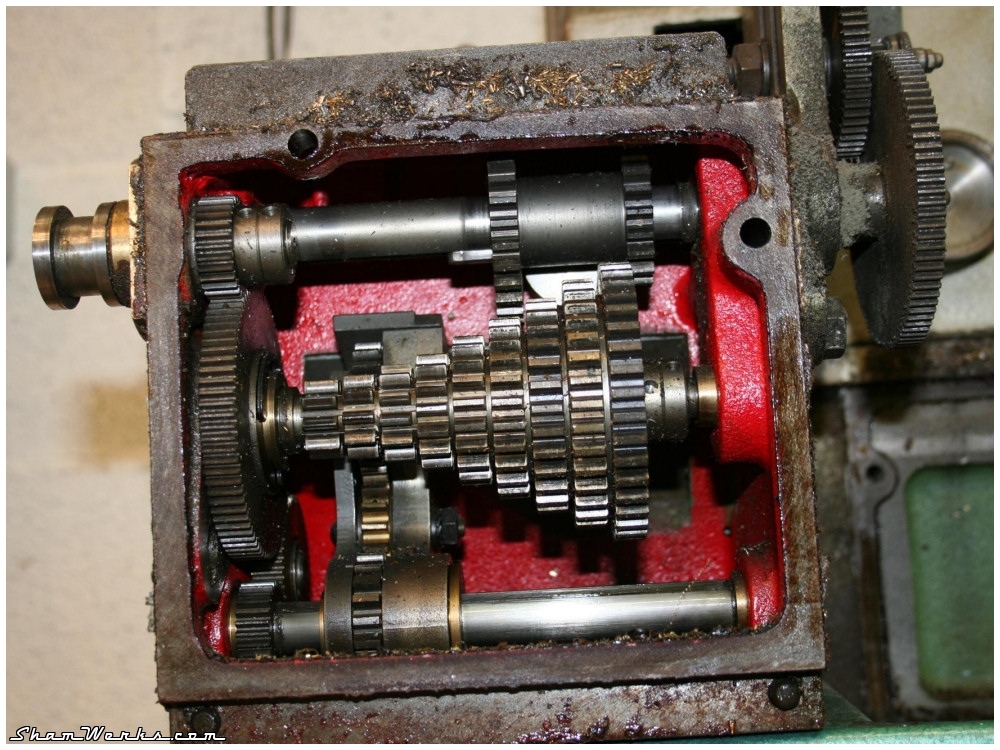
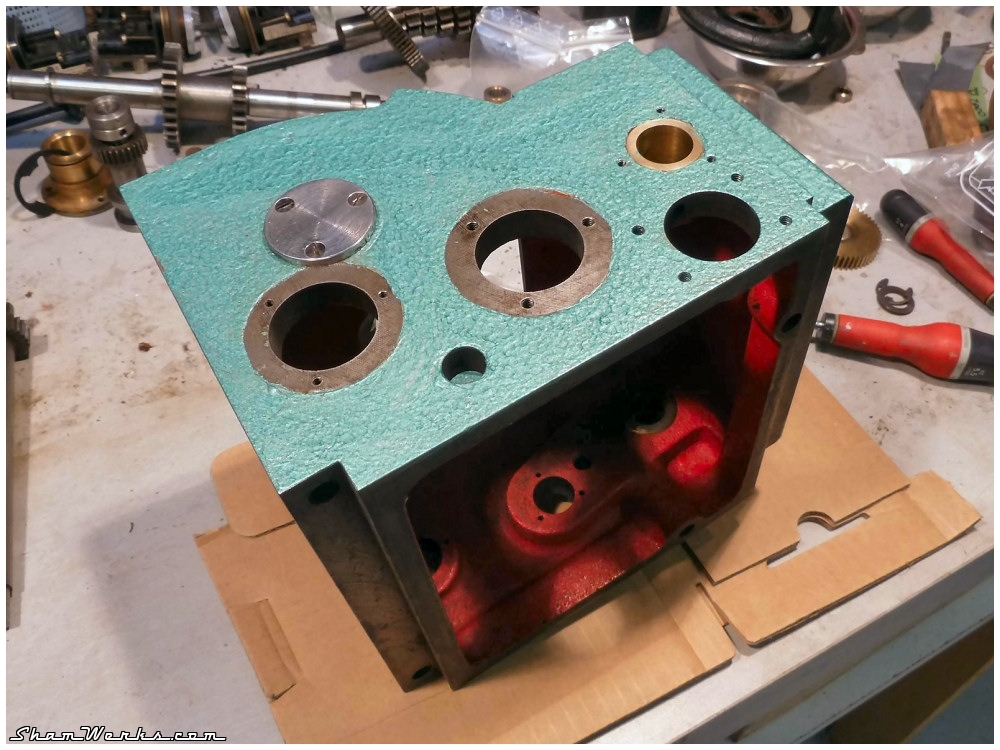
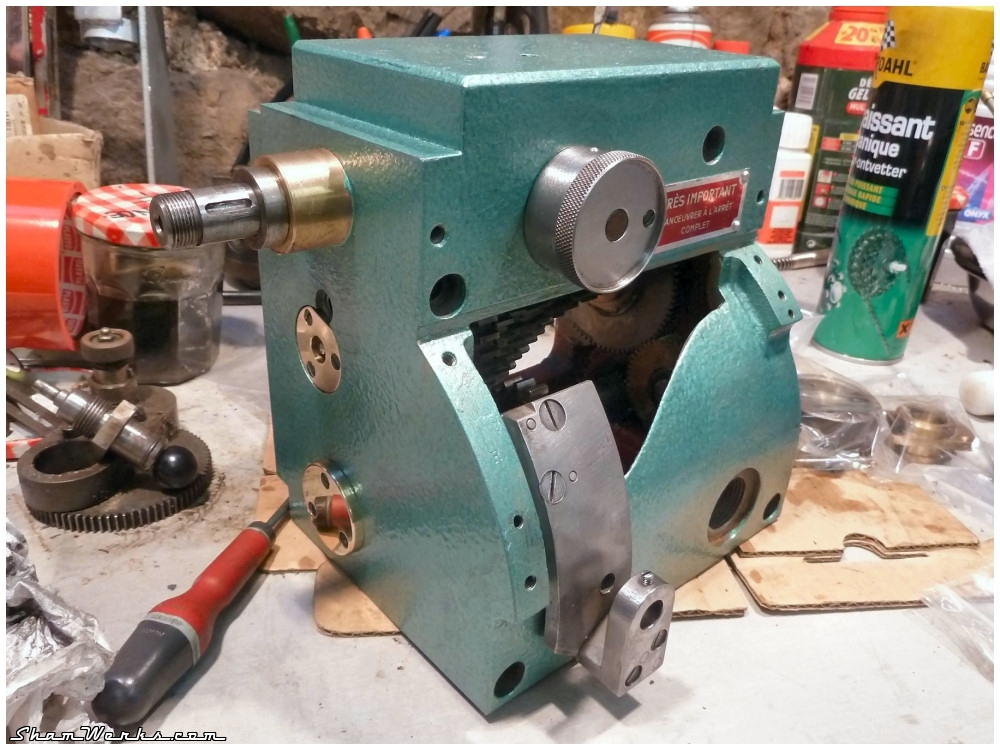
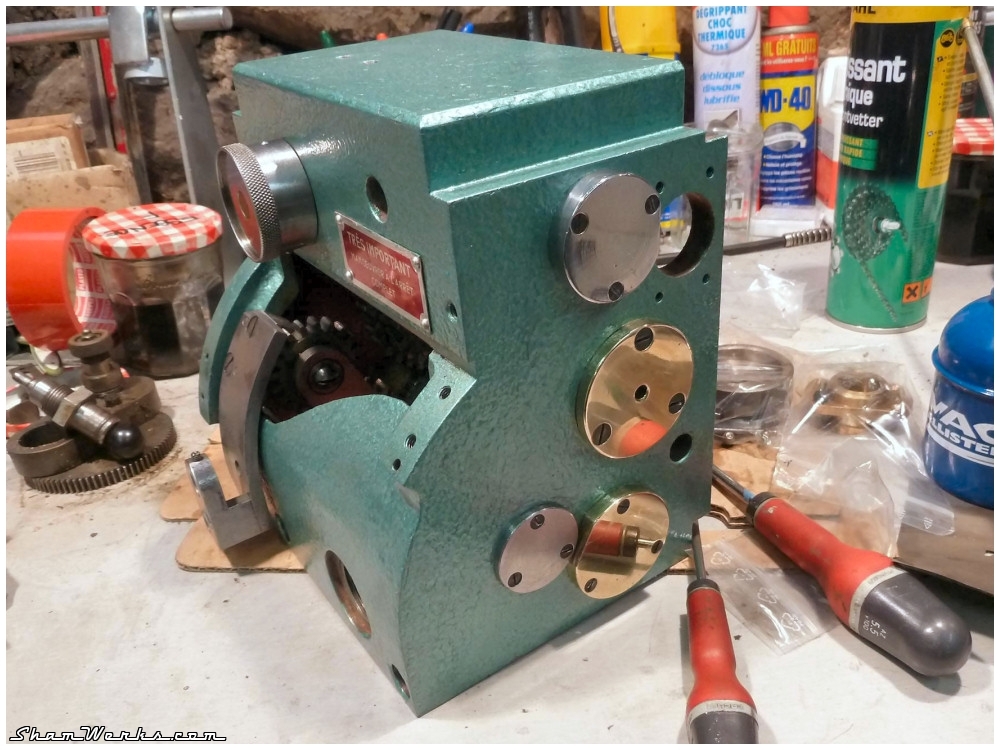
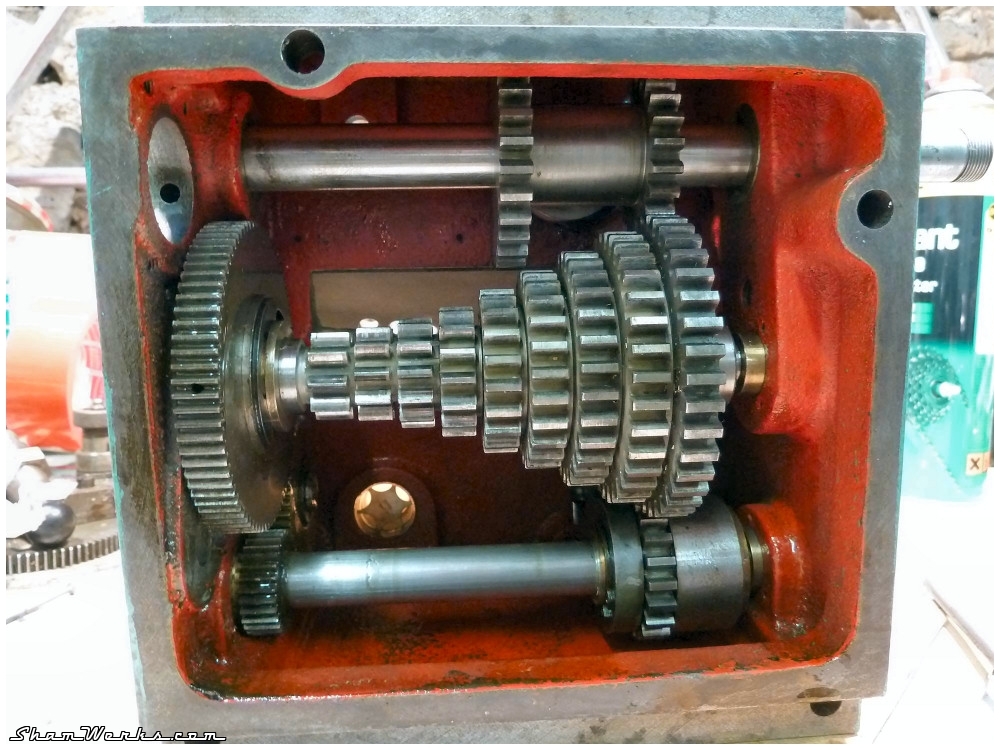
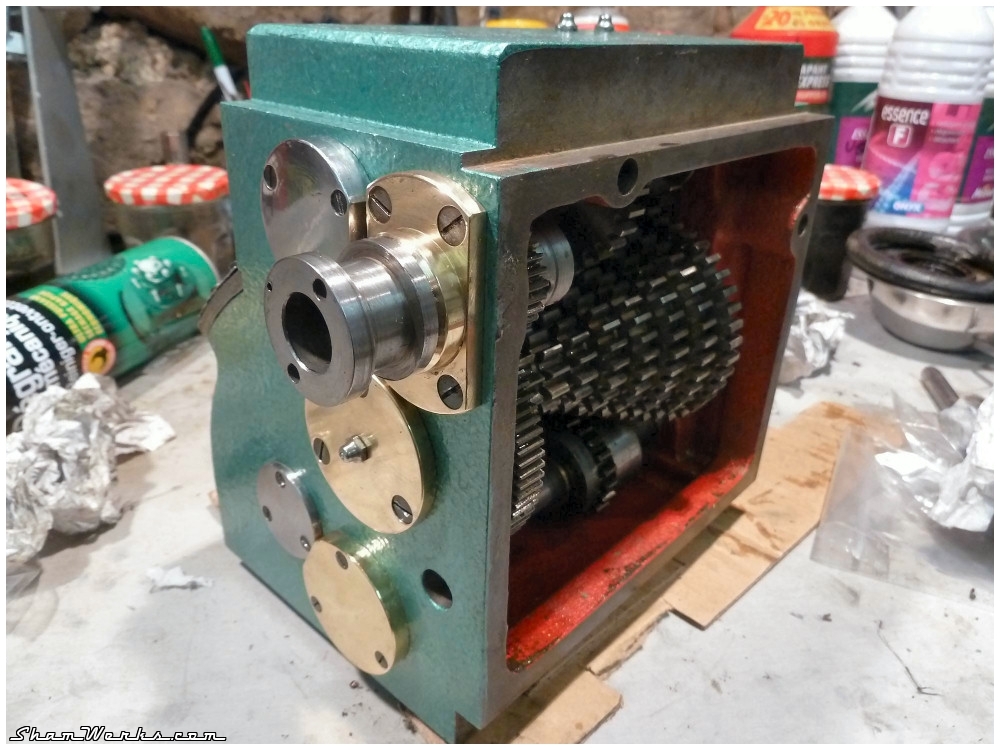
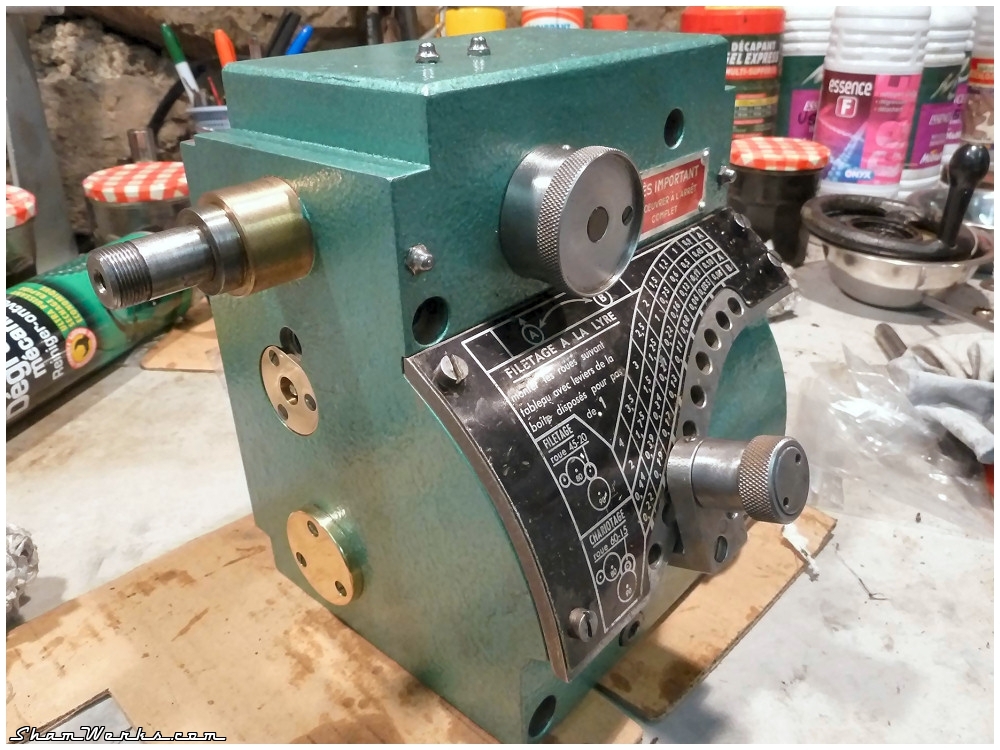
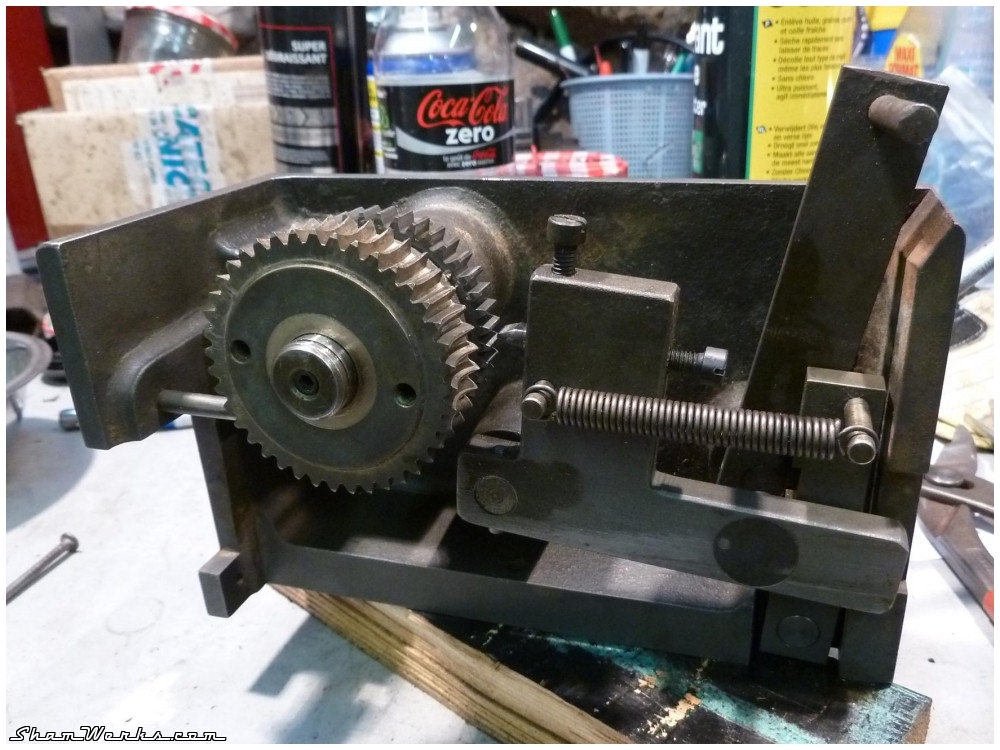
Feed gearbox
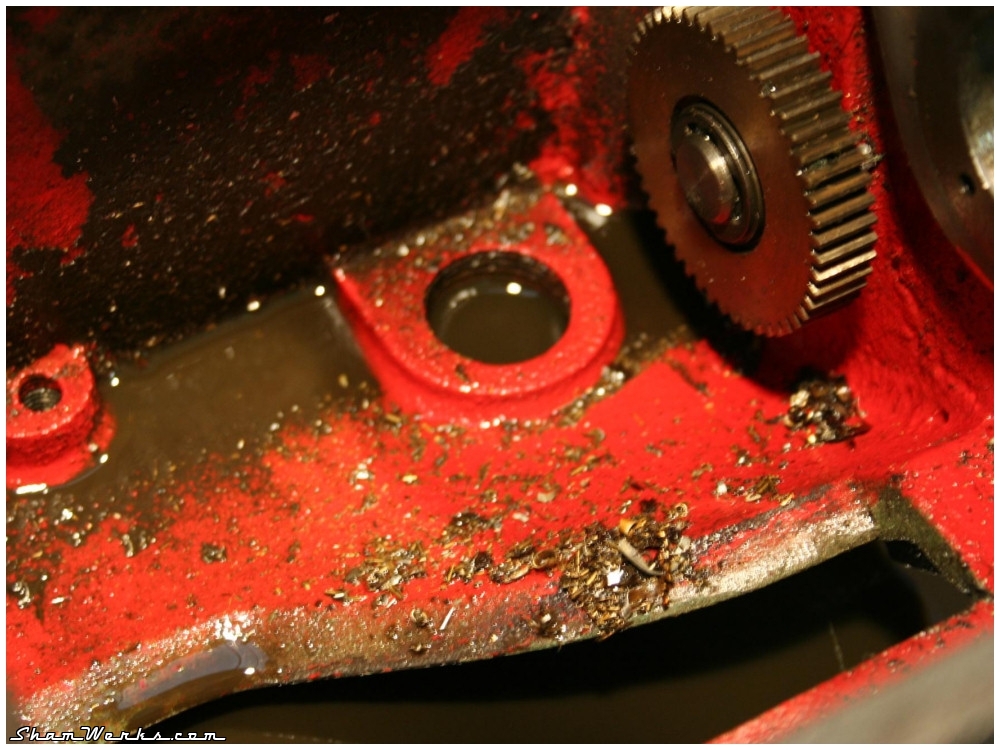
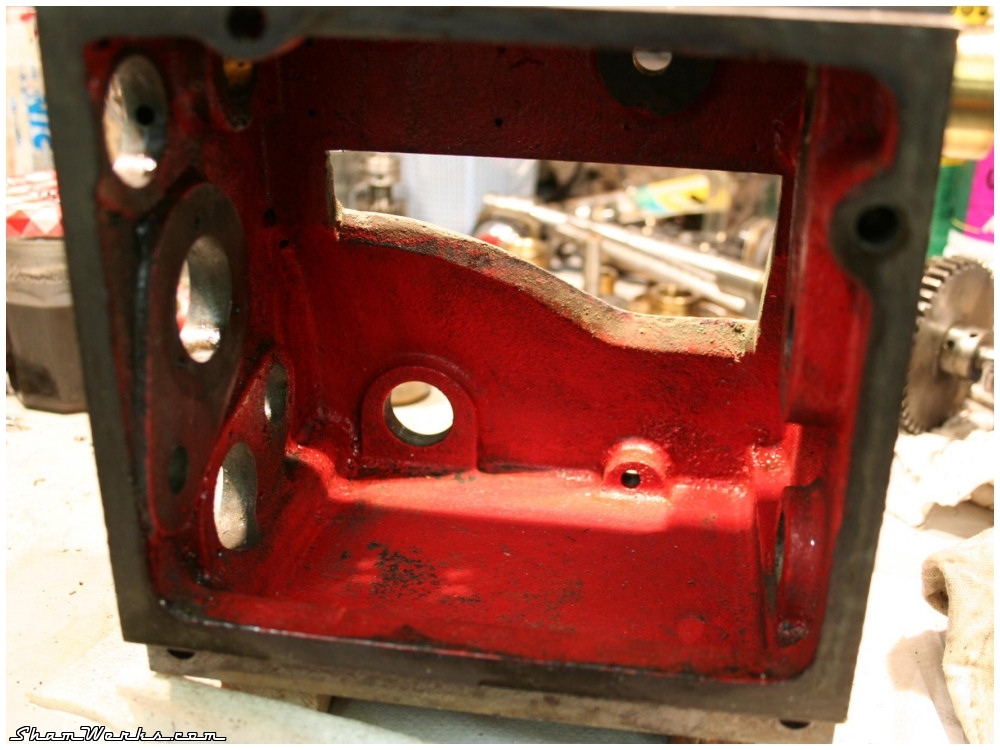
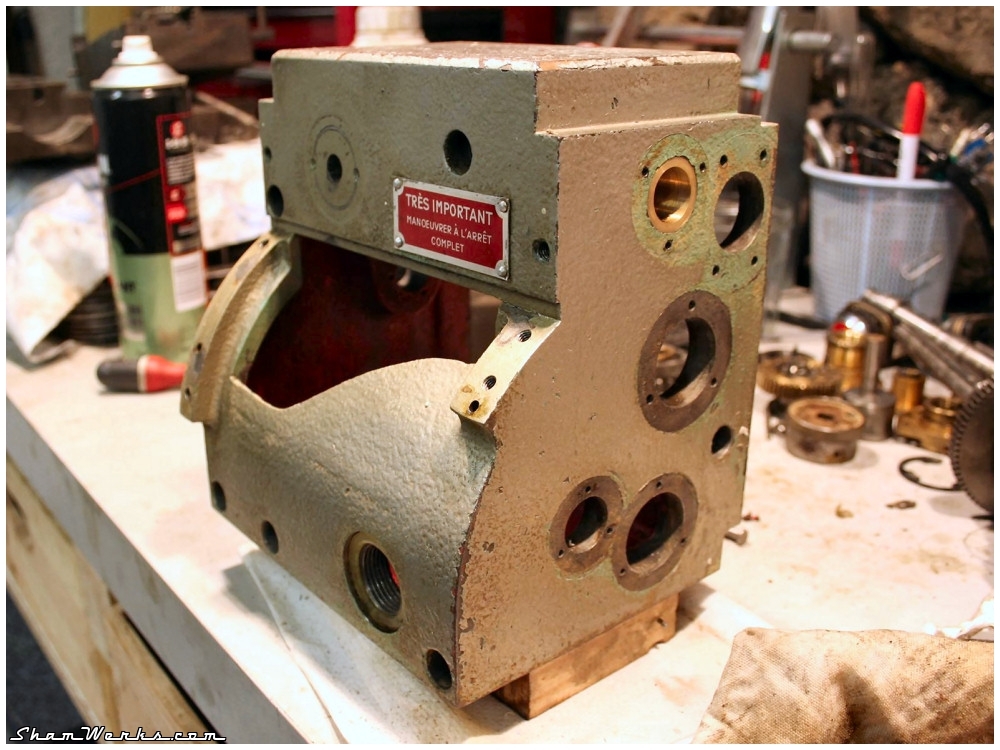
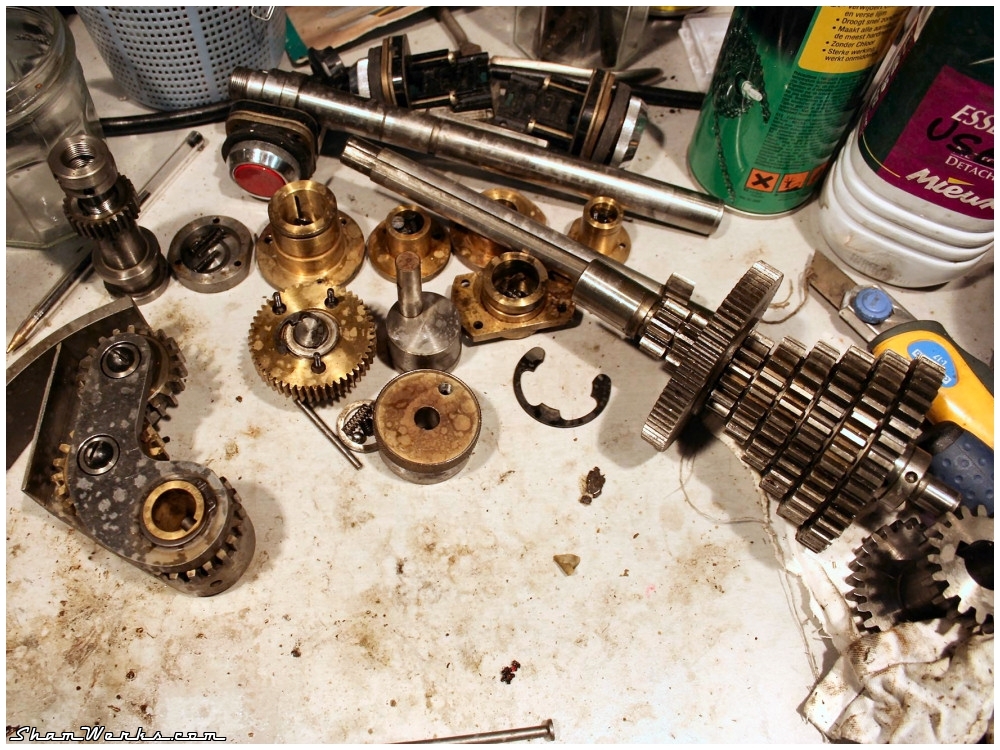
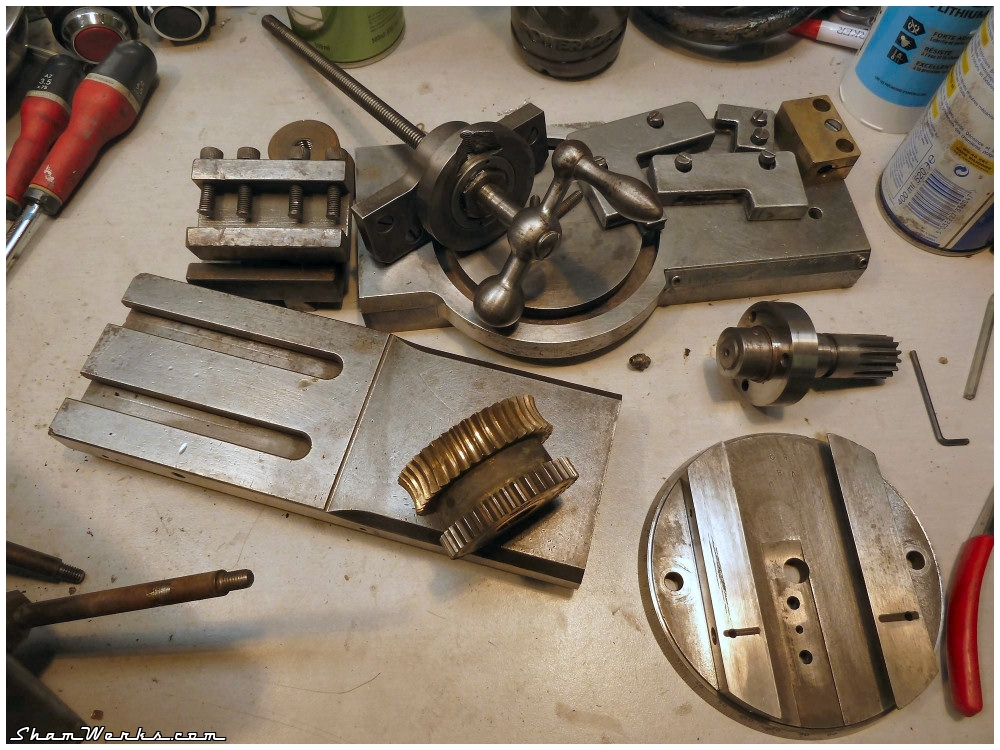
Then I start on the feed gearbox.There again, I originally just wanted to give it a good external clean, but... I got carried away.
I must say I had a moment of doubt when everything was disassembled on my workbench, with gears averywhere... But finally, with a bit of patience, methodology and organisation, it's not that complex.
Some of you may think I went too far with the mirror finish on the bronze bearings, but I couldn't help.


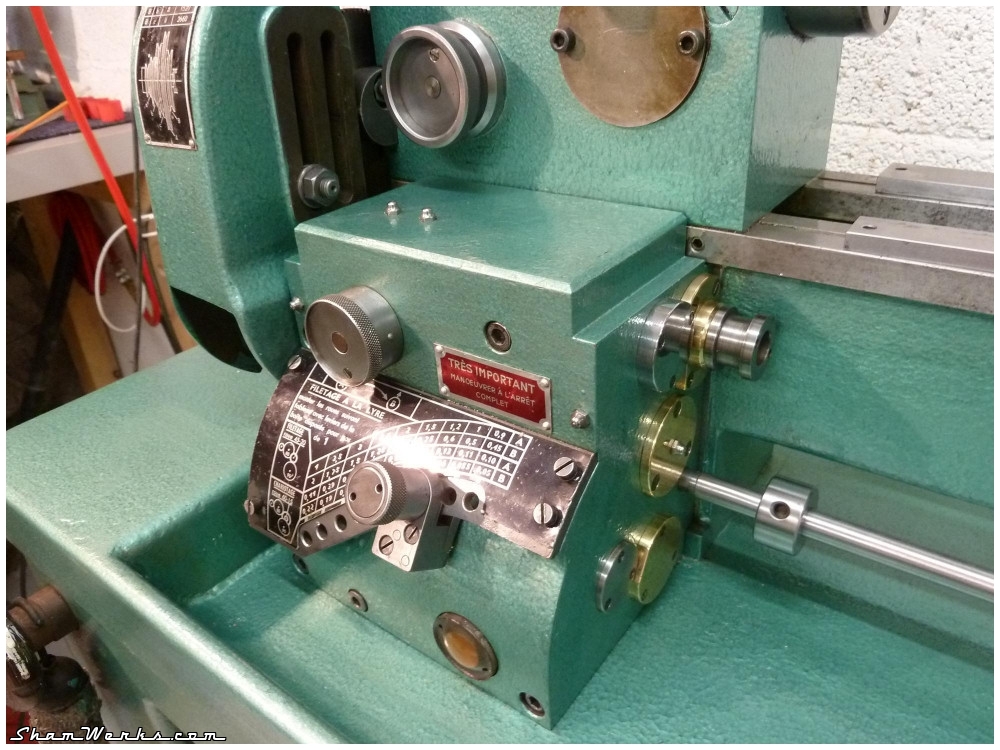
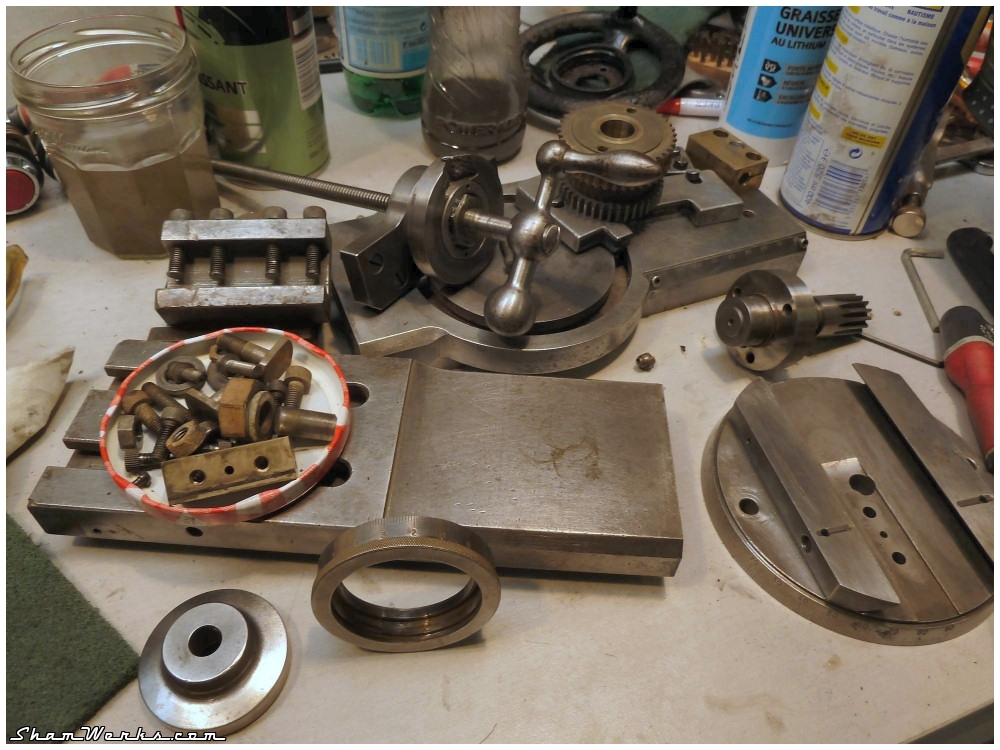
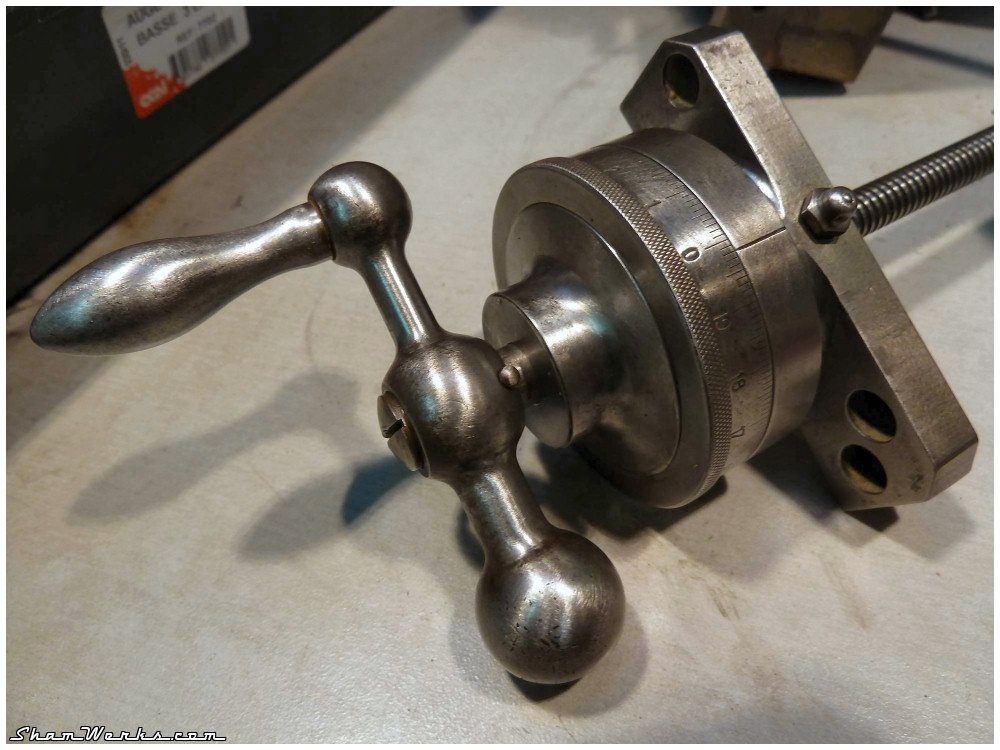
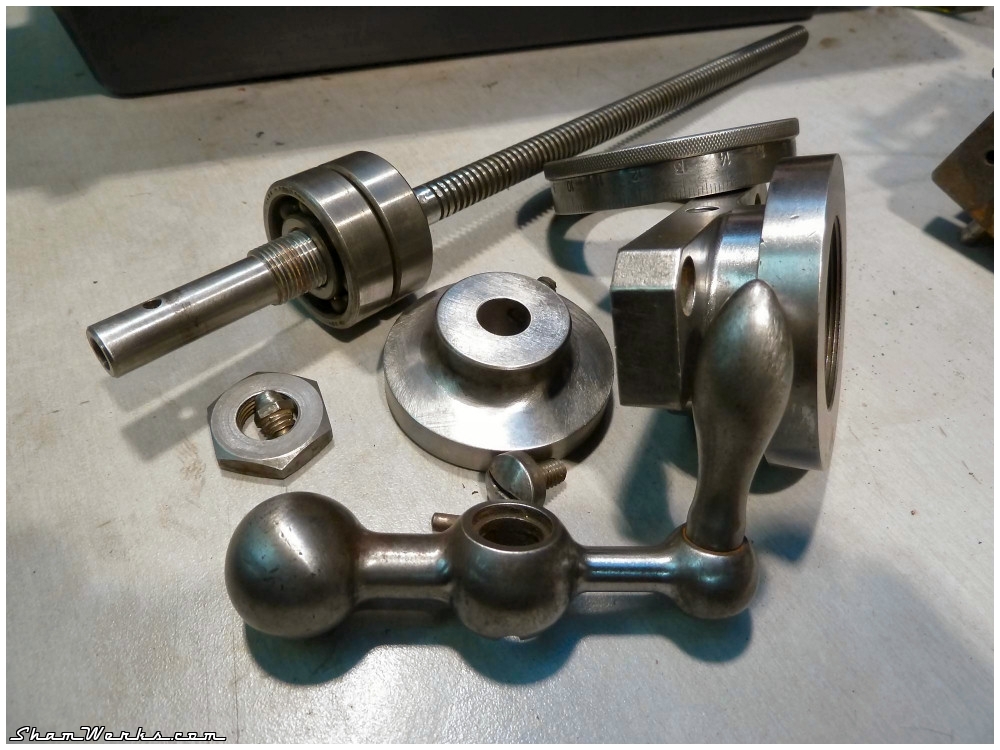
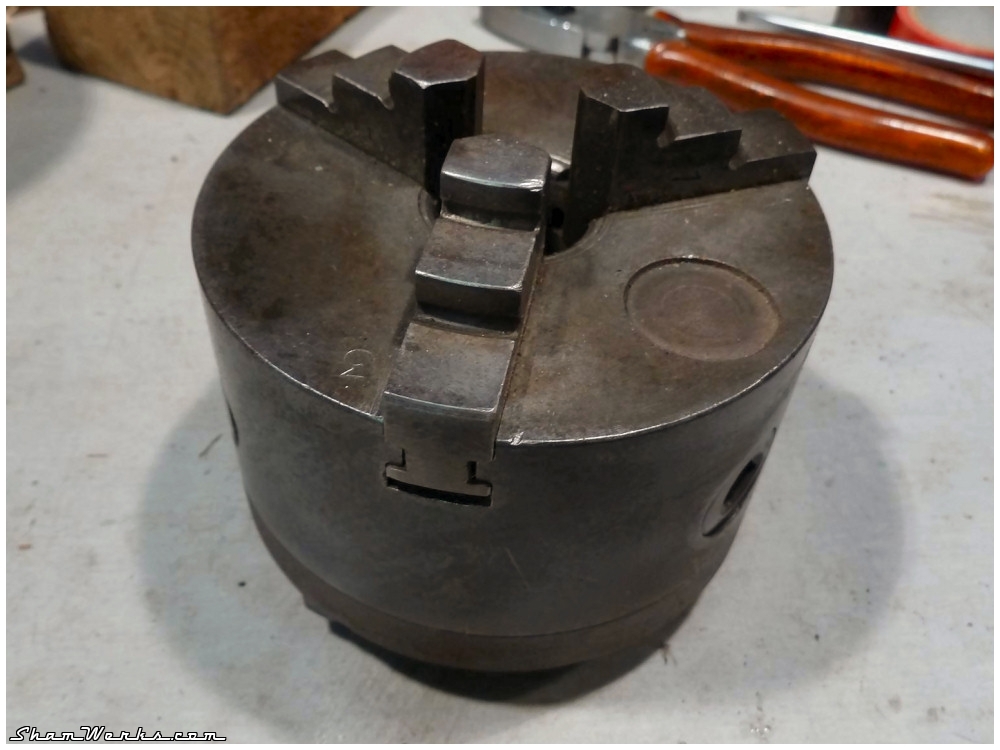
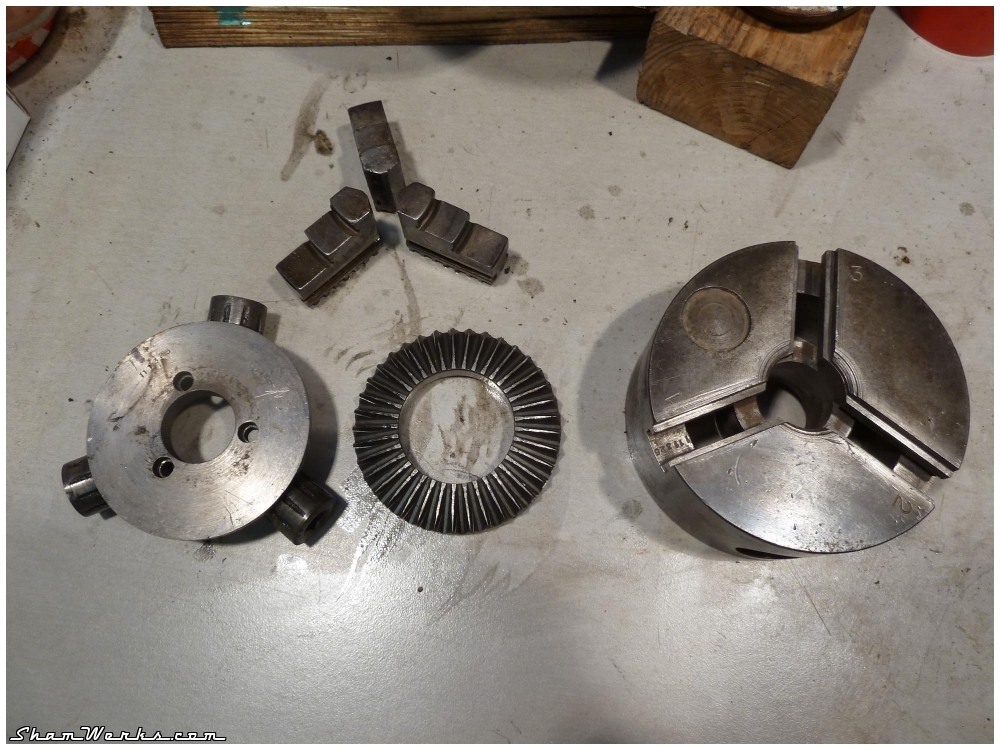
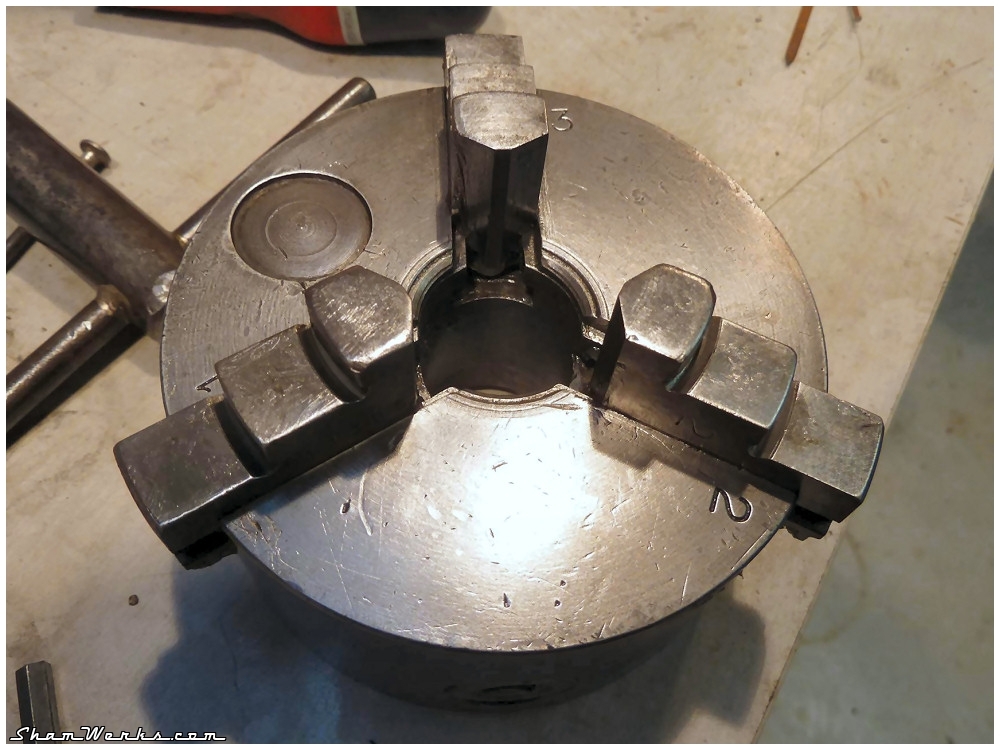
Carriage
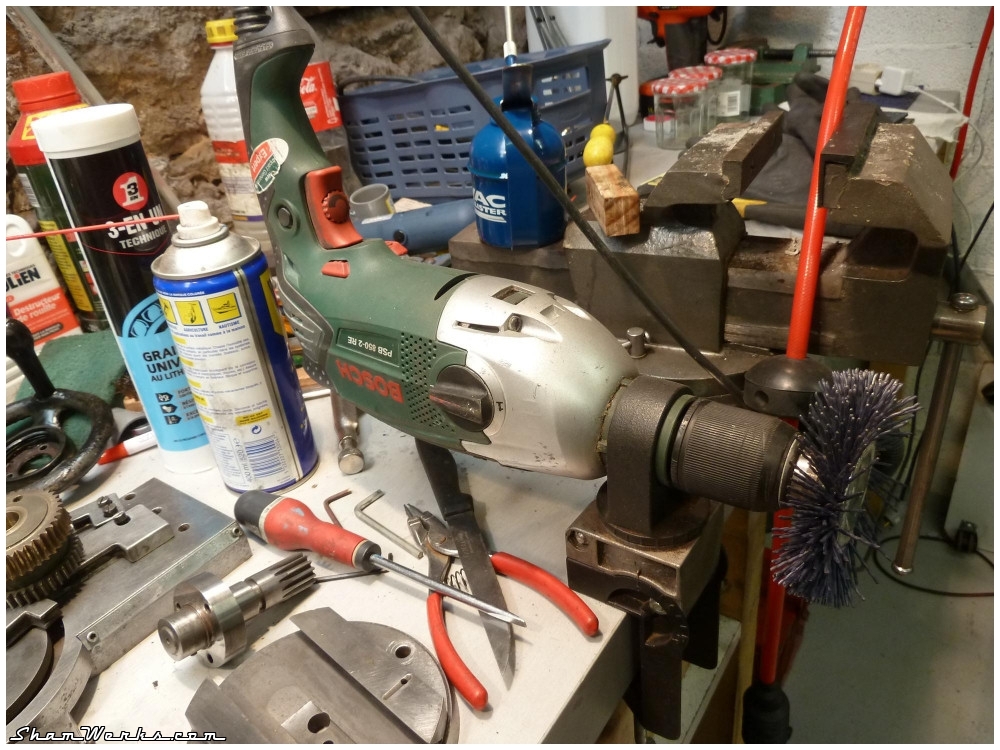
Then, dismantling the carriage assembly, down to the smallest screw... Now this is where you gotta be cautious : dozens and dozens of small parts just waiting to be lost... You must be organised : containers, reclaimed jam jars, Ziploc bags, hand-drawn schemas, pictures, anything's good to make sure you don't lose anything, and preparing for the re-assembling step later.I won't go through the detail of cleaning each and every part here, the process was always the same : degreasing in a tay with solvent F (naphtha) and a brush, then brushing/polishing with a rotary brush mounted on my hand drill (soft blue plastic brush) to remove oxydization marks. Eventually, some scrapping when there was paint stains, and/or 600 grit sandpaper with abit of WD40 to remove deeper oxydization.
Aaaaand finally, reassembling everything with clean oil/grease, while adjusting all the necessary plays : this is the funny part.
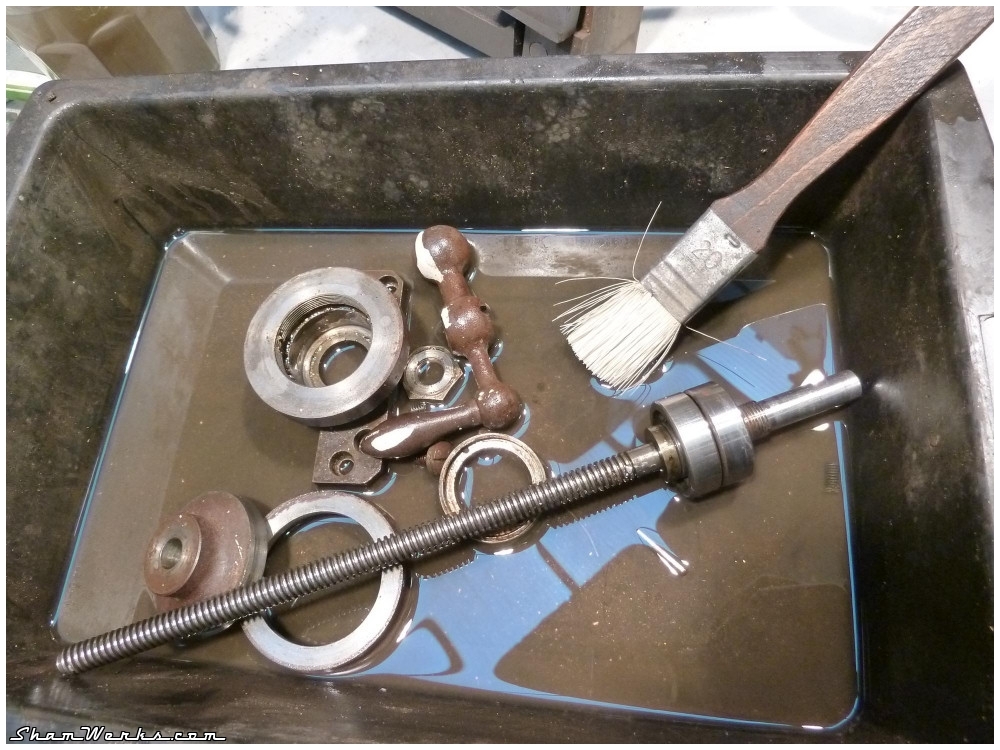

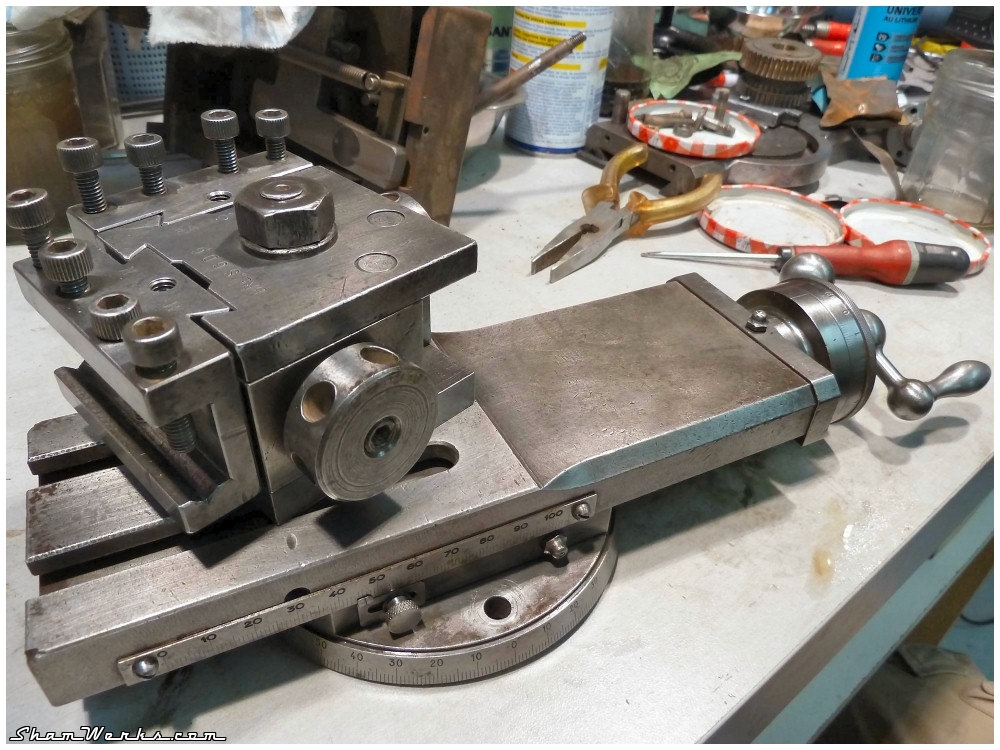


Tailstock and spindle
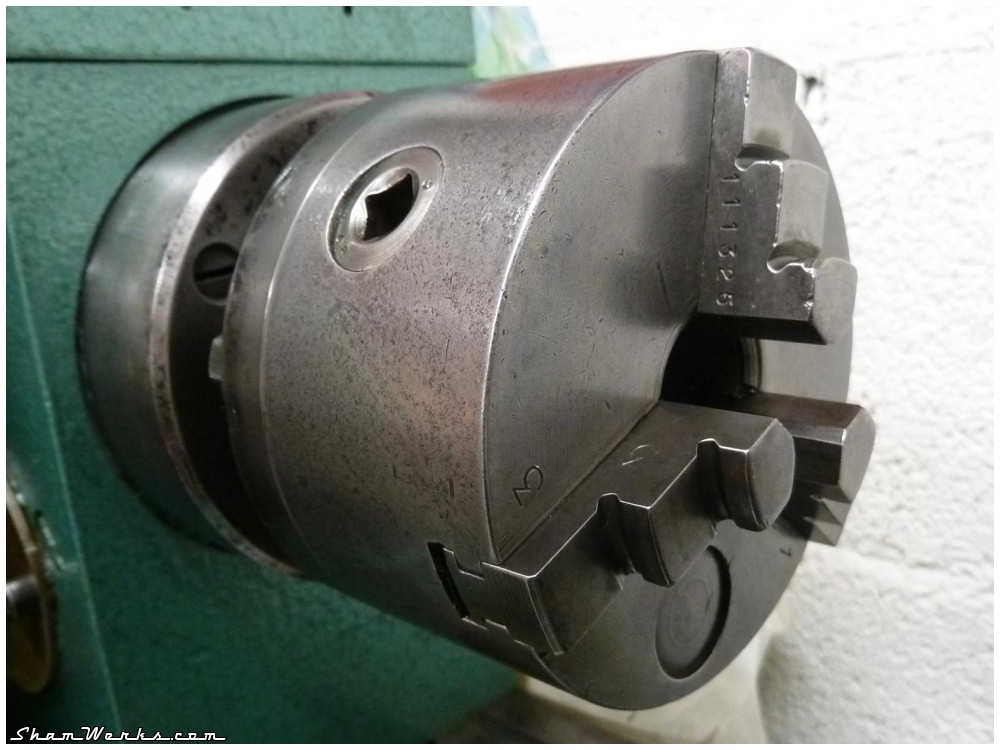
There's stillthe tailstock and spindle to restore. Regarding the latest, you must be extra cautious to reassemble it just the way it was originally, since the different parts broke in together.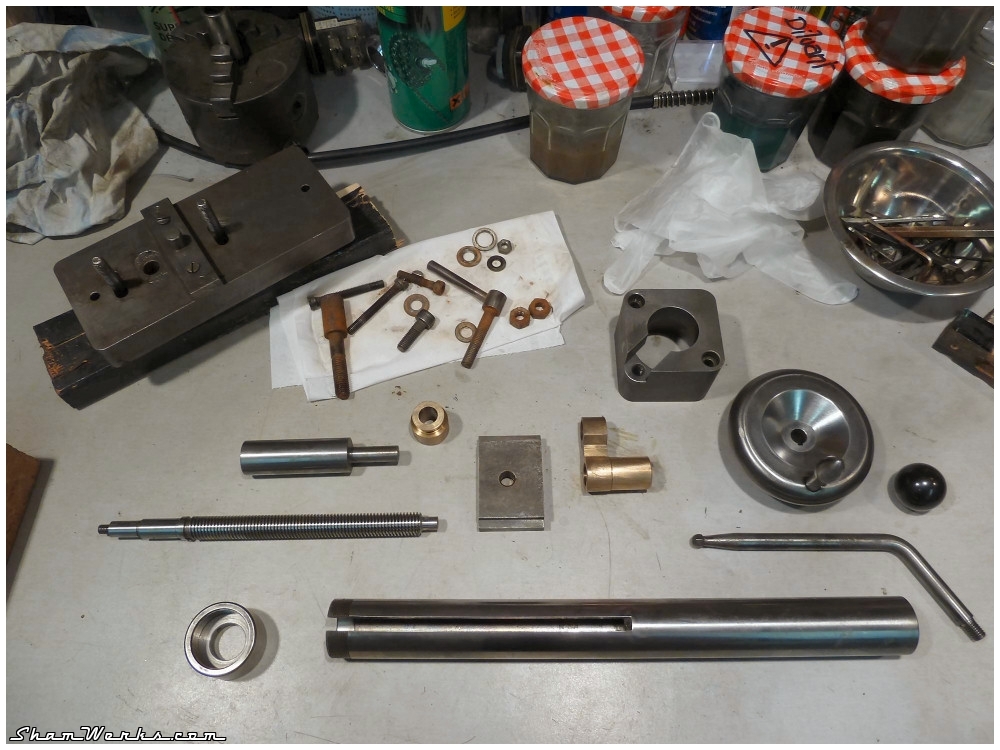

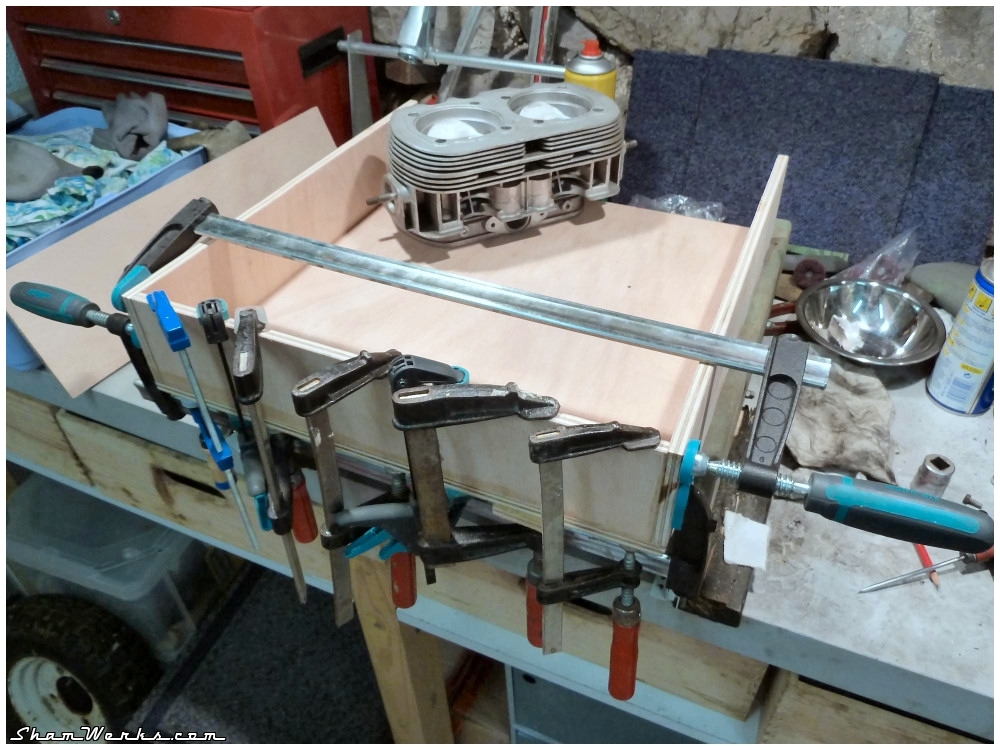
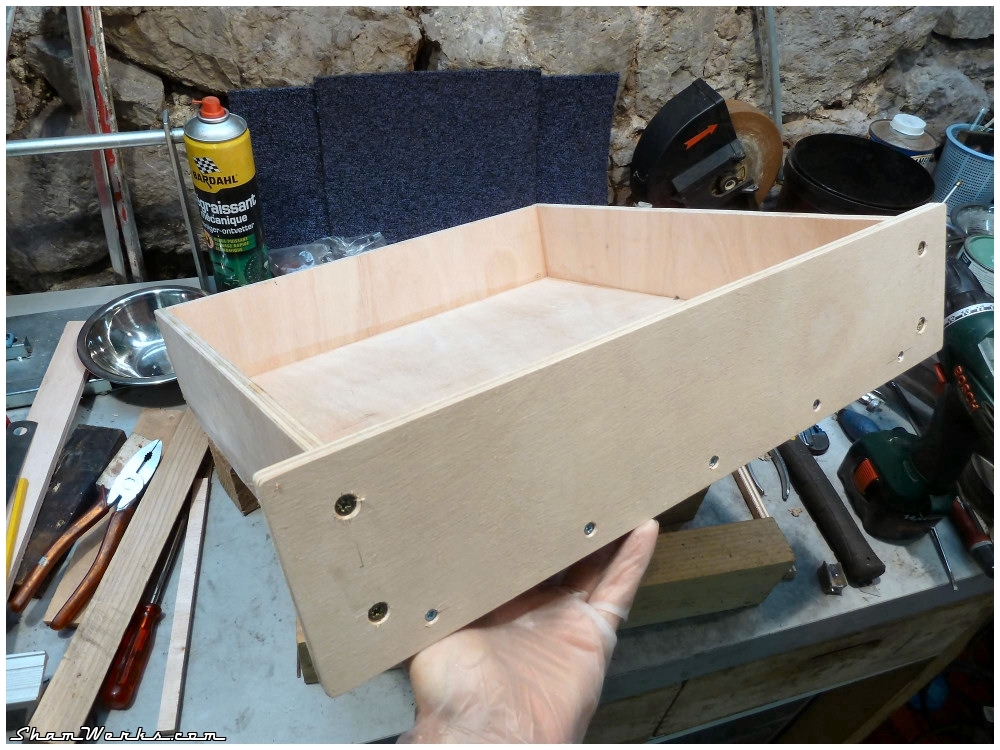
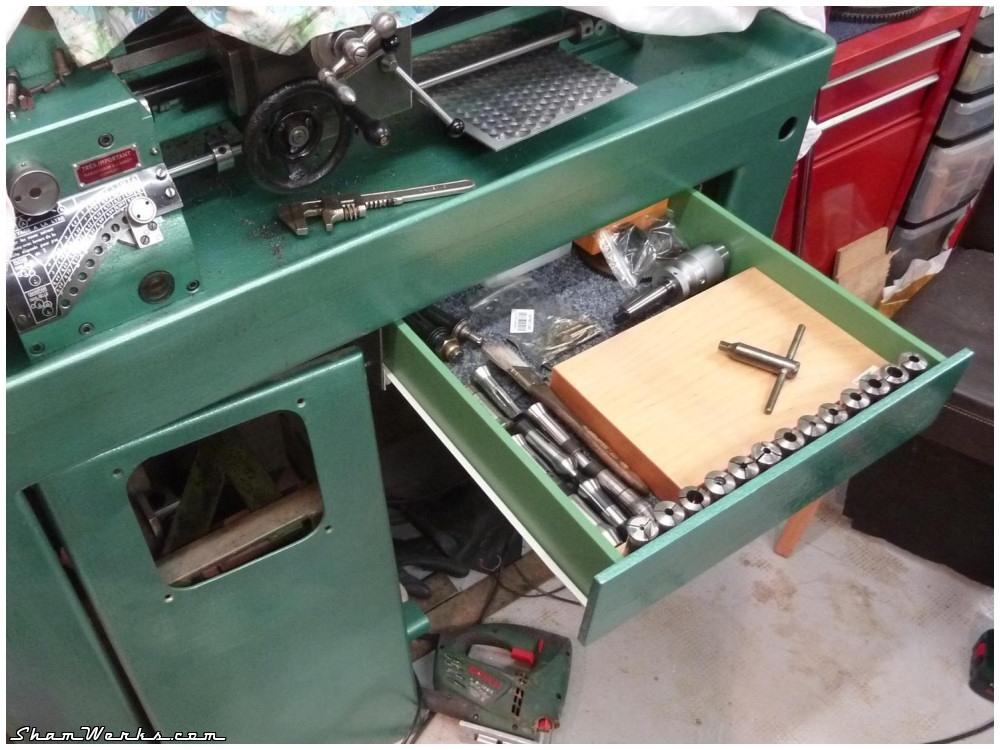
Drawer
Originally, my lathe had a little drawer, which is quite handy to keep tools protected and within a hand's reach. Unfortunately, the drawer was lost at some point in the history of the lathe. So, here I go, building a new one out of 10mm. plywood.A quick tip about plywood : to have a smooth finish once painted, you have to sand it before painting ; a good thing is then to humidify the wood a few minutes before sanding (use a spray or a sponge to slightly humidify the wood, don't soak it!). This will raise the grain of the wood, so you can sand it smooth. If you don't, the grain will raise with the humidity of your paint coat, and you and up with an ugly rough surface.


Electricity
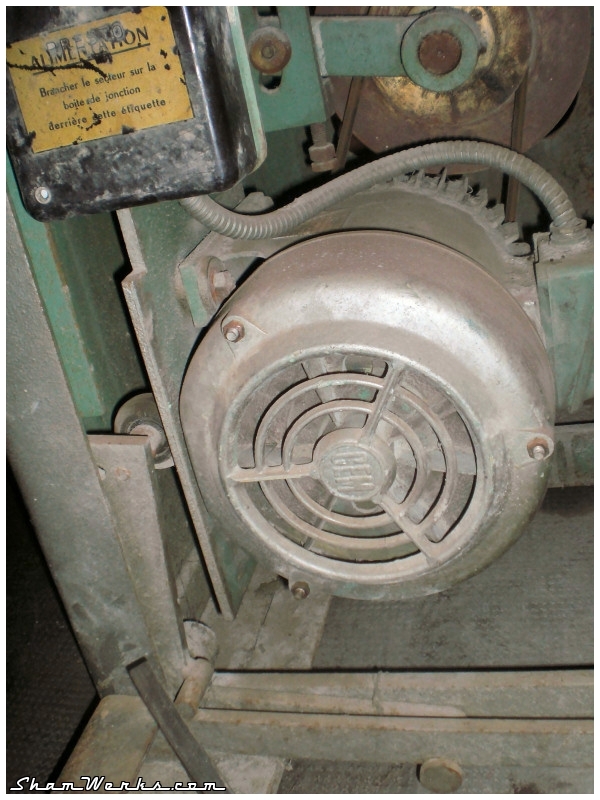
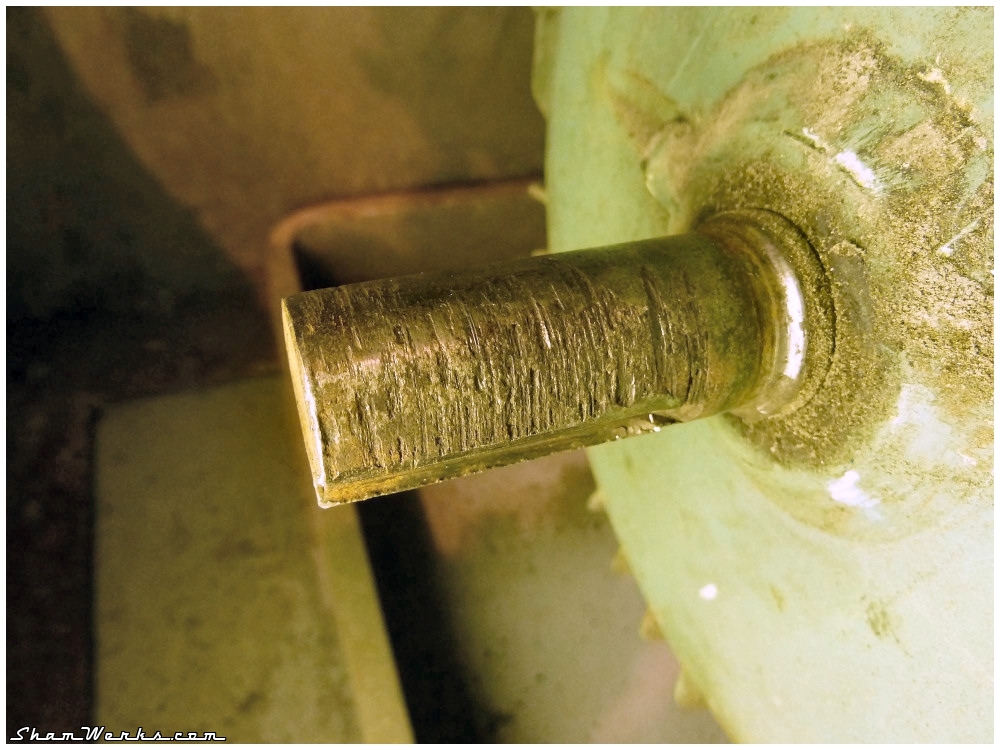
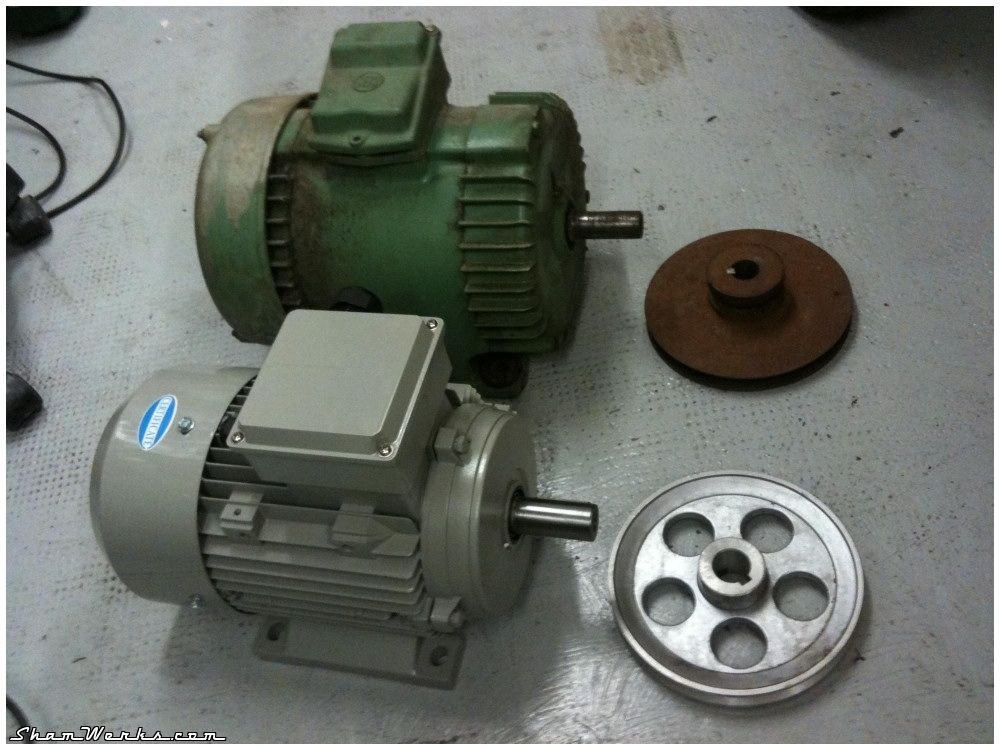
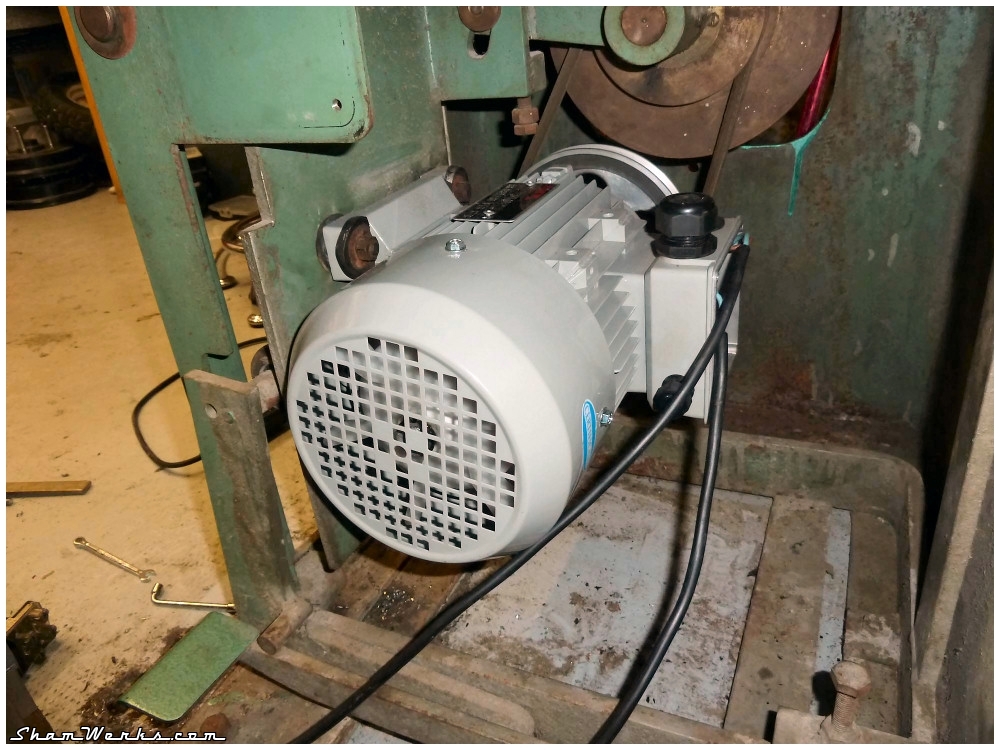
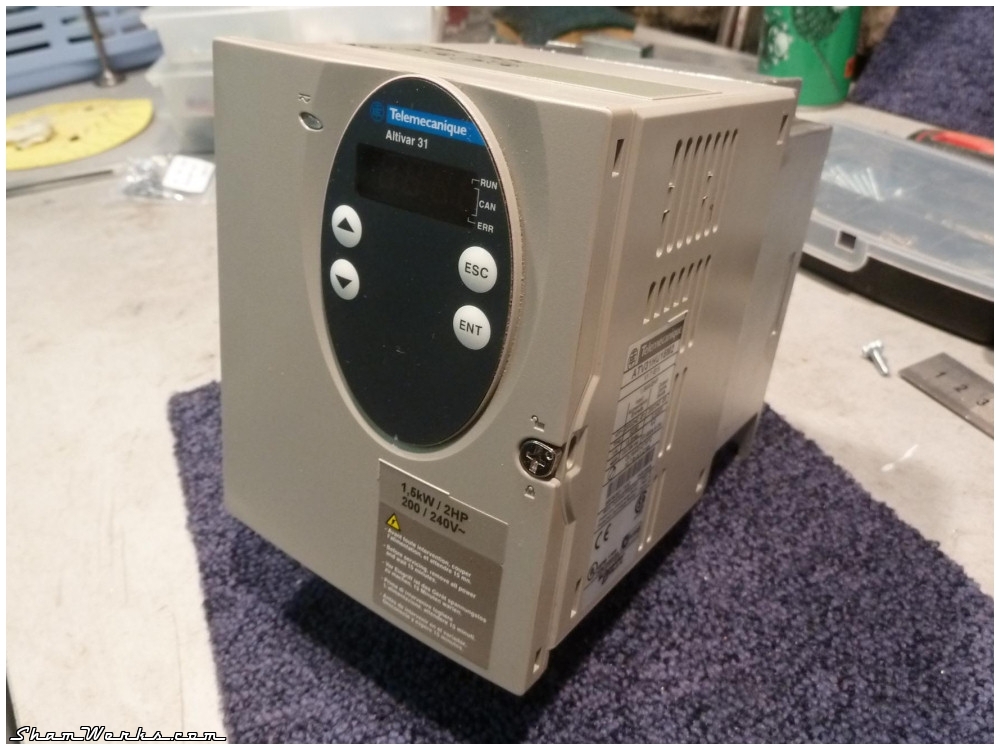
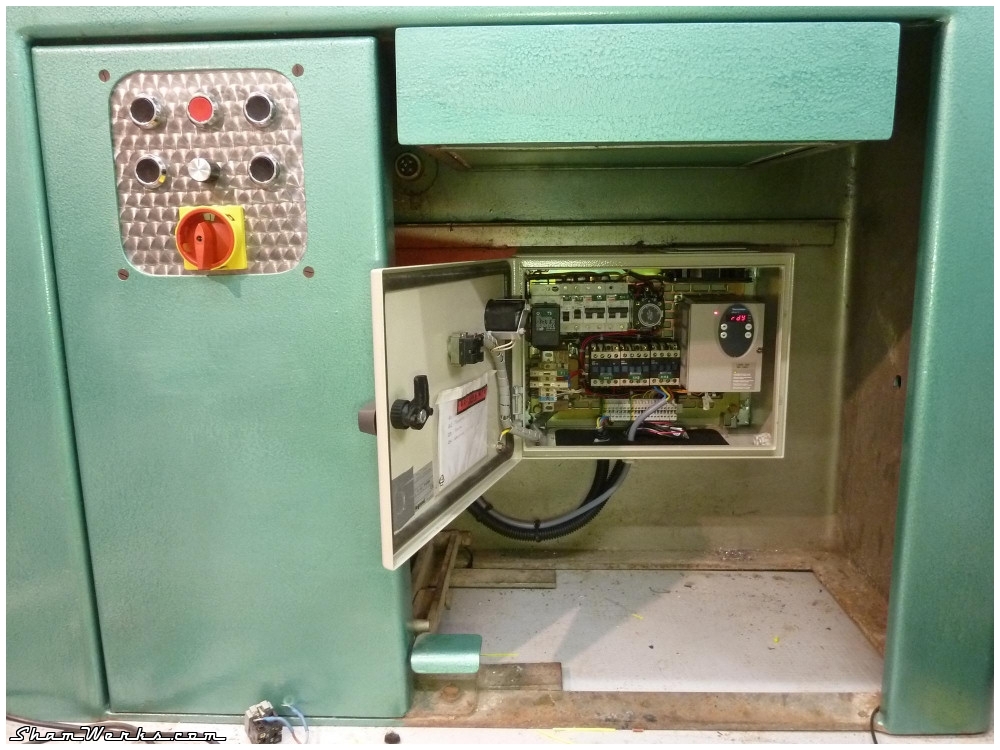
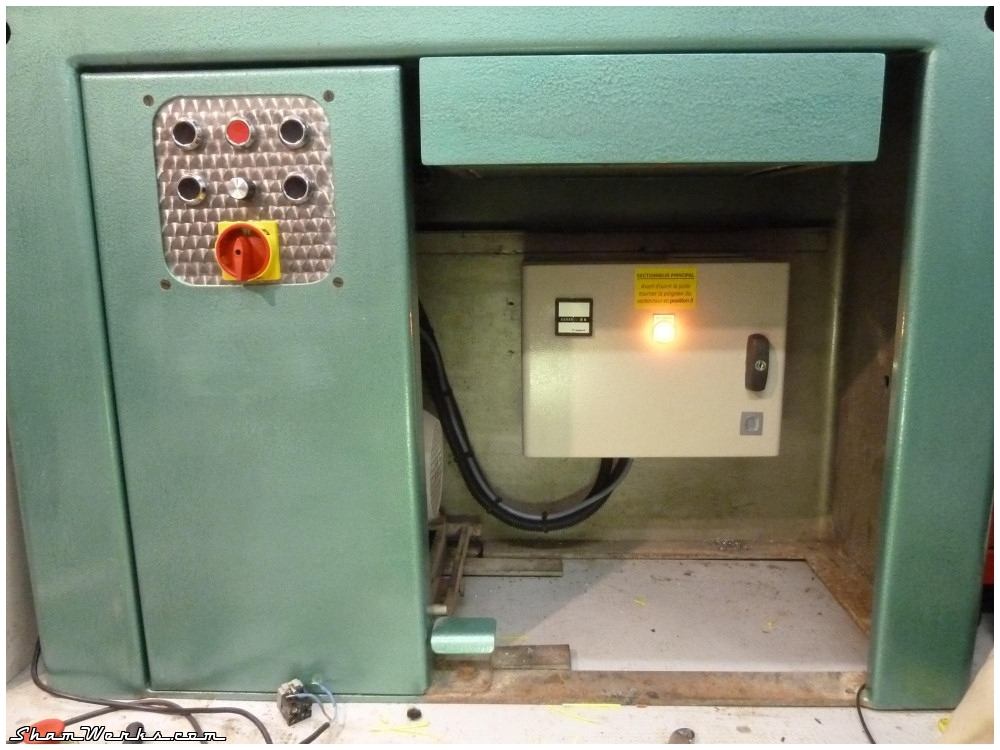
Since I don't have three-phase current available in my workshop, I use a variable speed drive to drive the motor (I use a Schneider Altivar 31, great product.).The original motor (1,5 kW/2hp, dual speed) will finally be in too bad a shape to be used. I don't know what its previous owners did with it, but boy does it have suffered : the output shaft was beaten, it was impossible to mount the pulley on it without heavy vibrations. I may have been able to grind it back straight, but since the motor made a naughty noise when running, I preferred to replace the motor + pulley assembly. For 160€ for both (same power as the original motor : 1,5kW, 1500 rpm, pulley 160mm in diameter), I preferred to have my mind at peace on this point.

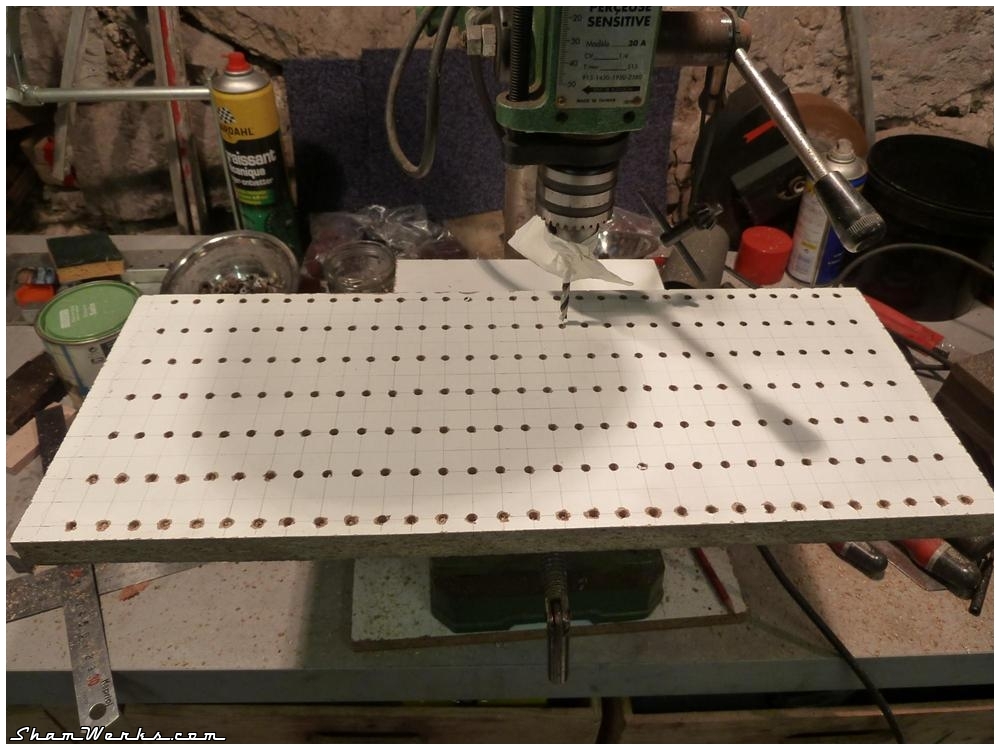
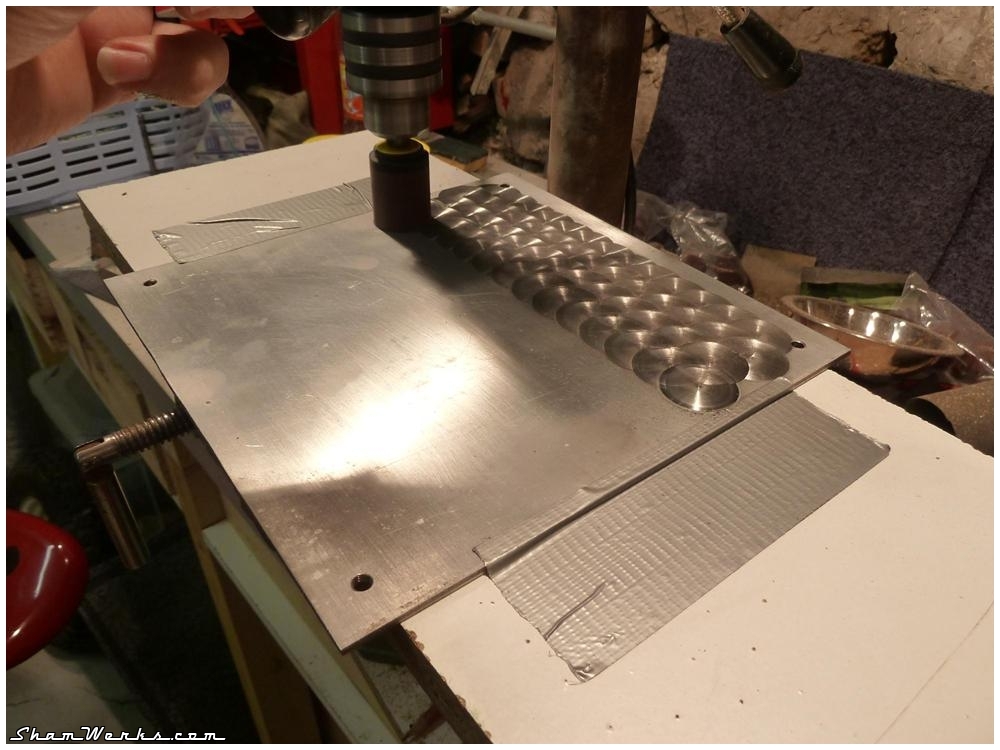
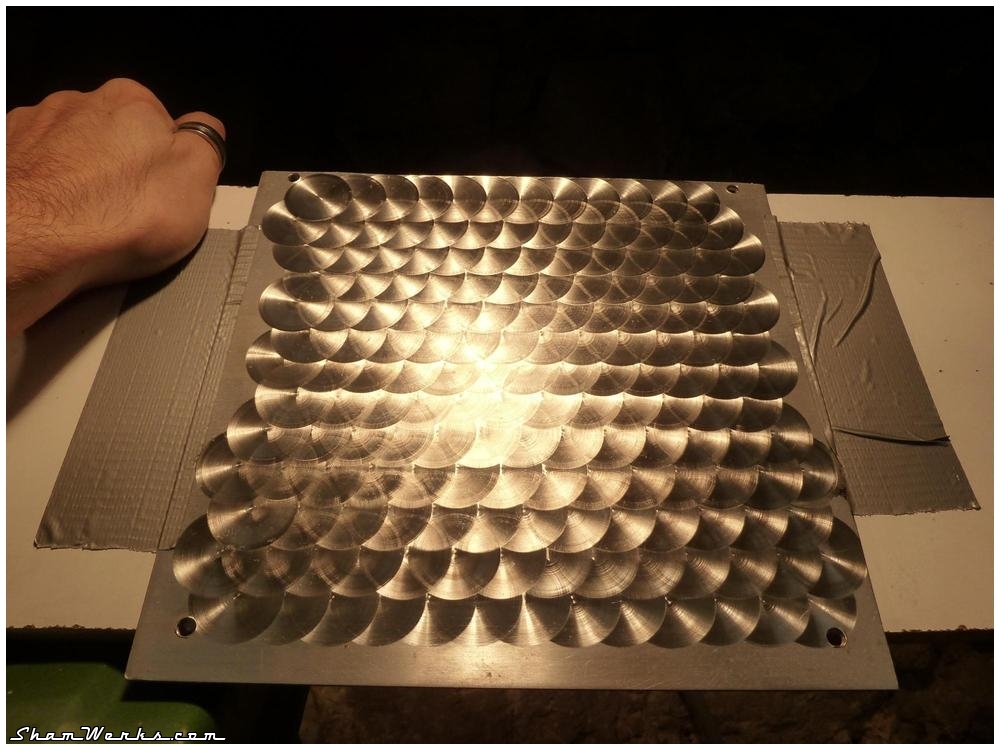
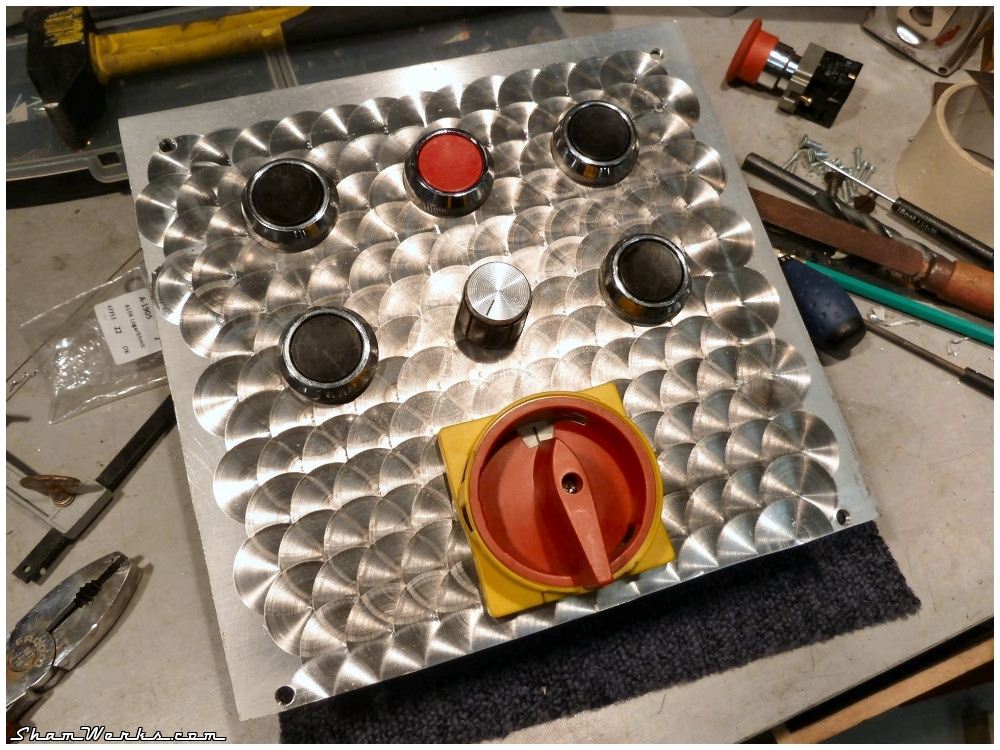
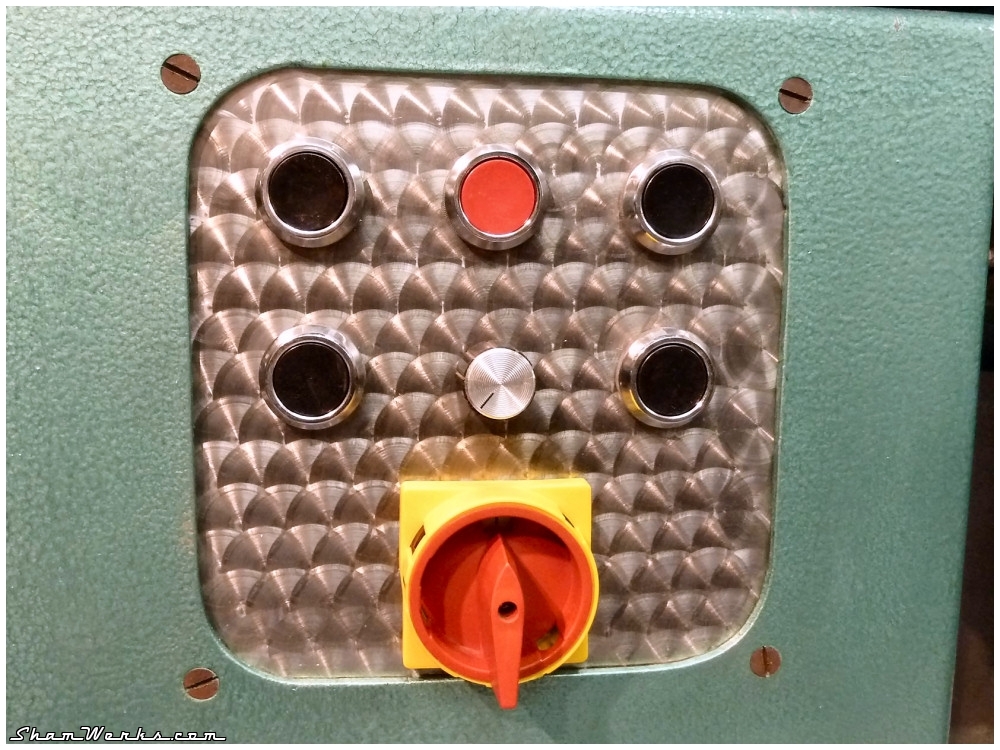
The abrasive grindstone I use is from PolirMalin, a bit expensive, but does a great job. The circles are 30mm in diameter, I've decided to shift each line by half a radius, the final aspect is much nicer. A bit more complex to do, but the result is worth it, see schema below. This is when the jig comes really handy!


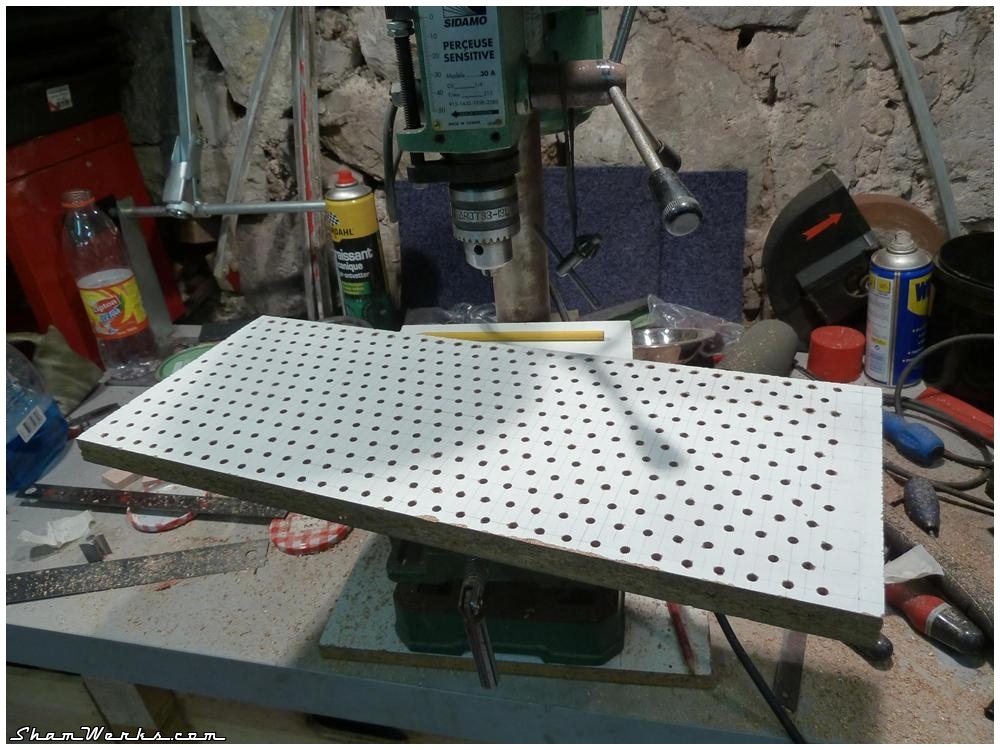
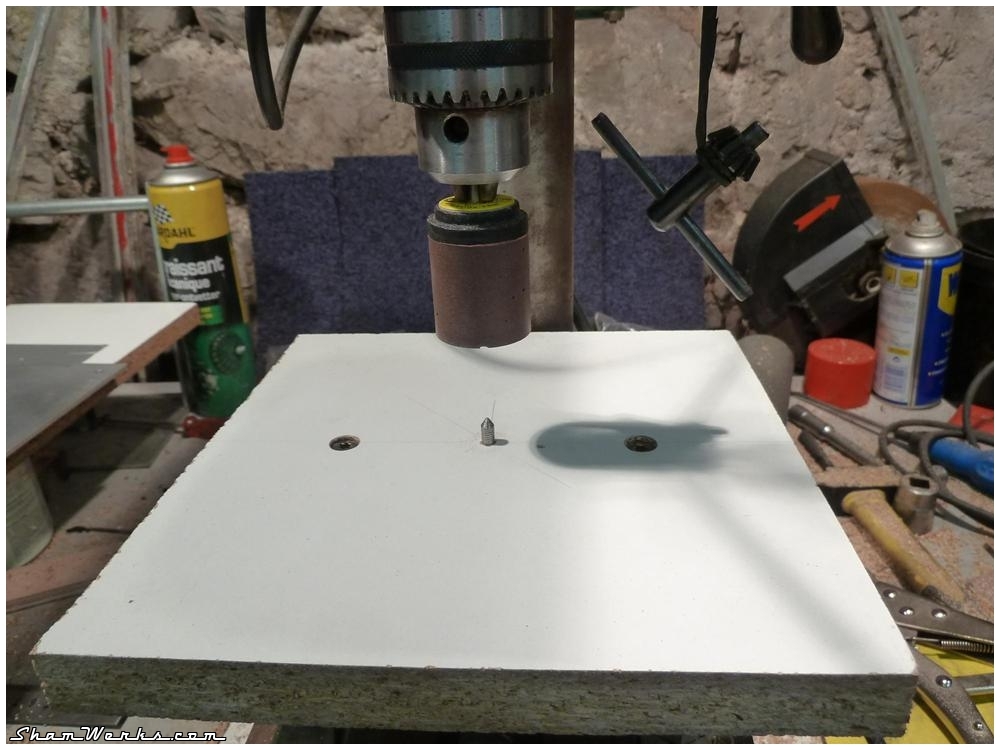
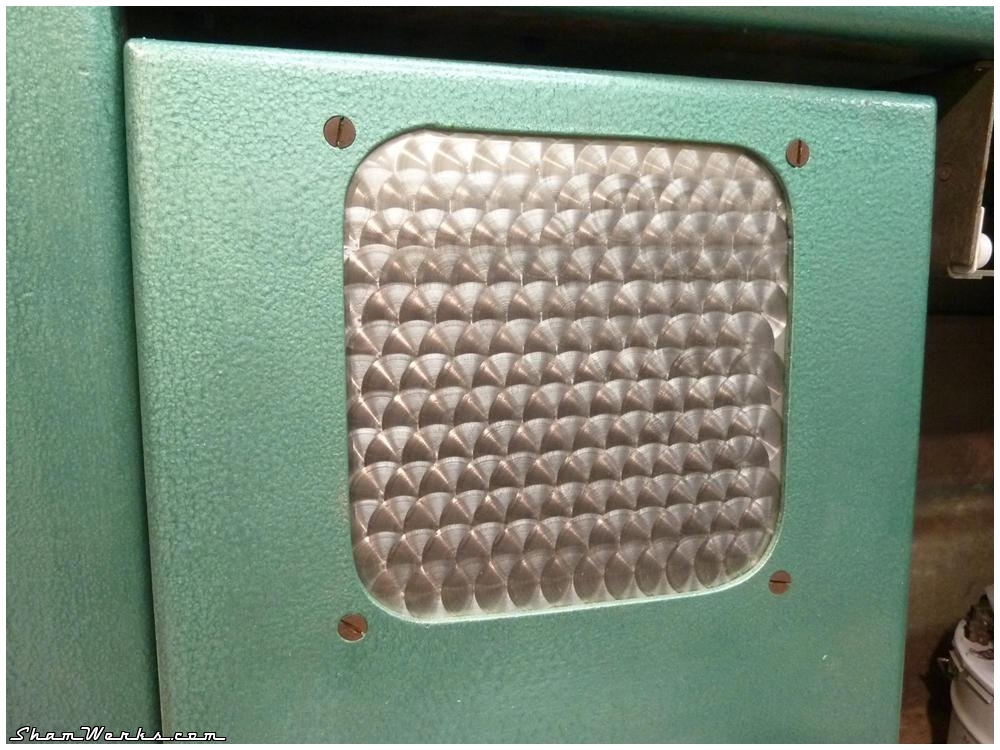
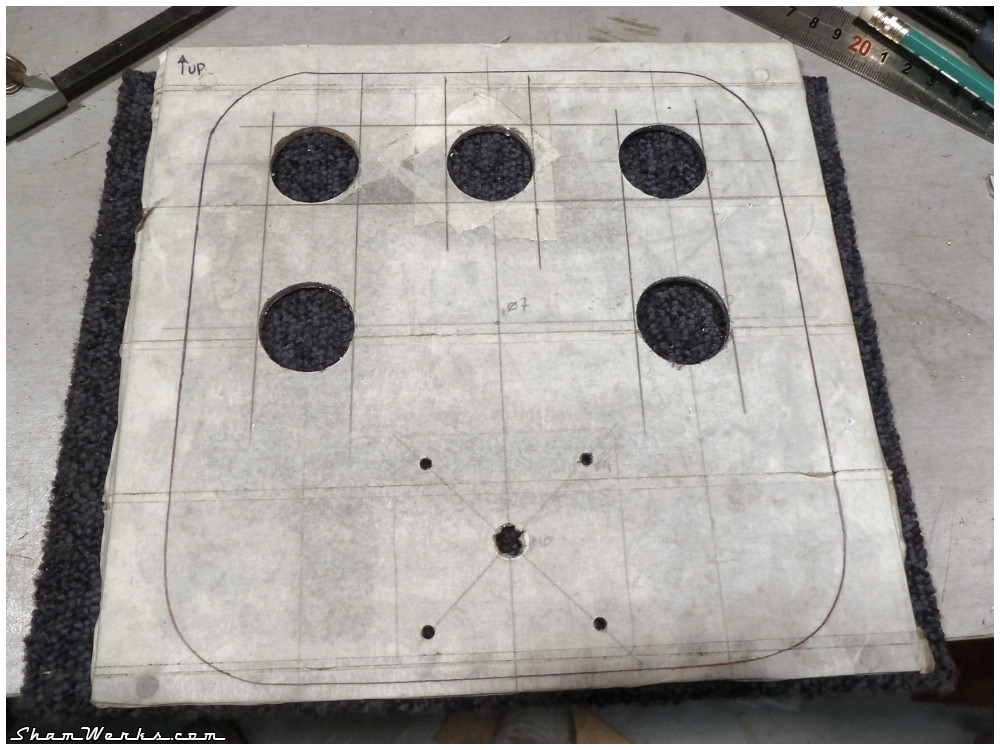
Then I just need to put the buttons in : I use paint adhesive tape (two layers) to protect the aluminum while driling the holes. Additionally, you can write on it, which is hande to note down where the holes should be!
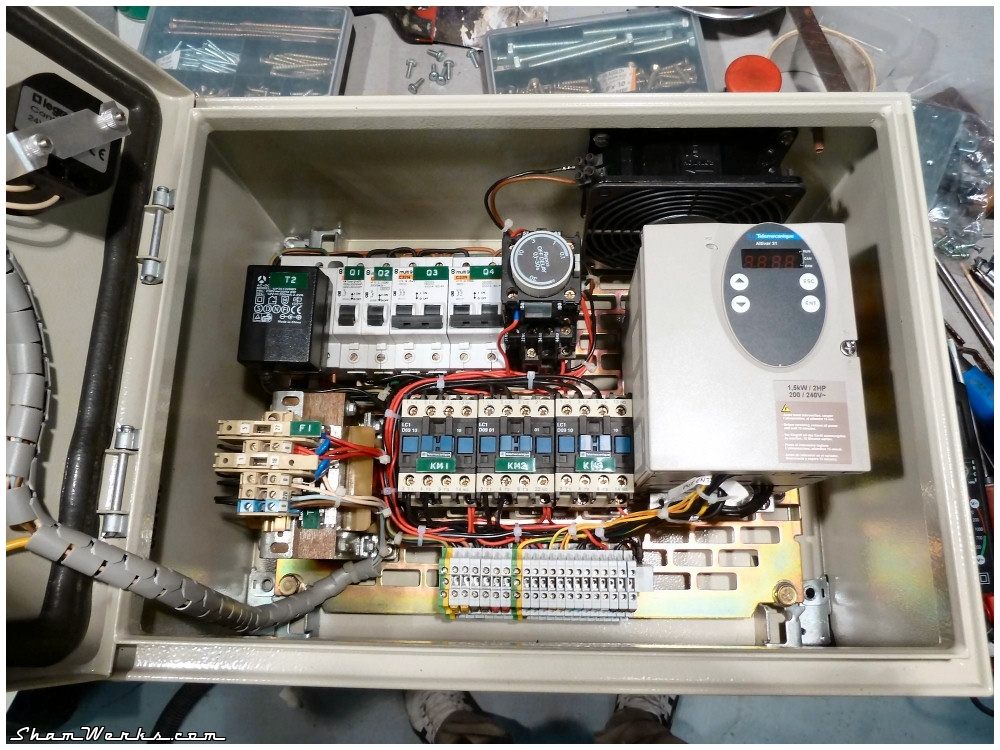
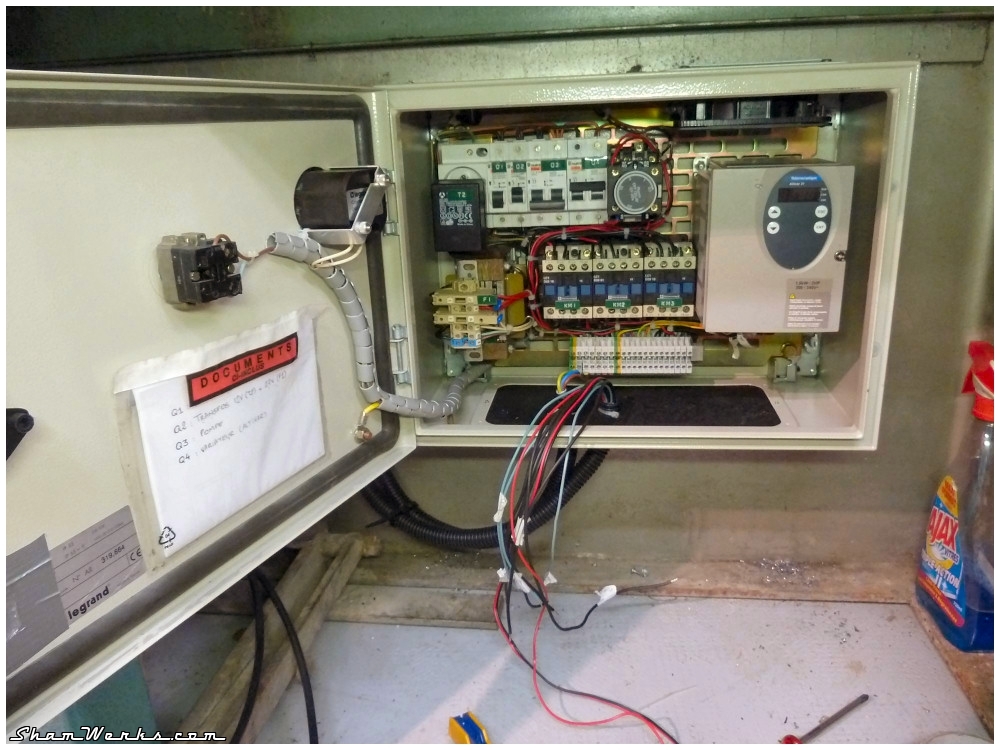
Fortunately, a member of the forum usinages.com proposes refurbished high-end second-hand products (thank you so much Emmanuel aka "Turbo Gros Michel S.A" for your help!), and he prepare a complete electrical box for me : relays for the motor drive, pump and light (even I don't use these last two for now), 27V transformer for the commands, 12V transformer for an electronic speed indicator that I'm gonna install later, emergency stop button with an adjustable 2.5s temporizer for the speed drive (which wouldn't appreciate being disconnected while in charge, so it waits for the motor to brake before shutting the current input)... A real electrical bow, up to standards, full options!

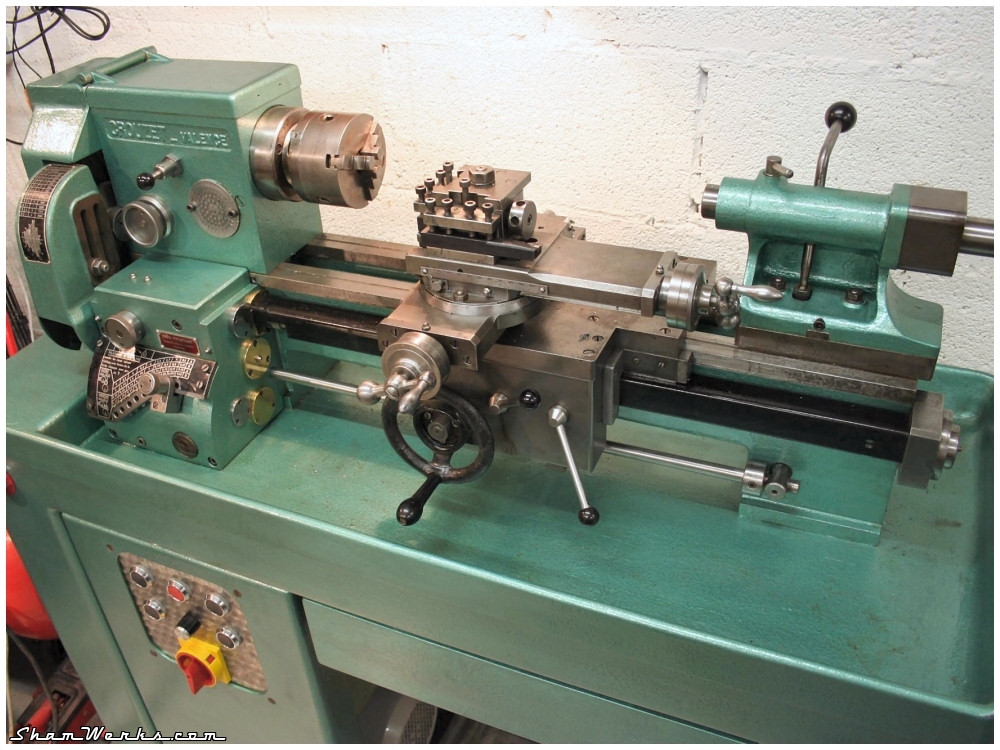
Final result
And finally, the result... It's such a pleasure to use this machine!Here are a couple of "before-after" pictures!


Cost
| Lathe : | 200 € |
| Belts : | 30 € |
| Motor : | 140 € |
| Motor pulley : | 20 € |
| Speed drive : | 140 € |
| Electrical box : | 170€ |
| Miscellaneous (paint, hardware...) : | 100 € |
| Total : | 800€ |
My only regret : the size of this lathe. A bit too small, I can't work on my VW drum brakes for example. But well, a bigger lathe wouldn't fit in my workshot anyway, would it??
That's it for today fols, I'm going back to the workshop, I got metal ships to make!