Kitty Injection : Moteur 2 : 1776!
As I explained in my previous article, after my signature "distributor gears salad", I'm moving to plan B : I'm taking the spare engine case from the shelf it's been sitting on for years, make some thorough measurements and... it's like new, with perfect, stock-size bearing saddles!
- Bearing saddle 1 : 64.98 / 65.00 / 64.99 / 65.00
- Bearing saddle 2 : 64.98 / 64.99 / 64.99
- Bearing saddle 3 : 64.99 / 64.98 / 64.98
- Bearing saddle 4 : 50.01 / 50.00 / 50.00 / 49.99
While I'm at it I measure the crank that's inside this case ; out-of-round is OK with 0.01mm, but the rod and main journals have been ground to 2nd undersize. Serviceable, but well, not ideal.
So...What now?
I take a deep breath and give it a good thinking... Since I'mm rebuilding a complete engine, why remain with a stock 1600? 😁So, after a lot of reflection about the cost / reliability / performances ratio of my future engine, I decide to go for a 1776cc : stock 69mm crank stroke, and larger 90.5mm bore pistons/cylinders.
My objective is to build an engine capable of long drives on the highway, but still playful on the little mountain roads of my area - this will remain a "week end driver", so mileage is not my priority.
I want a strong, durable, optimized engine, with a wide range of usability, while keeping the Mex injection manifold for now, but keeping an upgrade as an option for later...
So, I roll up my sleeves, and here we go! 😉
Crankcase
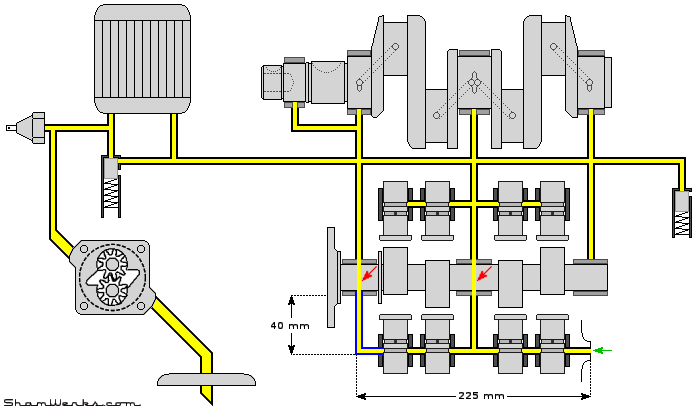
I make some modifications to the engine case, inspired by the "Bob Hoover's Sermons", what he used to call the "HVX modifications" (read about it on his blog here, and there). A good reading (in french, sorry!) as well if you want to give it a shot, this post and this post by Vince/PanelVan, who demonstrates this procedure very well.The idea behind this modification, is that the right side of the case is supplied with oil only through the grooves around the central camshaft bearing (see schema below). That's far from ideal, since the lifters/rockers/valves on the right side (cylinders #1 & #2) are less lubricated/cooled than on the left hand side of the case (cylinders #3 & #4).
The solution recommended by Bob Hoover was to extend the lifters oil gallery (bottom right on the schema), and feed it through a hole drilled below the gear-side camshaft bearing.
OK, here's a schema of the modification, that'll be easier to explain! 😁
Next is the extension of the lifters oil gallery, to bring it up to 225mm long. I've used for that a foot-long, Ø6mm drill bit, and used a small hand-held electric drill. The trick is to go in slowly with relatively high RPM (to avoid breaking the bit in the case), using some lubricant to avoid vibrations (WD40 will do), and back off often to get the shavings out. A piece of tape on the drill bit helps spotting when to stop.
For the hole under the camshaft bearing, I used a Ø7mm on a press drill.
It's actually quite an easy process ; I was a bit nervous the first time, but I drilled 4 cases in a row that day, I was pretty confident in the end!
Beware : make sure there's enough material on your case before drilling anything, not all cases are identical, and on some of them your gallery extension would end up outside of the case... Which would surely end up in the trash bin for that.
Simultaneously the oil grooves on both the camshaft bearings (red arrows on the schema) are widen with a Dremel to increase the oil flow.


The first hole is drilled with a Ø9mm bit, and then widen it with a pneumatic die grinder and carbide bits. My brand new bits eat through magnesium like if it was butter!
Here again, I was a bit nervous at the beginning, but the handling of the die grinder comes with practice... Three cases in a row that day! 😁


Next step, the case is shipped for some machining, but not alone : since we are a small group of friends building engines at the same time, we're pooling the shipping costs, and it's a complete pallet that leaves the workshop!


And after a couple of weeks of patience, here's the result! 😁


Camshaft / Lifters
The camshaft is a L&G V280 lobe 108°, to keep a street-oriented yet playful behavior to this engine... a compromise, we'll see in practice if it was the right choice!It's running thanks to a couple of straight-cut cam gears, to limit the axial efforts on the camshaft, and gather a bit of power too... The gears are steel and aluminum to limit their nose : steel on the crank, aluminum on the camshaft.


They're lighter than the stock ones : 57g each instead of 87g, nice! That's will help grabbing HPs at high revs!
At a hefty 350€ the set, these are quite expensive lifters, but at least I won't have to worry about'em.
Finally, the camshaft will run on a set of dual thrust bearing, to make sure it's axially guided on 360°...

