

Posted on 29/09/2005 at 17:30
The project...
I wanted to make such a project when I discovered the excellent site allinbox.com.
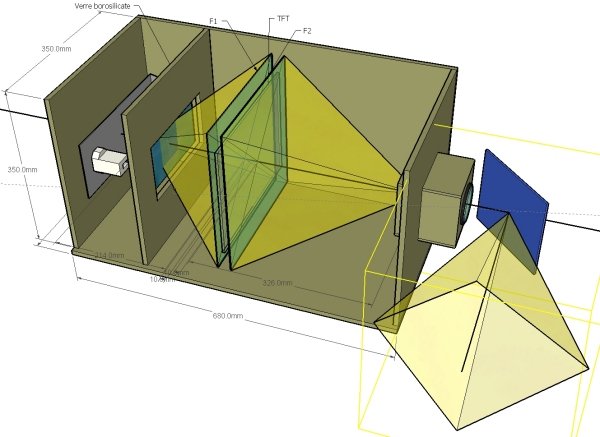
After several months defining the ideal configuration, I do 3D plans of my future video projector, to verify that my focal point calculations are coherent with the box size...
hérents avec la taille de l'engin...
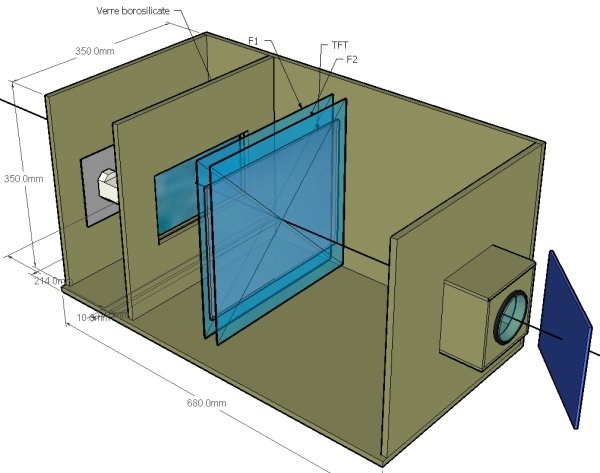
On the left, the lightbox (light source), followed with a borosilicate glass to limit the heat transmission toward the rest of the bow.
Then come F1 and F2, two Fresnel lenses to straighten up the light rays so they pass right through the LCD screen which is between. The resulting image goes trough a variable focal objective, and then finally is reflected to the screen by an optical mirror...
After several months defining the ideal configuration, I do 3D plans of my future video projector, to verify that my focal point calculations are coherent with the box size...
hérents avec la taille de l'engin...
On the left, the lightbox (light source), followed with a borosilicate glass to limit the heat transmission toward the rest of the bow.
Then come F1 and F2, two Fresnel lenses to straighten up the light rays so they pass right through the LCD screen which is between. The resulting image goes trough a variable focal objective, and then finally is reflected to the screen by an optical mirror...

Posted on 29/09/2005 at 17:31
Dismantling the screen
This is the most critical step of the construction : hacking the LCD screen. Do it in a quiet place, marking each plug, do never force on 'em... I used a Hyundaï L50s 17" that I got for a fair price. The benefit of a 17" screen is its 1024x768 resolution : not only I'll be able to watch movies, but also surf the internet, play video games, etc... Balancing drawback : the box will be large, therefore bulky... It's a matter of choices!
Unpacking the brand new screen, I plug it to check it works fine. No problems here, not even a dead pixel.

Removed the back part...

Dismantling goes on... I put a mark on each plug to make sure I'll be able to plug them back later at the right place.
And voila!
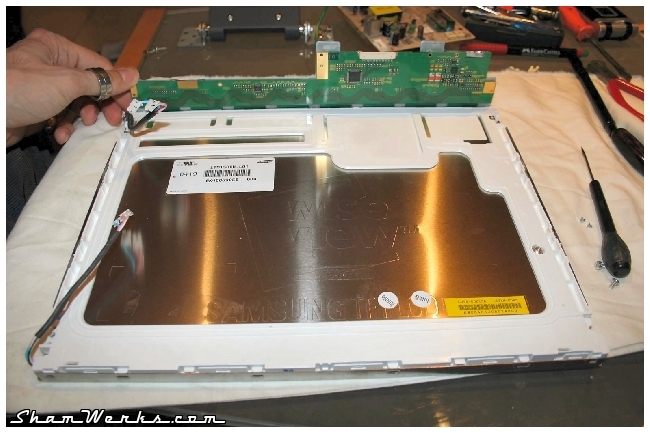
The LCD panel is naked, and plugged back "in the air" to check it is still working... Ooof, it does work!
You then have to manipulate the panel with extreme care, it's only a very fragile 2mm thick glass panel...


Unpacking the brand new screen, I plug it to check it works fine. No problems here, not even a dead pixel.
Removed the back part...
Dismantling goes on... I put a mark on each plug to make sure I'll be able to plug them back later at the right place.
And voila!
The LCD panel is naked, and plugged back "in the air" to check it is still working... Ooof, it does work!
You then have to manipulate the panel with extreme care, it's only a very fragile 2mm thick glass panel...

Posted on 29/09/2005 at 17:32
The Lightbox
The "lightbox" is the light source of the vidéoprojecteur.
I've choosen to use a HQI lamp (mercury vapor). Benefits are a very white light (movies will end with a perfect color), and it's a ponctual light source, perfect to align the focal of all the optical elements. Plus, this lamp has a life expectancy of 10.000 hours, way more than the ones from the market's VPs ; and when it dies, it costs only a few dozen bucks to replace.
Drawbacks : it heats as hell! So you have to make sure its support will handle the high temperature, and a sufficient fresh air flow.
Cutting the support in 1.5mm thick sheet metal... Top of the picture, the reflector that will come behind the lamp.

Folding the sheet...

Assembling the lightbox : lamp supports are made out of ceramic, and one of them is mounted loose to handle the lamp dilatation due to the temperature.

I've choosen to use a HQI lamp (mercury vapor). Benefits are a very white light (movies will end with a perfect color), and it's a ponctual light source, perfect to align the focal of all the optical elements. Plus, this lamp has a life expectancy of 10.000 hours, way more than the ones from the market's VPs ; and when it dies, it costs only a few dozen bucks to replace.
Drawbacks : it heats as hell! So you have to make sure its support will handle the high temperature, and a sufficient fresh air flow.
Cutting the support in 1.5mm thick sheet metal... Top of the picture, the reflector that will come behind the lamp.
Folding the sheet...
Assembling the lightbox : lamp supports are made out of ceramic, and one of them is mounted loose to handle the lamp dilatation due to the temperature.

Posted on 29/09/2005 at 17:33
The box...
Well, you guessed it folks, I need to make a big box to contain everything!
I decided to make it out of medium wood (MDF) 10mm. thick. Light, cheap, easy to work with... The box is pretty bullky : 68cm x 35cm x 35cm.
Here we go! The grills in the background will mask the light on the air intakes. Be careful following the plan with a millimeter precision, unless the focal axis won't be respected, and therefore the image will be blur...

First box test assembly :

This divider will hold the borosilicate glass avoiding th heat to transmit from the lightbox to the rest of the box.

This same divider painted black, with the glass in.

Again the same divider, with the lightbox mounted behind. This later is mounted on the divider through spacers, by security, as the metal will heat up a lot, I don't want to take any risk with the wood...

As seen from the back, the lightbox being cabled, with its ballast on the bottom.

All the interior is painted black to avoid any reflection that would reduce the resulting image quality. The bottom left hole will be used for the VGA connectivity, as well as power inlet, and switches.

This divider will hold the LCD screen in its center, and the two Fresnel lenses on each side :

Centering the Fresnel lenses :

Objective support :


The objective support is mounted on rails inside the box, to be able to adjust the focal to the screen distance. While playing with the objective's adjustable focal, I can adjust the projected image size.

I decided to make it out of medium wood (MDF) 10mm. thick. Light, cheap, easy to work with... The box is pretty bullky : 68cm x 35cm x 35cm.
Here we go! The grills in the background will mask the light on the air intakes. Be careful following the plan with a millimeter precision, unless the focal axis won't be respected, and therefore the image will be blur...
First box test assembly :
This divider will hold the borosilicate glass avoiding th heat to transmit from the lightbox to the rest of the box.
This same divider painted black, with the glass in.
Again the same divider, with the lightbox mounted behind. This later is mounted on the divider through spacers, by security, as the metal will heat up a lot, I don't want to take any risk with the wood...
As seen from the back, the lightbox being cabled, with its ballast on the bottom.
All the interior is painted black to avoid any reflection that would reduce the resulting image quality. The bottom left hole will be used for the VGA connectivity, as well as power inlet, and switches.
This divider will hold the LCD screen in its center, and the two Fresnel lenses on each side :
Centering the Fresnel lenses :
Objective support :
The objective support is mounted on rails inside the box, to be able to adjust the focal to the screen distance. While playing with the objective's adjustable focal, I can adjust the projected image size.

Posted on 29/09/2005 at 17:34
Connections
Here is the little plate I made for the connections to the box ::

 220V input, VGA input (I'll remove it in the end, the final picture quality being way better without this connection), and 3 switches : one for the main power and the fans, one for the LCD, and a last one for the HQI lamp.

Posted on 29/09/2005 at 17:35
Cabling and final assembly...
Cabling the whole thing...
On this picture, on the bottom right, the transformer for the fans. As it is adjustable, I can under-volt the fans, getting them to run slower, therefore less noisy.
 The four 80mm fans are directly fixed under the top cover of the box, and connected to the transformer.
 The LCD screen and its driving boards:
 On the top, the condenser and its HQI lamp. The objective's support adjusting rails slide under the LCD's boards.
 An optical-quality mirror will allow me to stick the box to a wall, making it little bit less bulky in the bedroom...
 The completed box, viewed from outside!
 Here it is! Now, I only have to stick it to the wall, and voila!
